Nvidia Modular diagnostic software - MODS
Nvidia MODS or Modular diagnostic software
is an Nvidia internal set of tools for GPU diagnostic. Those tools did leak out and are now used by third-party repair shops when troubleshooting broken GPUs. Let's take a look at what MODS can do and how to use it.
Modular diagnostic software overview
MODS is available as a collection of two tools that can run various tests that check all aspects of a graphics card - from VRAM chips to GPU chip specifics. It's used by OEMs to validate a card or by repair technicians to help track down broken parts of the product.
The software versions that went public are distributed as ZIP archives containing a miniature Linux distribution with all dependencies and drivers. The intent is to boot it from a bootable flash drive, execute tests, and look at the results (which are also saved as a text file on the flash drive). Mods comes with a PDF file containing full documentation on how to use it.
Creating bootable MODS flash drive
You will have to Google out sites offering MODS for download. Usually, it's some Russian forums or sites related to third-party repair. You will also find some tutorials or repair examples on YouTube. You should not attempt a repair if you have no experience with this.
From what I could find there are two versions - 367.38.1 with all tools and documentation and partial 400.184 containing only mods
and mats
tools (there could be a newer version as well). The 367.38.1 version does not support Turing cards so if you have an RTX or GTX 16XX card you will need those newer two files as well (from what I see only mats
works).
Assuming you have the ZIP file we can create the bootable flash drive:
- Use Rufus to create bootable FreeDOS on the Flash drive
- Extract the MODS zip file and copy its contents onto the flash drive
- Edit autoexec.bat and add such lines at the end of the file:
copy c:\mods\367381.pkg c:\mods\pkgname
copy c:\mods\runmods.rbt c:\mods\runmods

\grub --config-file="find --set-root /tiny/kernel; configfile /dos2lin/dos2lin.lst"
Note that if you have a different version of the tools the 367381.pkg
file name would have to be corrected here. This will give you a bootable MODS flash drive that boots into Linux via FreeDOS.
On boot it will execute tests defined in /mods/ARGS file, for example:
gputest.js
-test 3
-mfg
-null_display
-poll_interrupts
-pstate 0.max
-no_thermal_slowdown
-matsinfo
You can edit this file and set a preferred set of tests or execute them manually after the system boots. For more options on usage and customization of the software stack, you can watch this video:
How to use MODS
There are two main tools in this software stack - mods and mats. The first one is used to test the GPU the second one is used to test the VRAM chips. Weird artifacts or famous Turing xd
artifacts are usually associated with damaged VRAM chips. Other symptoms may be related to the GPU chip itself or some component on the board. mods
won't tell you everything but if you are a repair specialist it should help.
For end users/gamers those tools could be quickly used to see if their GPU is working correctly, especially when buying used cards.
Mods can run explicit tests from a list (check the PDF for details) or two sets of tests - quicker OEM one or full suite:
mods gputest.js -mfg (for CEM testing)
mods gputest.js -oqa (for OEM outgoing QA testing)
Running mods
creates a mods.log
file containing all output from all tests run.
MODS start: Thu Nov 12 17:11:37 2020

 Warning : test specifications should be used to control p-states

Command Line : gputest.js -test 3 -test 18 -test 19 -test 52 -test 111 -test 112 -test 143 -mfg -null_display -poll_interrupts -pstate 0.max -no_thermal_slowdown -matsinfo

CPU
Foundry   : GenuineIntel
Name      : Intel(R) Core(TM) i5-9400F CPU @ 2.90GHz
Family    : 6
Model     : 14
Stepping  : 10

Version
MODS           : 367.38
OperatingSystem: Linux (x86_64)
Kernel         : 4.1.2-gentoo
KernelDriver   : 3.63
HostName       : tinylinux
Smbios version [0x302] is not supported

                 gpu 0  dev.sub 0.0
                 ---------------------------
Device Id      : GP104
...
mats
can be used to test VRAM chips, for example:
This will start displaying weird colors on the screen and after it's done it will print a report (and save it as report.txt
). The result can look like so:
mats version 400.184.  Testing TU106 with 50 MB of memory starting with 0 MB.

Read    Error Count: 0
Write   Error Count: 0
Unknown Error Count: 0

=== MEMORY ERRORS BY SUBPARTITION ===
SUBPART READ ERRORS WRITE ERRORS UNKNOWN ERRS
------- ----------- ------------ ------------
FBIOA0            0            0            0
FBIOA1            0            0            0
FBIOB0            0            0            0
FBIOB1            0            0            0
FBIOC0            0            0            0
FBIOC1            0            0            0
FBIOD0            0            0            0
FBIOD1            0            0            0

Failing Bits:
   None


Error Code = 00000000 (OK)


 #######     ####     ######    ######
 ########   ######   ########  ########
 ##    ##  ##    ##  ##     #  ##     #
 ##    ##  ##    ##   ###       ###
 ########  ########    ####      ####
 #######   ########      ###       ###
 ##        ##    ##  #     ##  #     ##
 ##        ##    ##  ########  ########
 ##        ##    ##   ######    ######
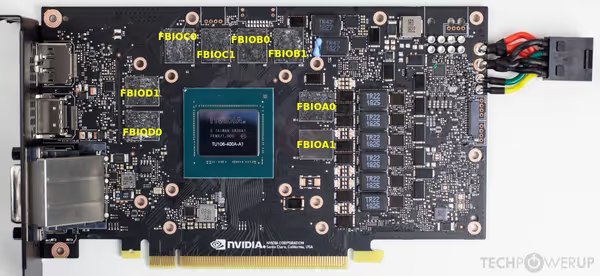
This lists every memory channel (FBIO) / chip and errors for each if any occurred. Starting from the bottom right chip you can identify each VRAM chip with the subpart label (starting with higher bits first):

If you get some errors on some of the chips then that could indicate a problem with that chip - or problems with the memory controller on the GPU or circuitry leading to the memory chip.
If you are interested in GPU repair or analyzing graphics card state, power lines, and alike I would recommend checking YouTube videos where repair specialists go over fixing broken GPUs. I would not recommend any attempts at fixing a valuable GPU if you have no prior experience with it.
Comment article