Threadripper 1920X and Vega 64 all water AiO build
From time to time a time for changes comes and it pulls some money out of the wallet. To end 2018 with more FPS and compute power I decided to build a new PC based on 12 core Threadripper 1920X and RX Vega 64 - both with water cooling and in a compact case.
Picking the right platform
Before I picked the 1920X Threadripper I was looking on various CPUs both new and used on second hand market. 6-8 core CPUs are easily available either from Intel or AMD Ryzen. What I was interested more was the amount of PCIe lines supported by the CPU/platform. Ryzen CPUs as well as a lot of Intel CPUs support limited amount, while I wanted to have an option to play with multiple GPU (not only SLI/Crossfire) or just have the option for additional controllers and NVMe drives.
Looking at Intel offerings I wasn't interested in the more expensive top end so that was off the table. I also checked almost-latest Xeon CPUs on the second hand market but wherever it was Xeon, i5 or i7 it's either was good CPU on the cores but low PCIe amount or low core count, low max frequency and more PCIe lanes (at a price limit). Aside of that there was an option of adapting a dual Xeon workstation motherboard. The PC isn't primarily for gaming and multitasking as well as things like code compilation, Docker + Kubernetes handle NUMA multi-CPU platforms well.
But still, decision was still open when a new contender entered the list - a sale on first generation Threadripper. 8 core 1900X for around 230 EUR while 1920X 325 - 370 EUR. Even the 8-core variant in comparison to 8-core Ryzen supports vastly more PCIe lines. And so I opted for the 1920X.
If I wouldn't want to have edge-case features like many PCIe lines there would be way more cheaper solutions, especially on used market and Intel CPUs (not saying top gaming system, but still - nicely working). Also Ryzen would fit nicely.
Threadripper hidden costs
Threadripper platform hides some costs from first time users. You pay 325 EUR for a 1920X but a TR4 motherboard will cost yet another 325 EUR. AMD does want some extra money for this premium platform and every TR4 motherboard will be expensive when compared to more mainstream like AM4. Although 1920X price right now isn't a good example of a Threadripper CPU price. Second generation 2920X is already around 630 EUR while 24 core 2970X is around 1300 EUR so still the motherboard is a fraction
of the platform cost.
There isn't much of a second hand market for TR4 as this platform is new. We may see some second had deals when 7nm Threadripper will enter the market with a new chipset and some people will start upgrading and motherboard sales begin.
Also depending where you live and where you want to shop availability on some items may be limited. Looking i EU shops nearby I could find everything, but in local stores the options were limited. There was Noctua air cooler for Threadripper available while water AiO at best were old models with adapters while having small water block more suited from smaller Intel and Ryzen CPUs. It's not a gaming platform, kind of expensive and it's rather to be expected that not every retailer/local supplier will want to freeze some cash in TR4 parts.
Picked components
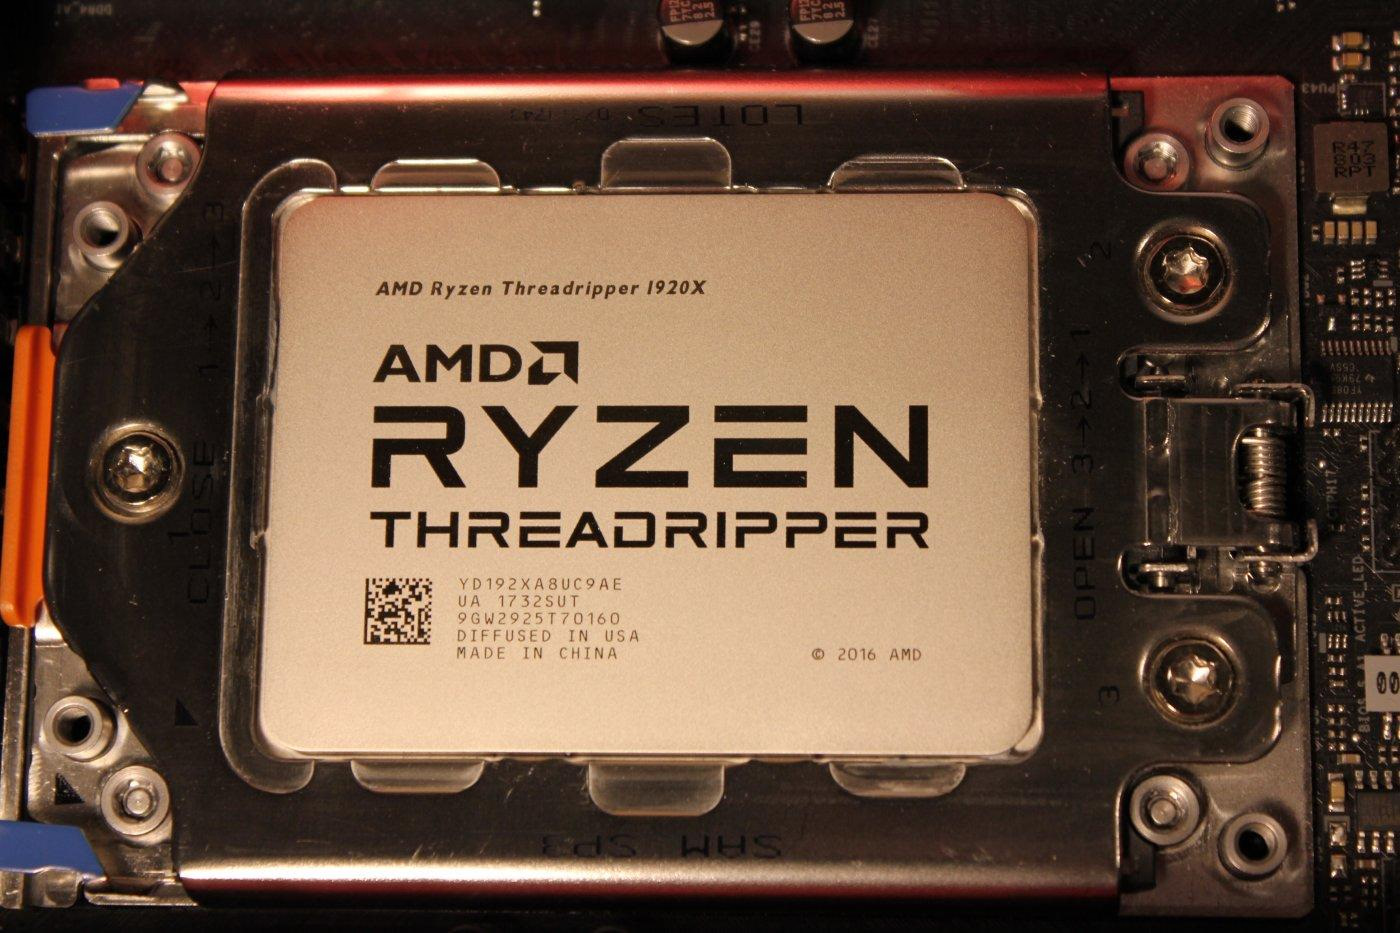
- CPU: Threadripper 1920X
- Motherboard: X399M Taichi micro-ATX
- RAM: 4 x 8 GB G.Skill Ripjaws V (3200MHz, F4-3200C15D Samsung B-die)
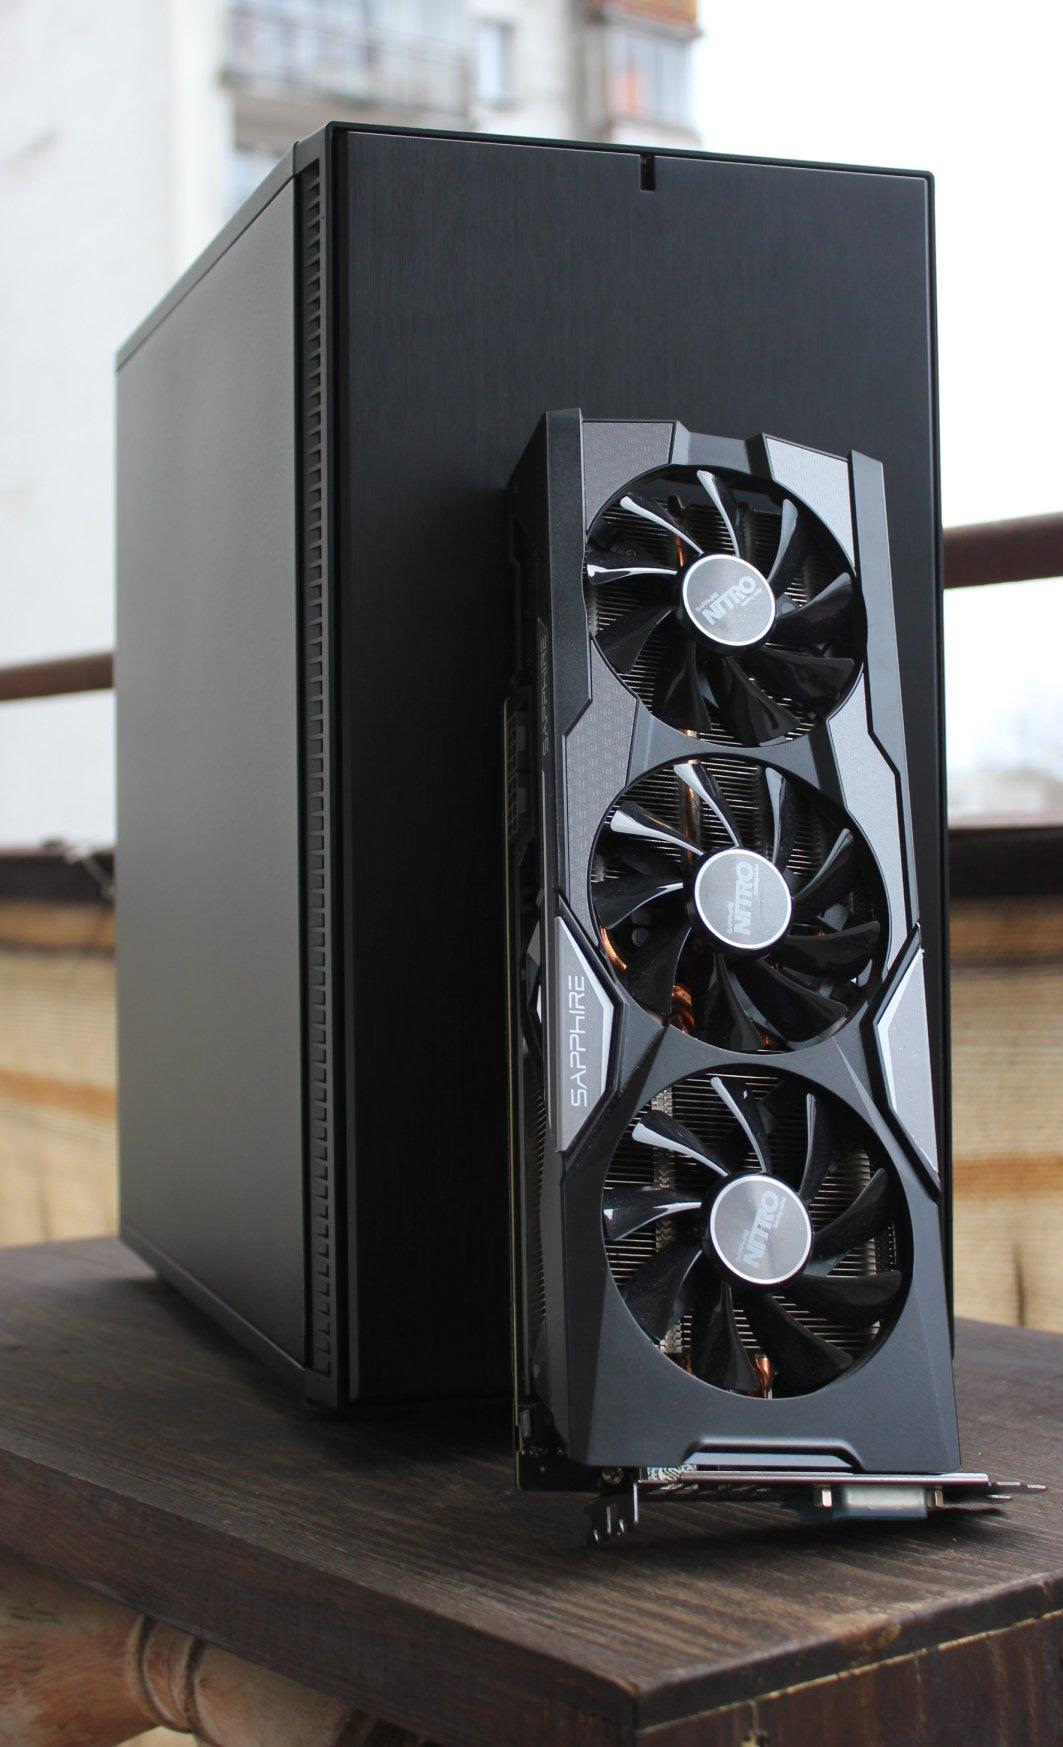
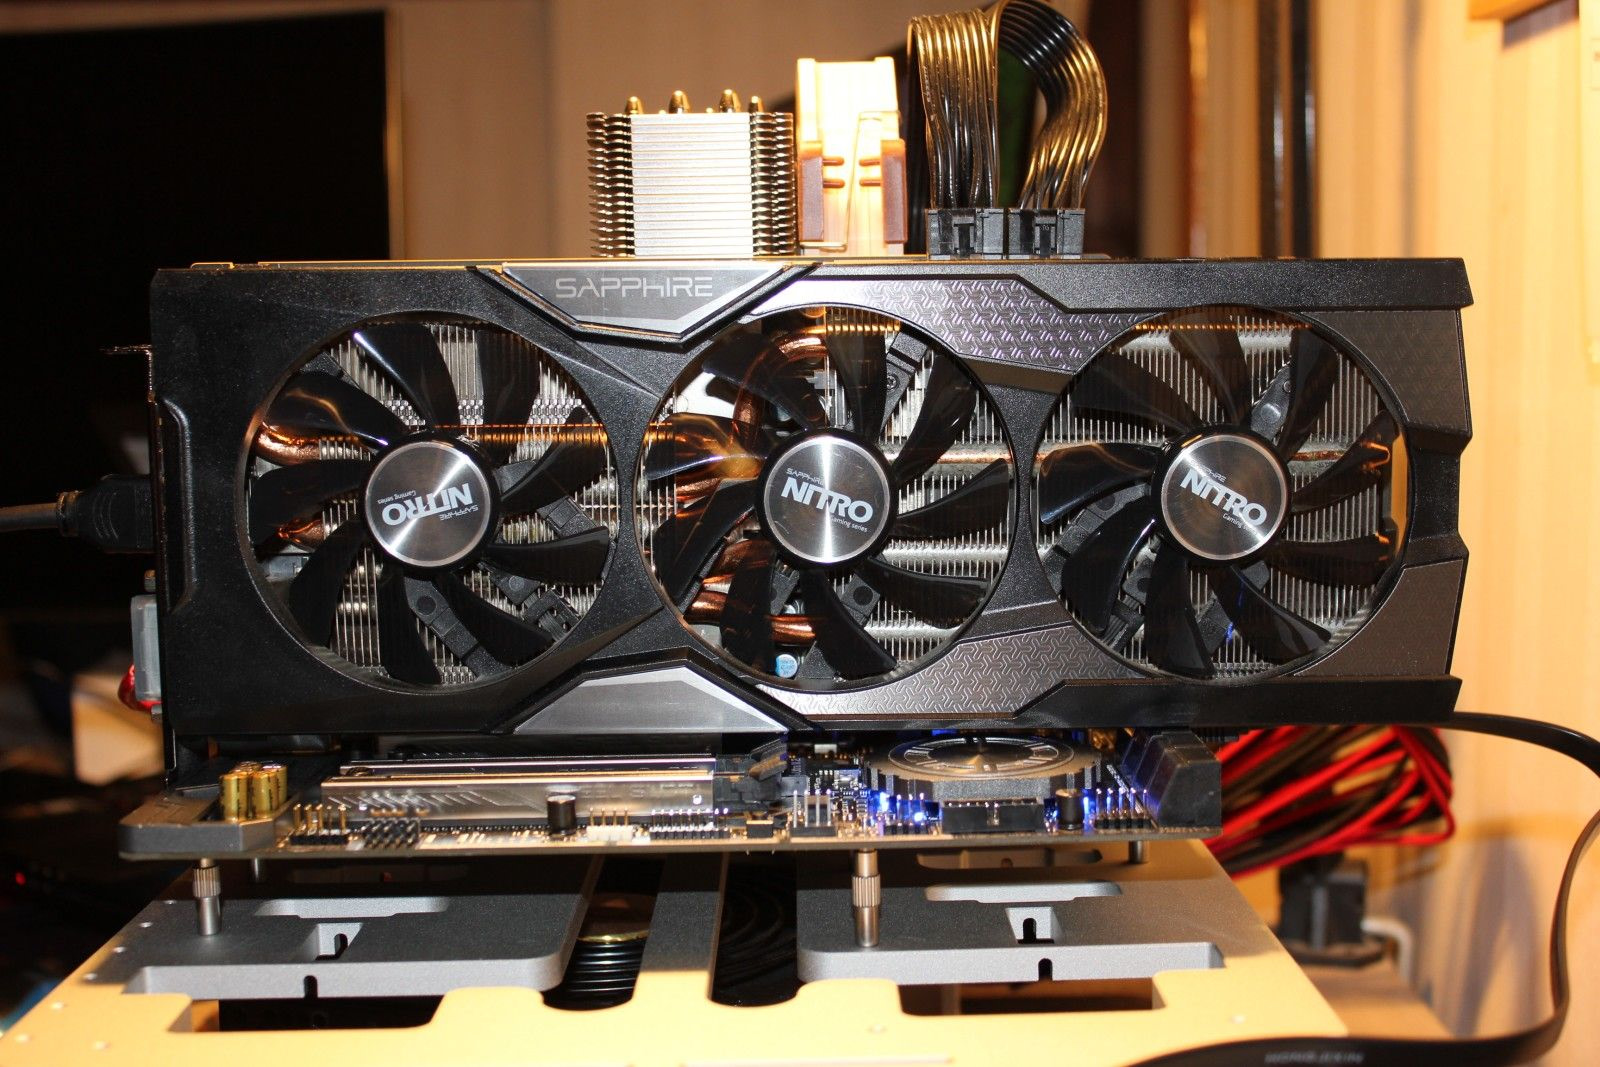
- GPU: RX Vega 64 (Sapphire, reference card)
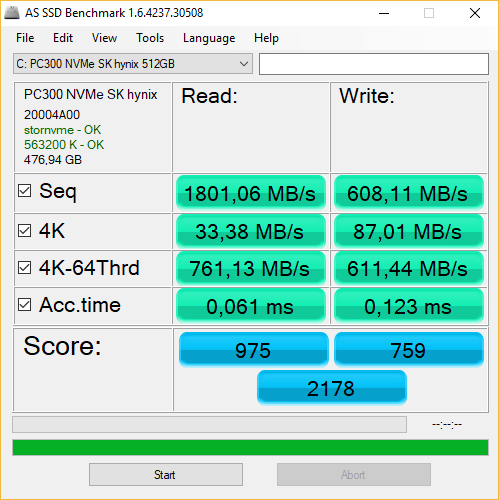
- Storage: 500 GB Samsung NVMe PC300 NVMe SK Hynix (Windows), Toshiba 256GB THNSF5256GPUK NVMe (Linux), 2 x SATA SSD from old system
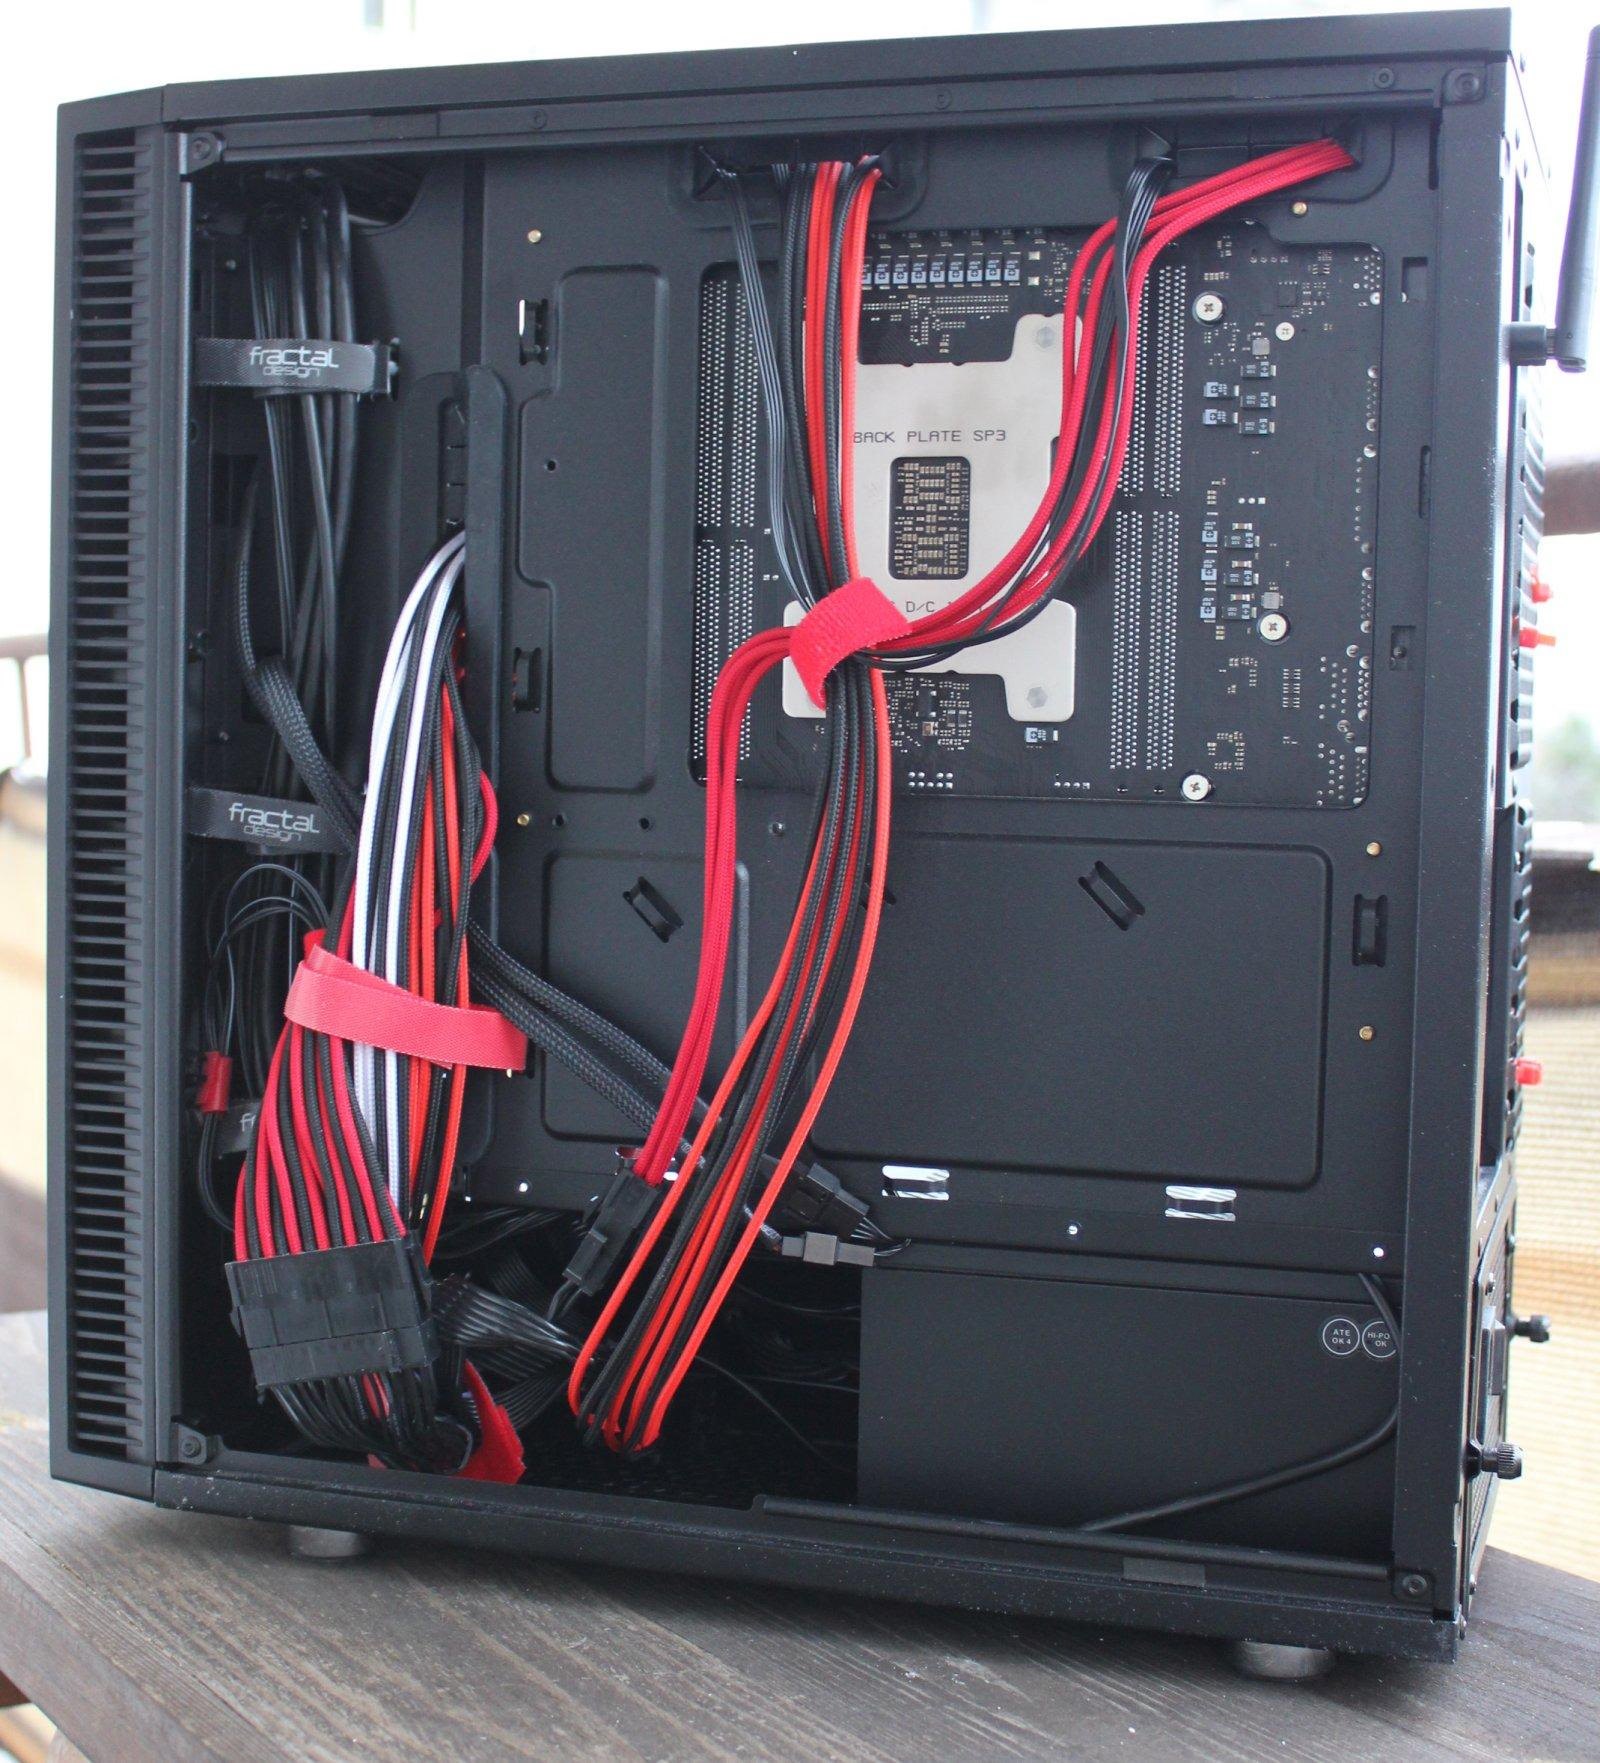
- Power supply: Chieftec PROTON BDF-1000C
- CPU cooler: Alphacool Eisbaer 240
- GPU cooler: Alphacool Eiswolf 240 GPX Pro
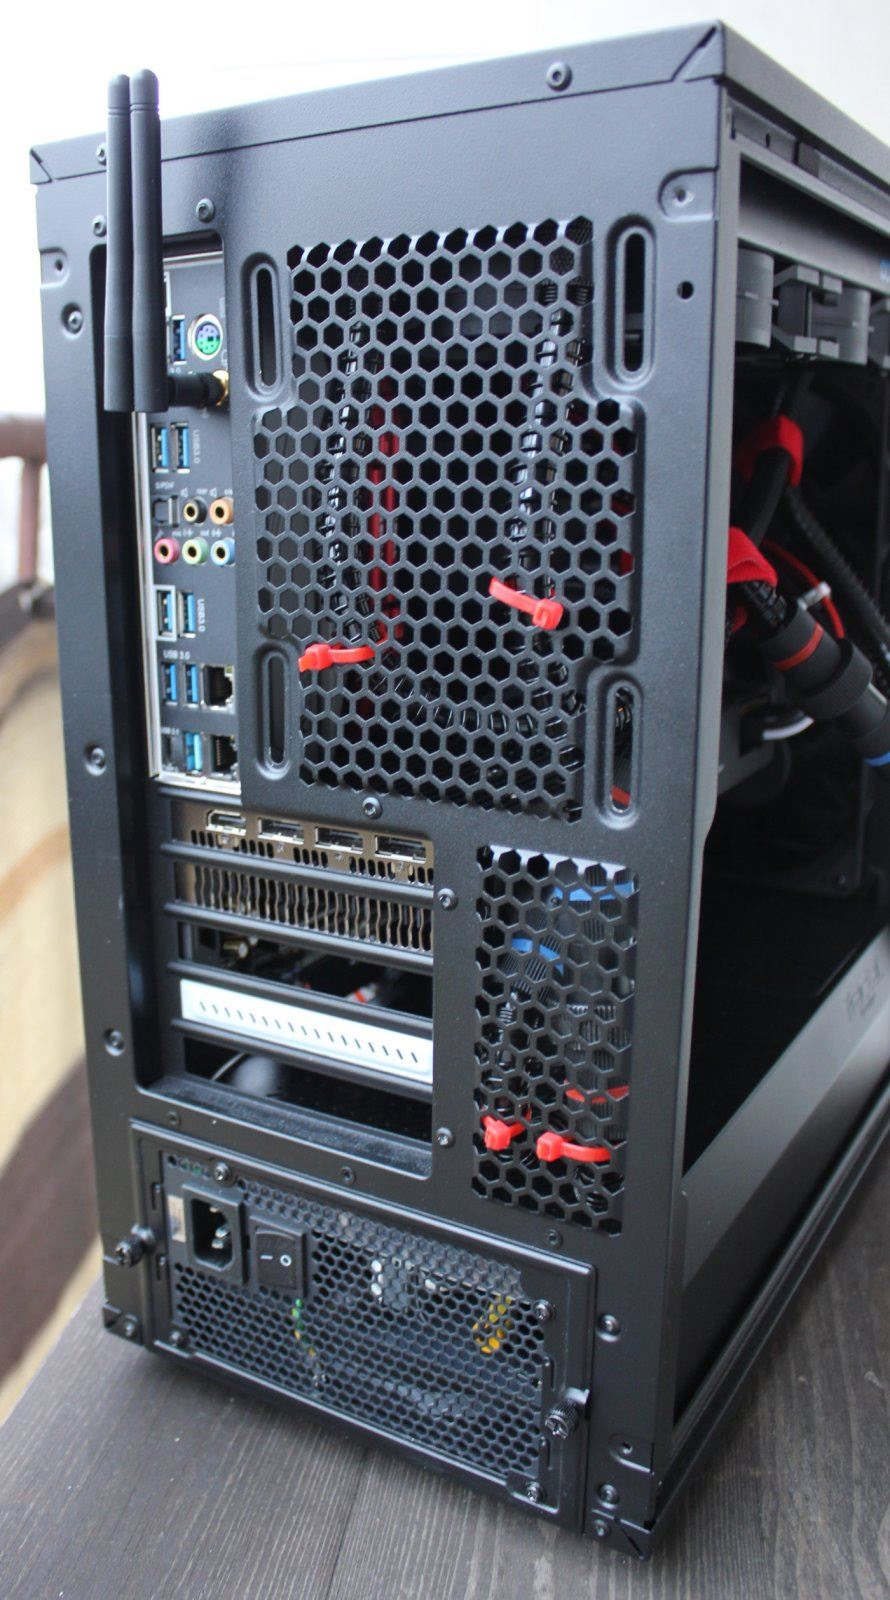
- Case: Fractal Design Define Mini C
At first I planned to use my existing R9 Fury and wait for Navi but as it happened I got a nice cheap reference ex-mining Vega 64 with the intent to mod it for water cooling as that reference cooler isn't best and the chip runs hot. I was also looking at ex-mining 1080 Ti but wasn't fully committed as I would loose FreeSync support on my LG 34UC88 (3440 x 1440) ultra wide display.
I was also looking through ebay for Vega Frontier Edition with 16GB VRAM, which miners and other ex-users sell for a nice price, but mostly in US. There are also water cooled Vega 64 and FE going on from time to time if you are interested. I also was looking on Radeon Pro Duo - the one composed from two R9 Fury - dual GPU on one PCB. Crossfire is not optimal (or dead alongside SLI) for gaming but for some other usages or new (still not mainstream) multi-GPU DX12/Vulkan it may be interesting at low prices.
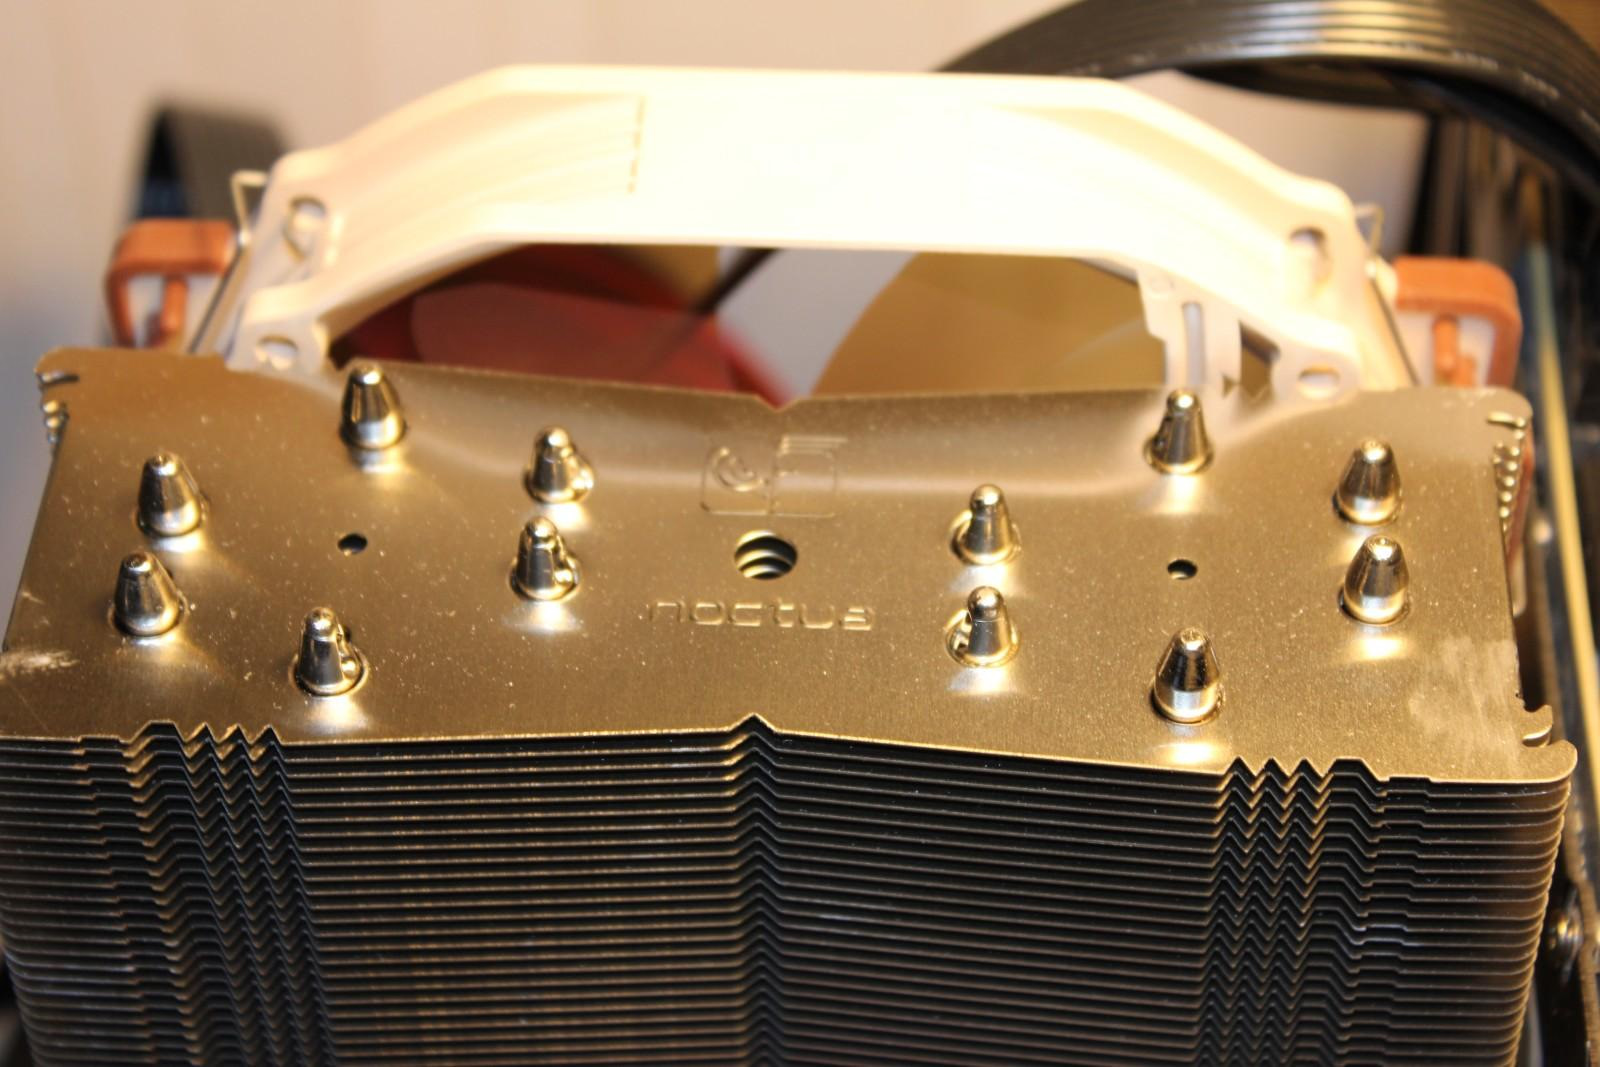
Initially it supposed to be a simple air cooled build. I wanted to use Noctua NH-U14S CPU cooler but on a mATX board the fan didn't fit in between the radiator and RAM sticks. There was some wiggle room on those RAM sticks giving some margin to push the fan but I didn't wanted to do it. The fan could be risen above RAM sticks but then it would not fit in picked case. So air cooling was canned.
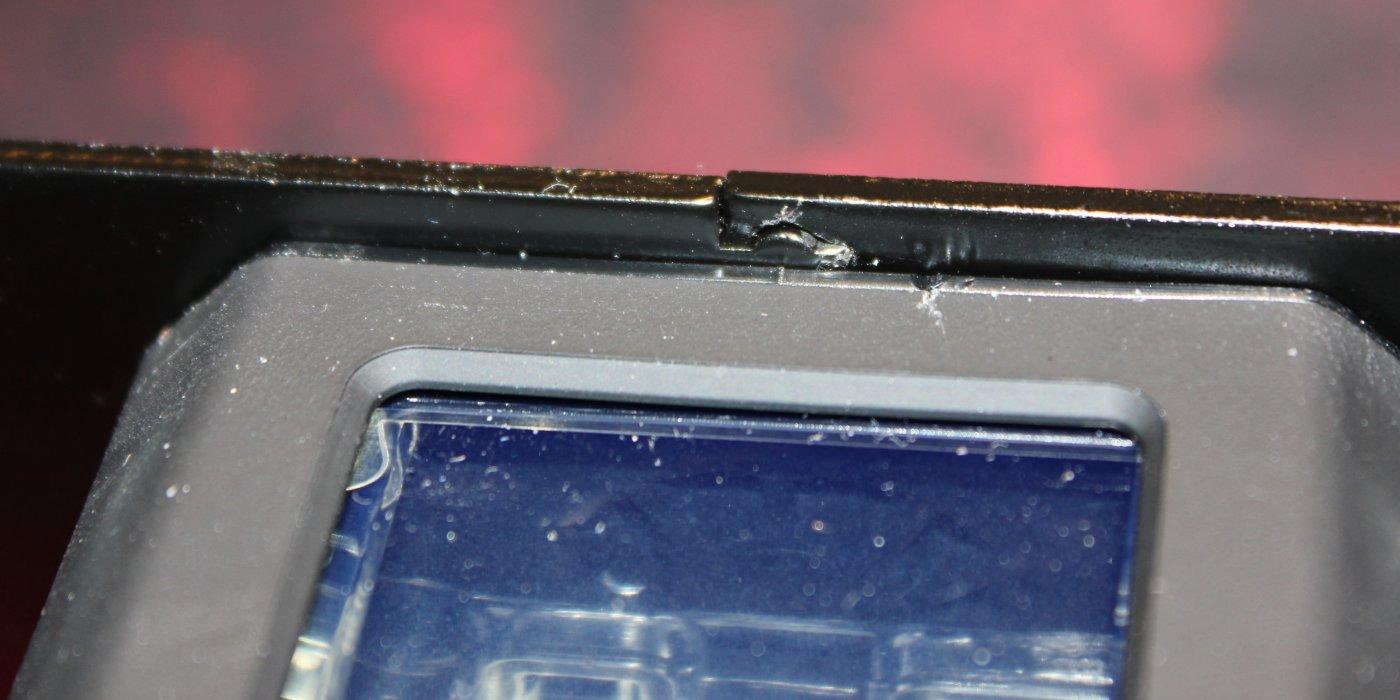
The Fractal Design Define Mini C case doesn't have a window (nice!) and is quite compact. It's filled with sound dampening material and quiet PC is kind of important for me. I live in a quite quiet place and at night things like analog clock ticking can be categorized as audible noise. My previous PC was in a similar case and my laptop was also quiet on average use. First time I heard coil whine on my R9 Fury was when I moved R9 Fury from the case to the open test bench next to me.
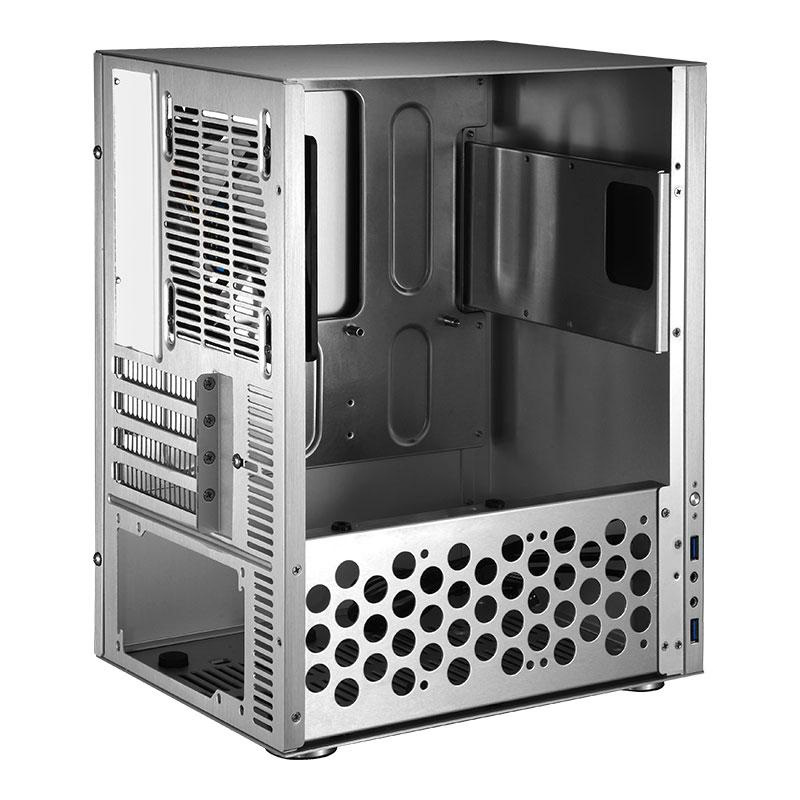
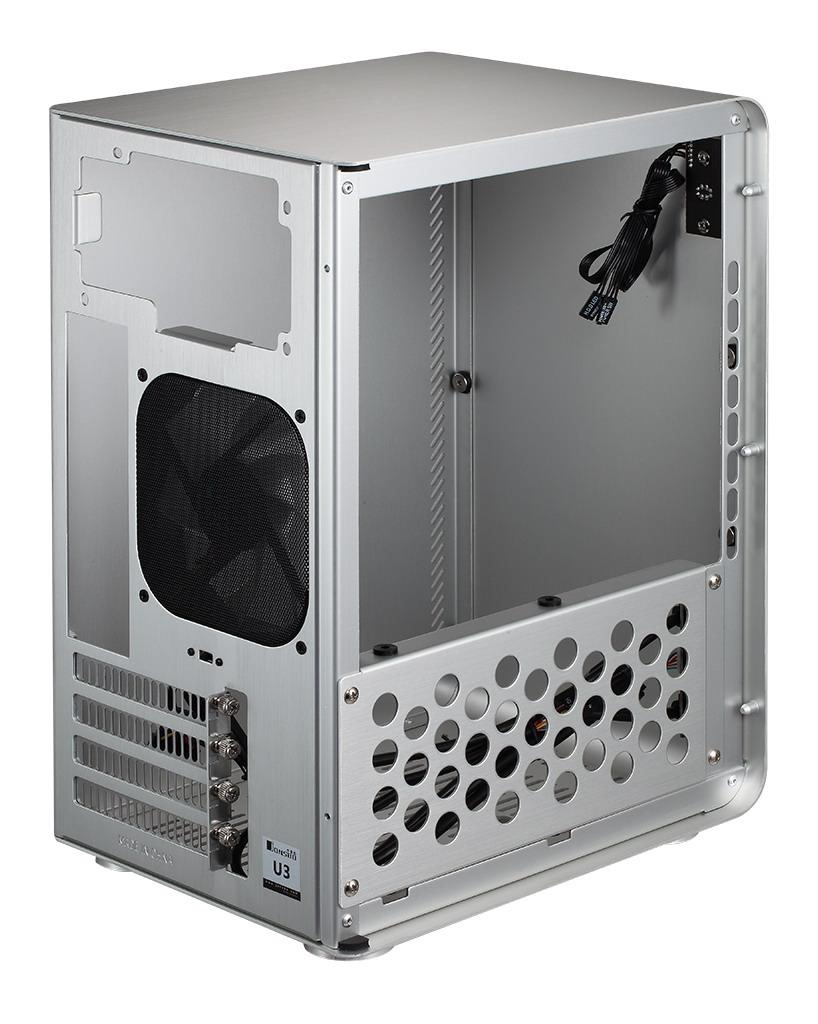
When I was planning my build I was looking at different compact cases, mostly Jonsbo (Cooltek) with brushed aluminum. However the local store couldn't get them from local supplier so I had to switch. I was looking at Jonsbo U4 which do have a window but a glass, full size and dimmed one. UMX3S model without a window was also hard to get locally and at higher prices.

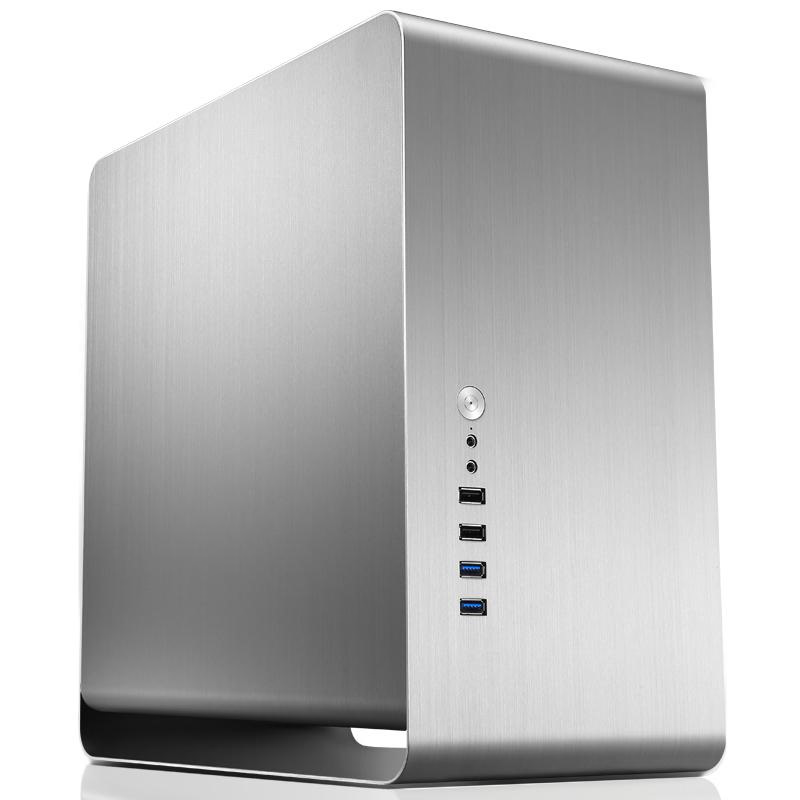
With micro-ATX motherboard a Threadripper can go into even smaller case. Jonsbo has C3 and U3S cases which are really small, little room for anything not to mention airflow. Thankfully aluminum melts at 660C.
Build progress
The build did take a while due to all those changes. I had to find and wait on some components to do the final build. Air cooled Threadripper on the test platform with R9 Fury and unmodded Vega 64 was assembled quickly and allowed some initial Linux/Windows testing.
X399M Taichi motherboard
Most TR4 motherboards is ATX or even bigger for servers and workstations. micro-ATX does have to sacrifice a PCIe slot and extra DIMM slots but still has all the Threadripper features you have on ATX variant.
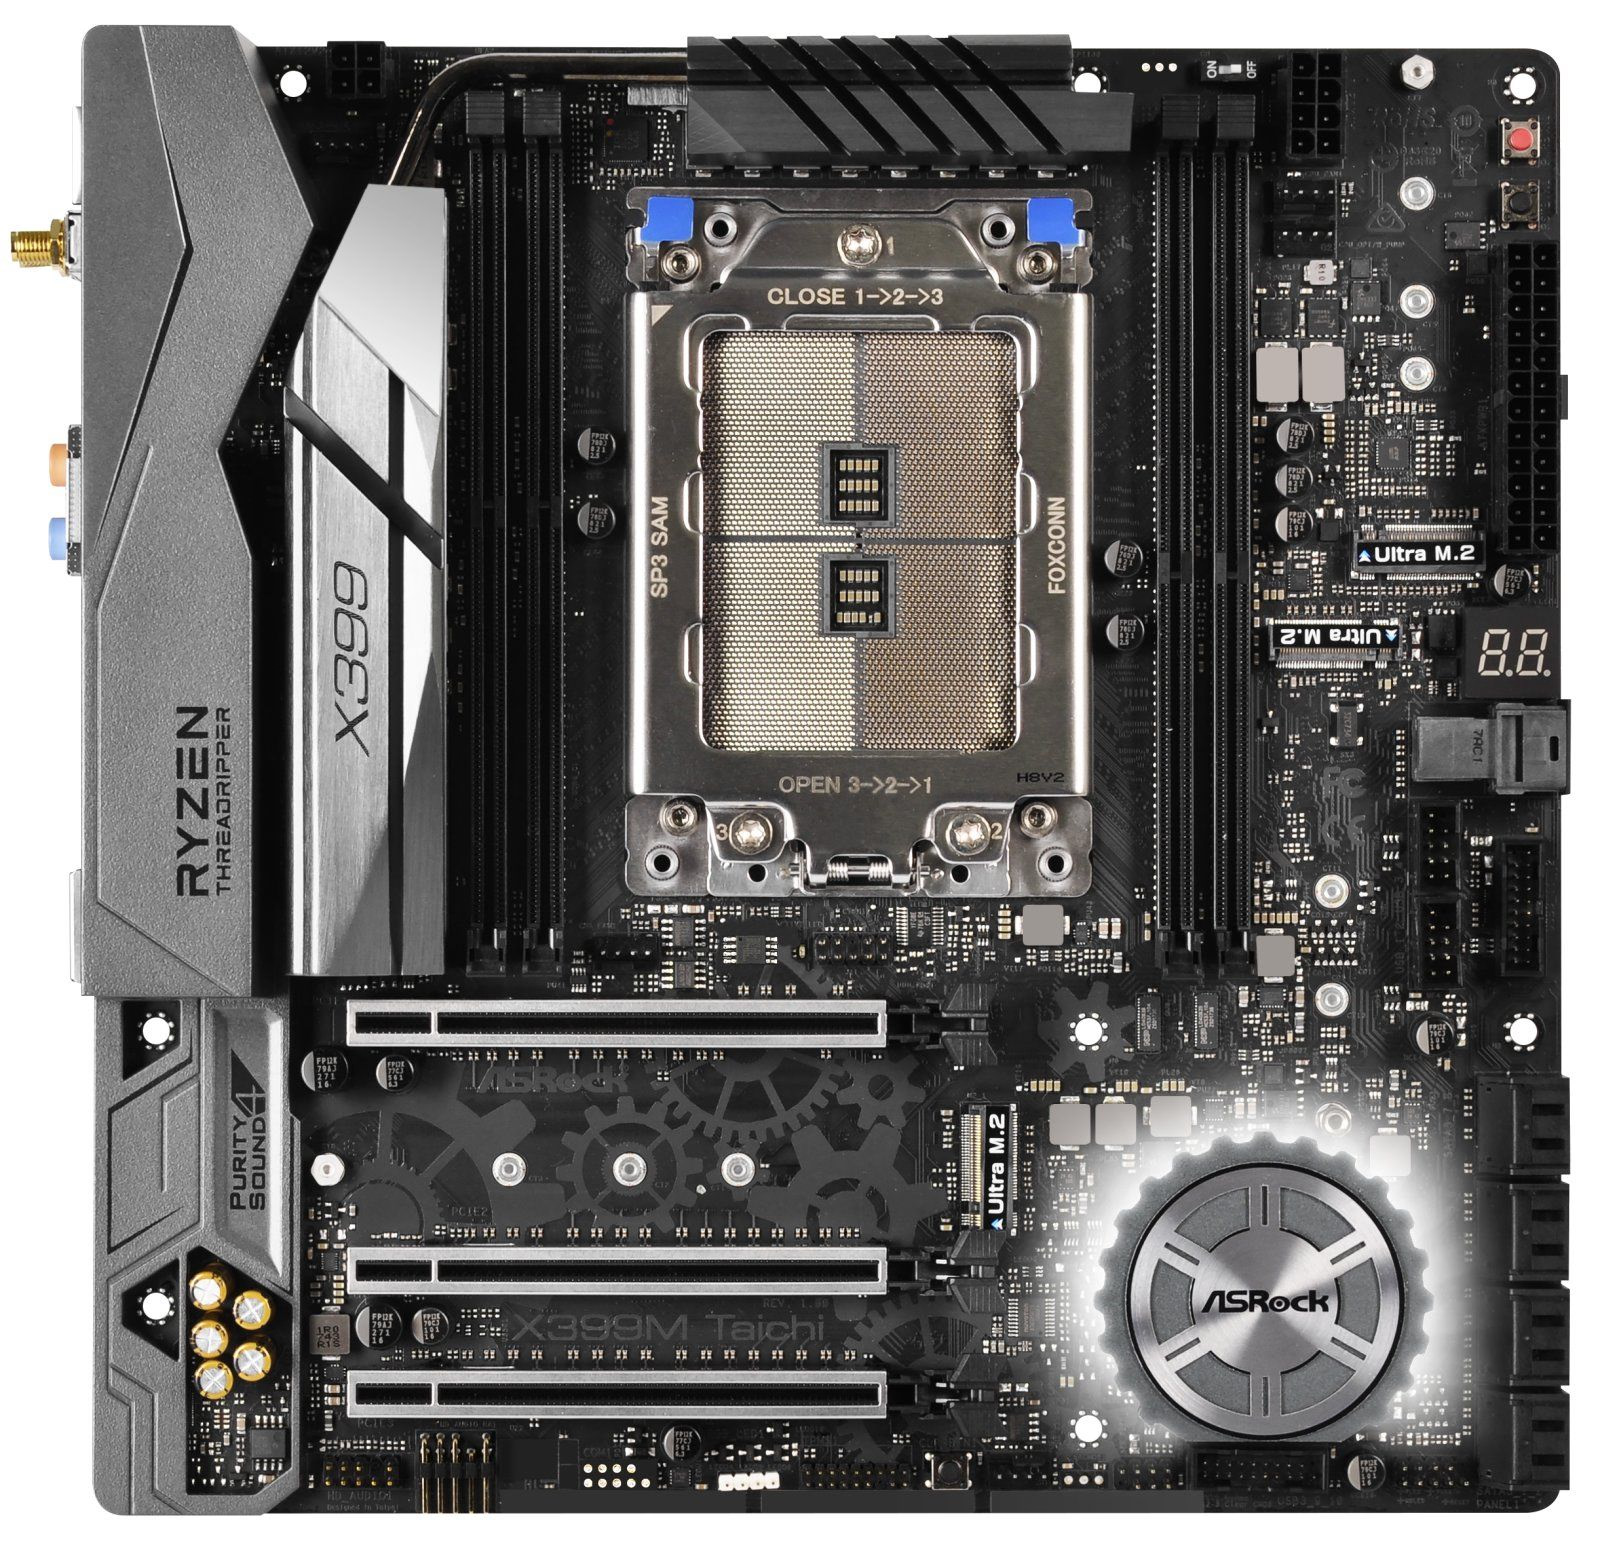
- micro-ATX size
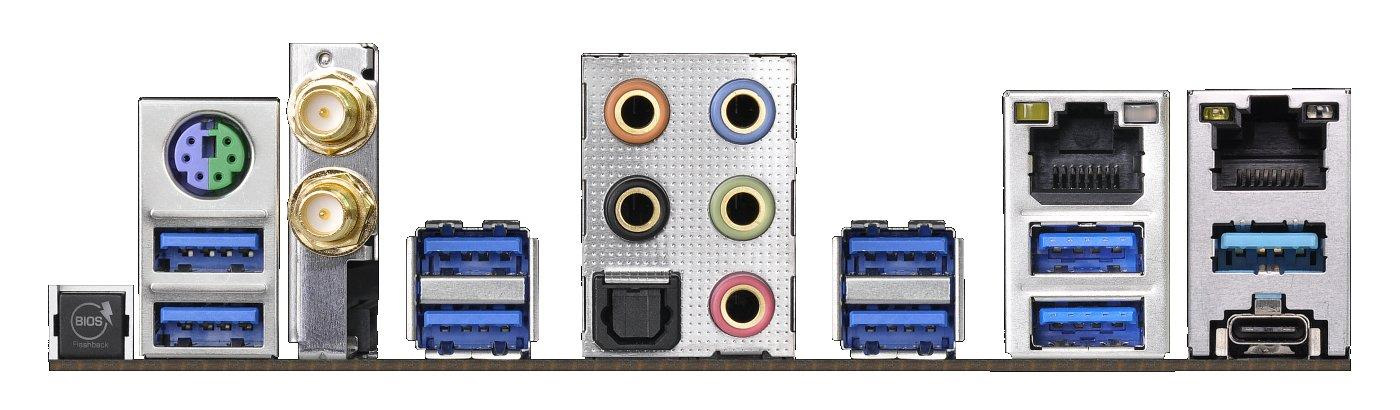
- 1 x USB 3.1 Gen 2, 1 x USB 3.1 Gen 2 Type-C; 8 x USB 3.1 Gen1 (old USB 3.0)
- Four DIMM DDR4 slots with four-channel configuration (ATX boards have 8 DIMMS and 4 channels)
- 2 x GigaLAN Intel I211AT
- Built in Intel 802.11ac WiFi (plus Bluetooth 4.2 / 3.0)
- 3 x PCIe slots working at x16 simultaneously
- 3 x M.2 PCIe x4 NVMe drive slots (M Key)
- A lot of fan / water pump connectors with 3/4-pin detection.
- Monitoring options, power and reset buttons, POST-code display, RGB lights support and more.
I had no issues with the board, only a bit of fiddling with the CPU socket cover but after that everything went easily. It's worth to watch a YouTube video showcasing how to slide in the CPU and how to screw in the screws.
After first boot it's important to go into the UEFI settings (BIOS). By default the RAM was running at 2133 MHz and I have to pick an XMP profile to get that 3200MHz which does work with this board and CPU. There are also fan curves there so you can customize things for noise or cooling performance.

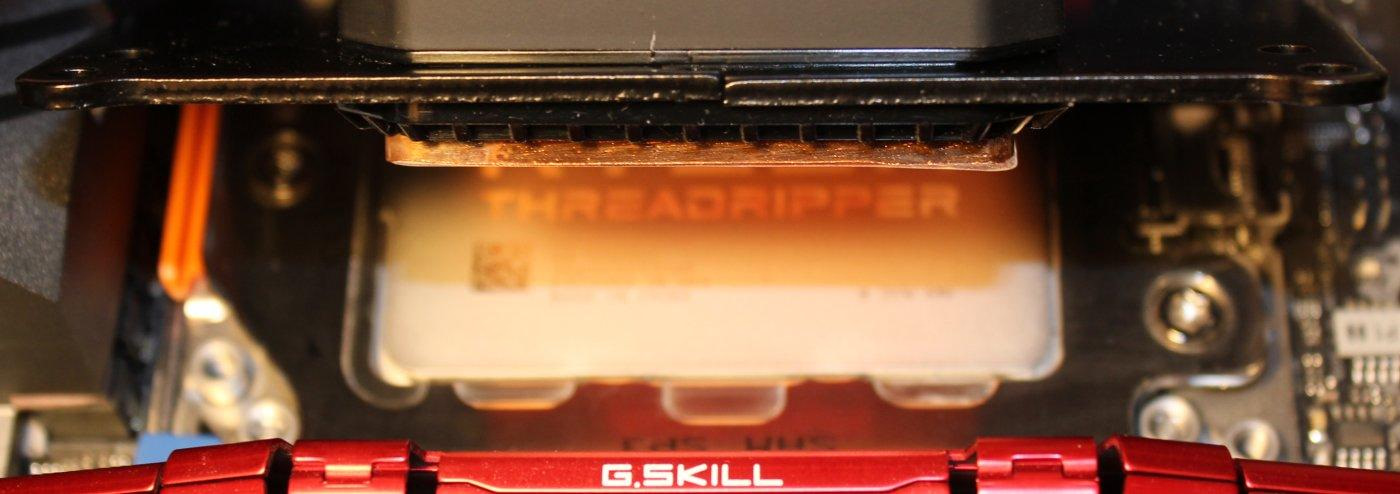
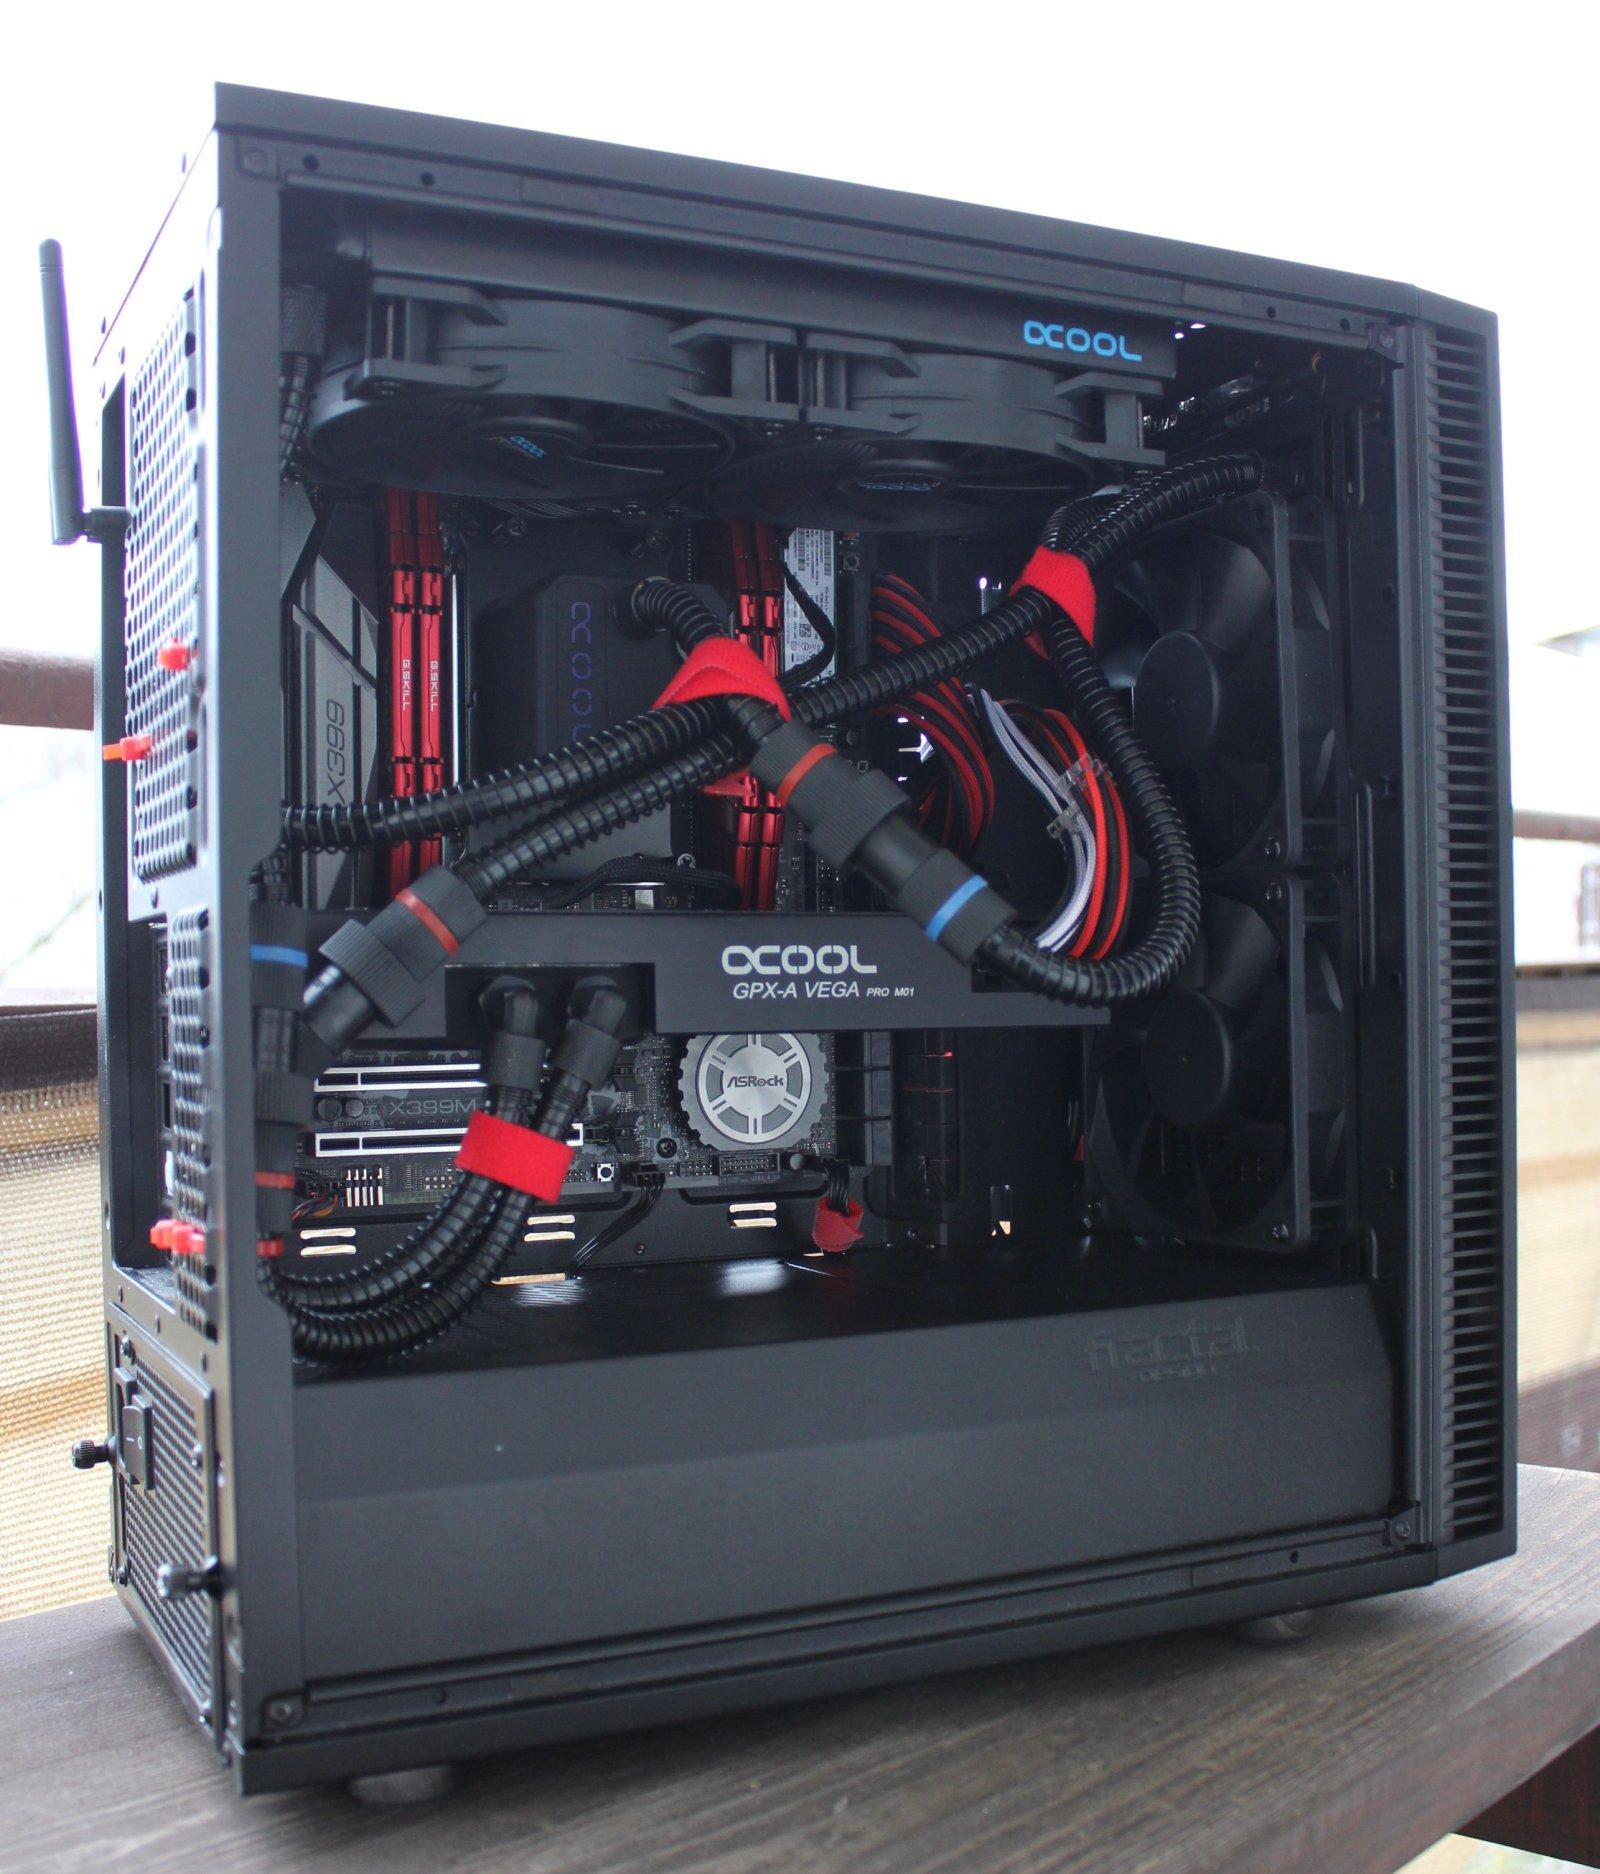
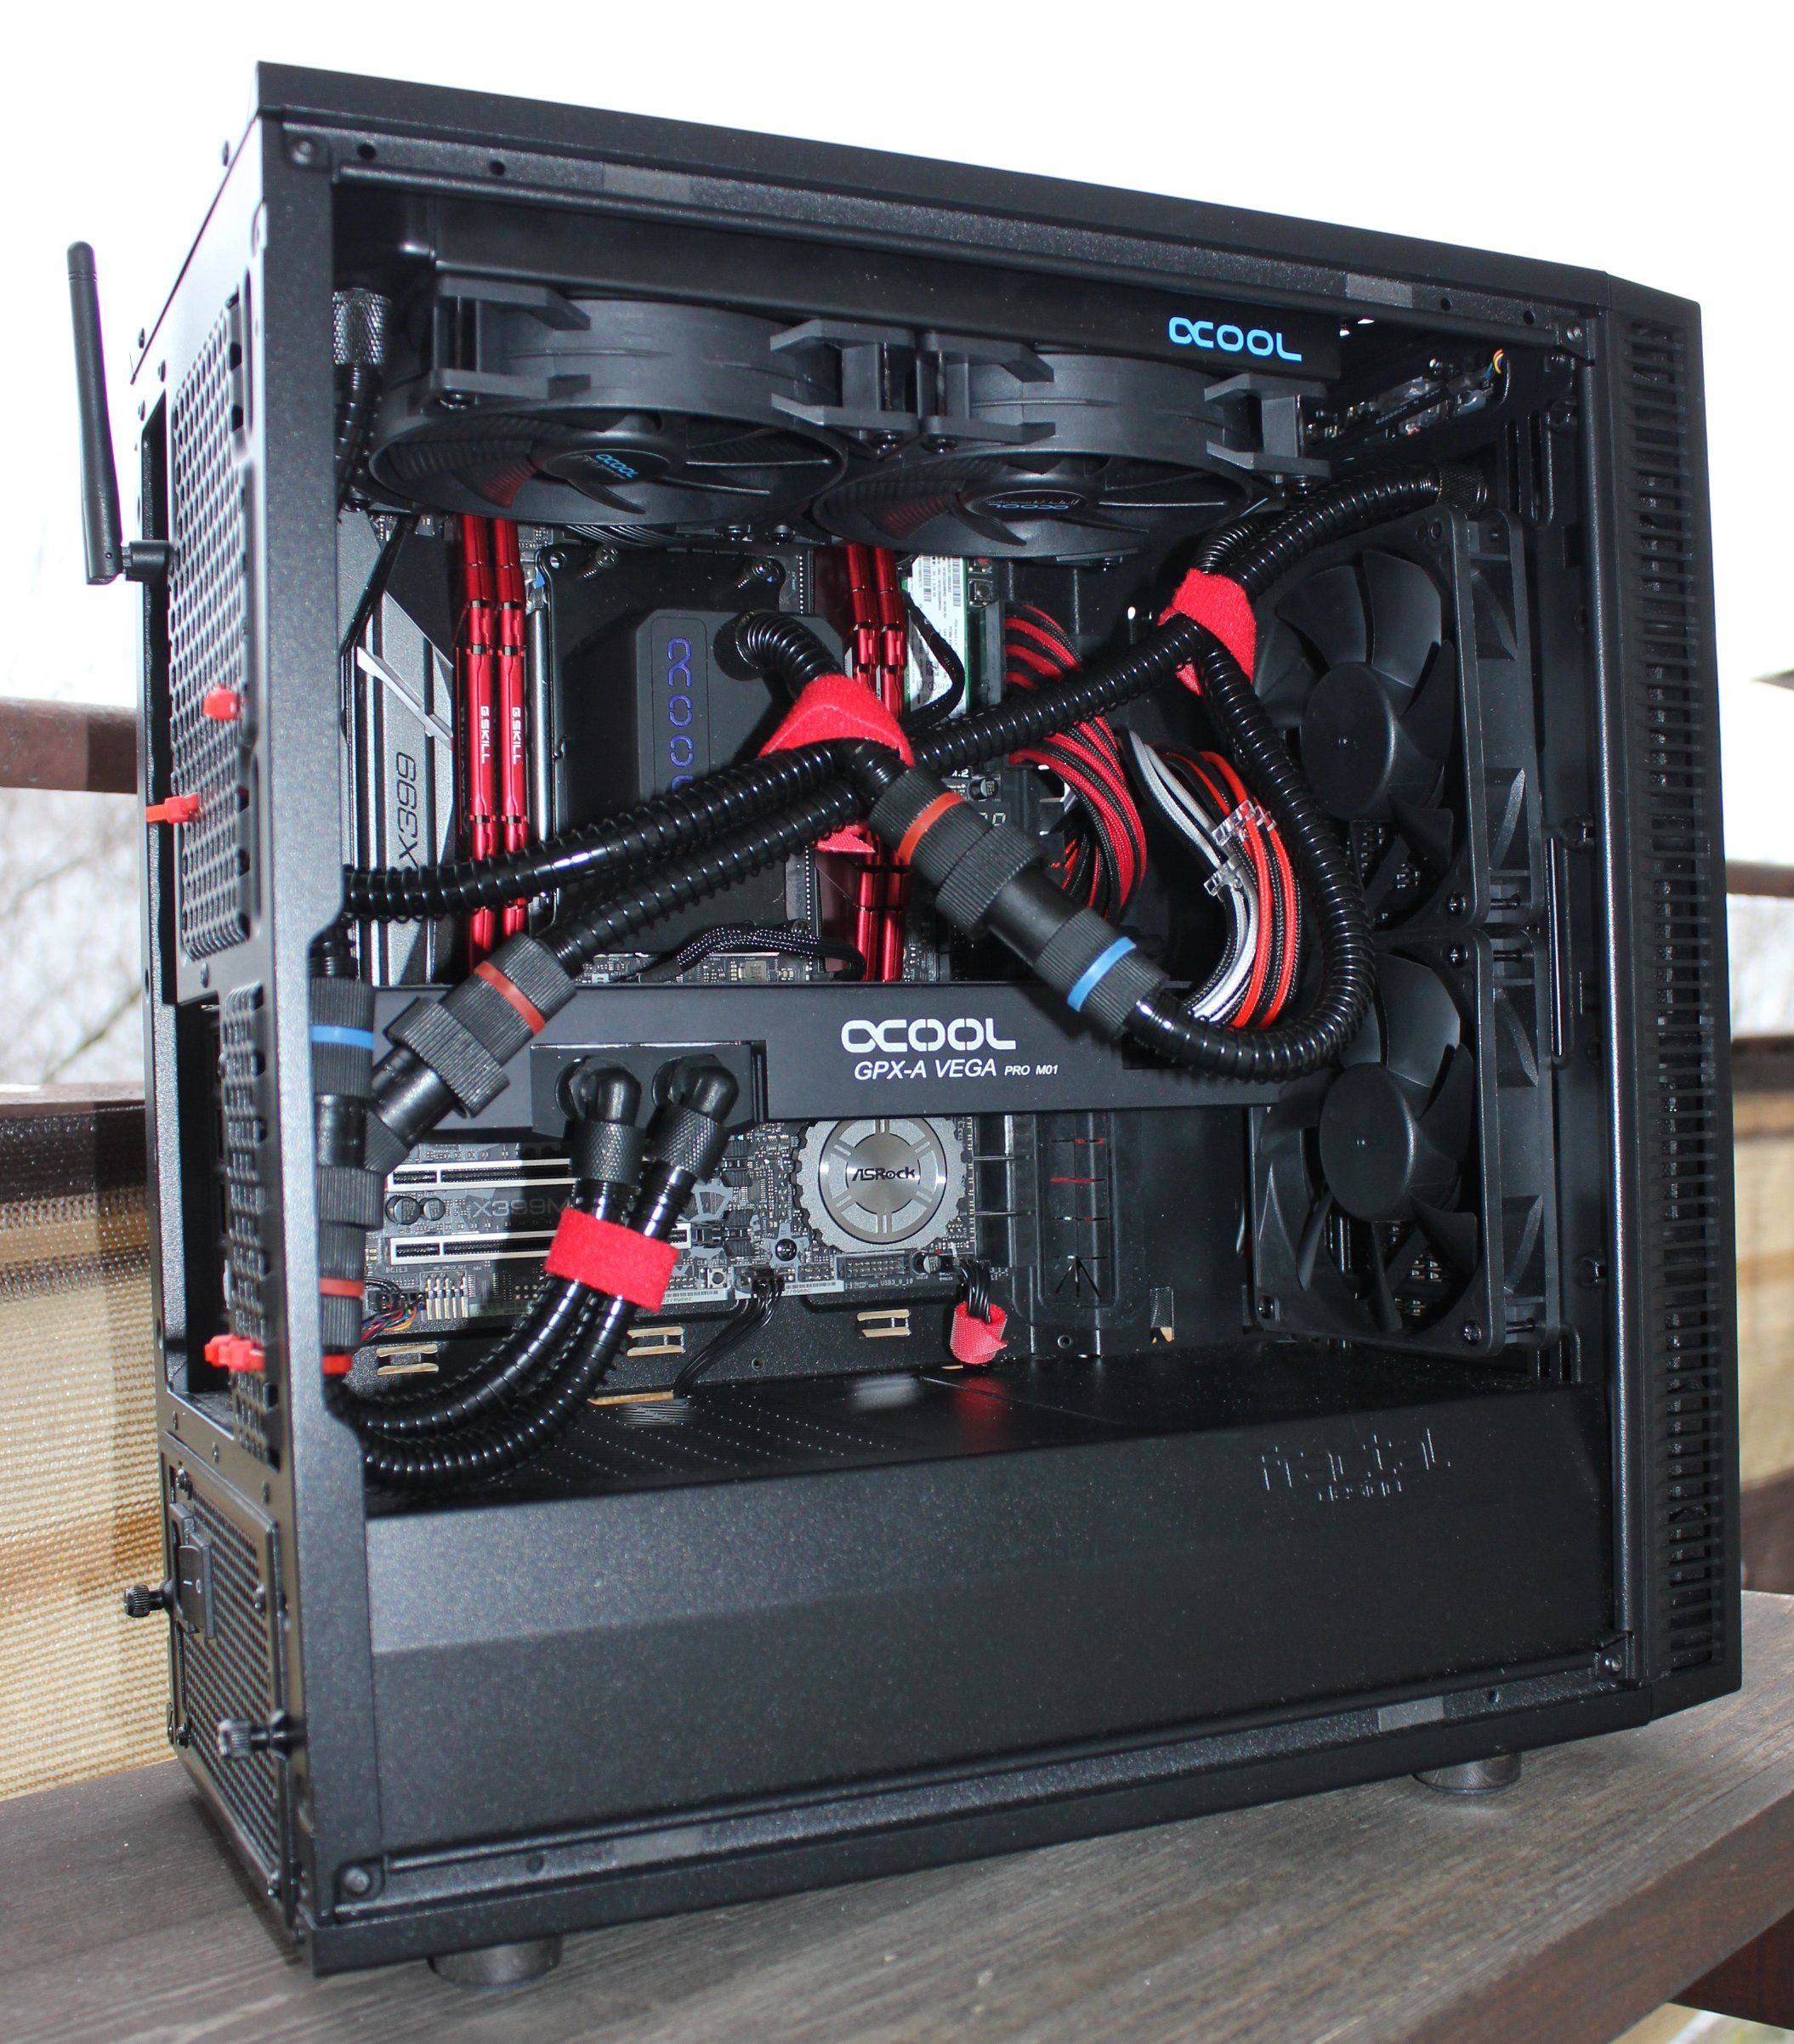
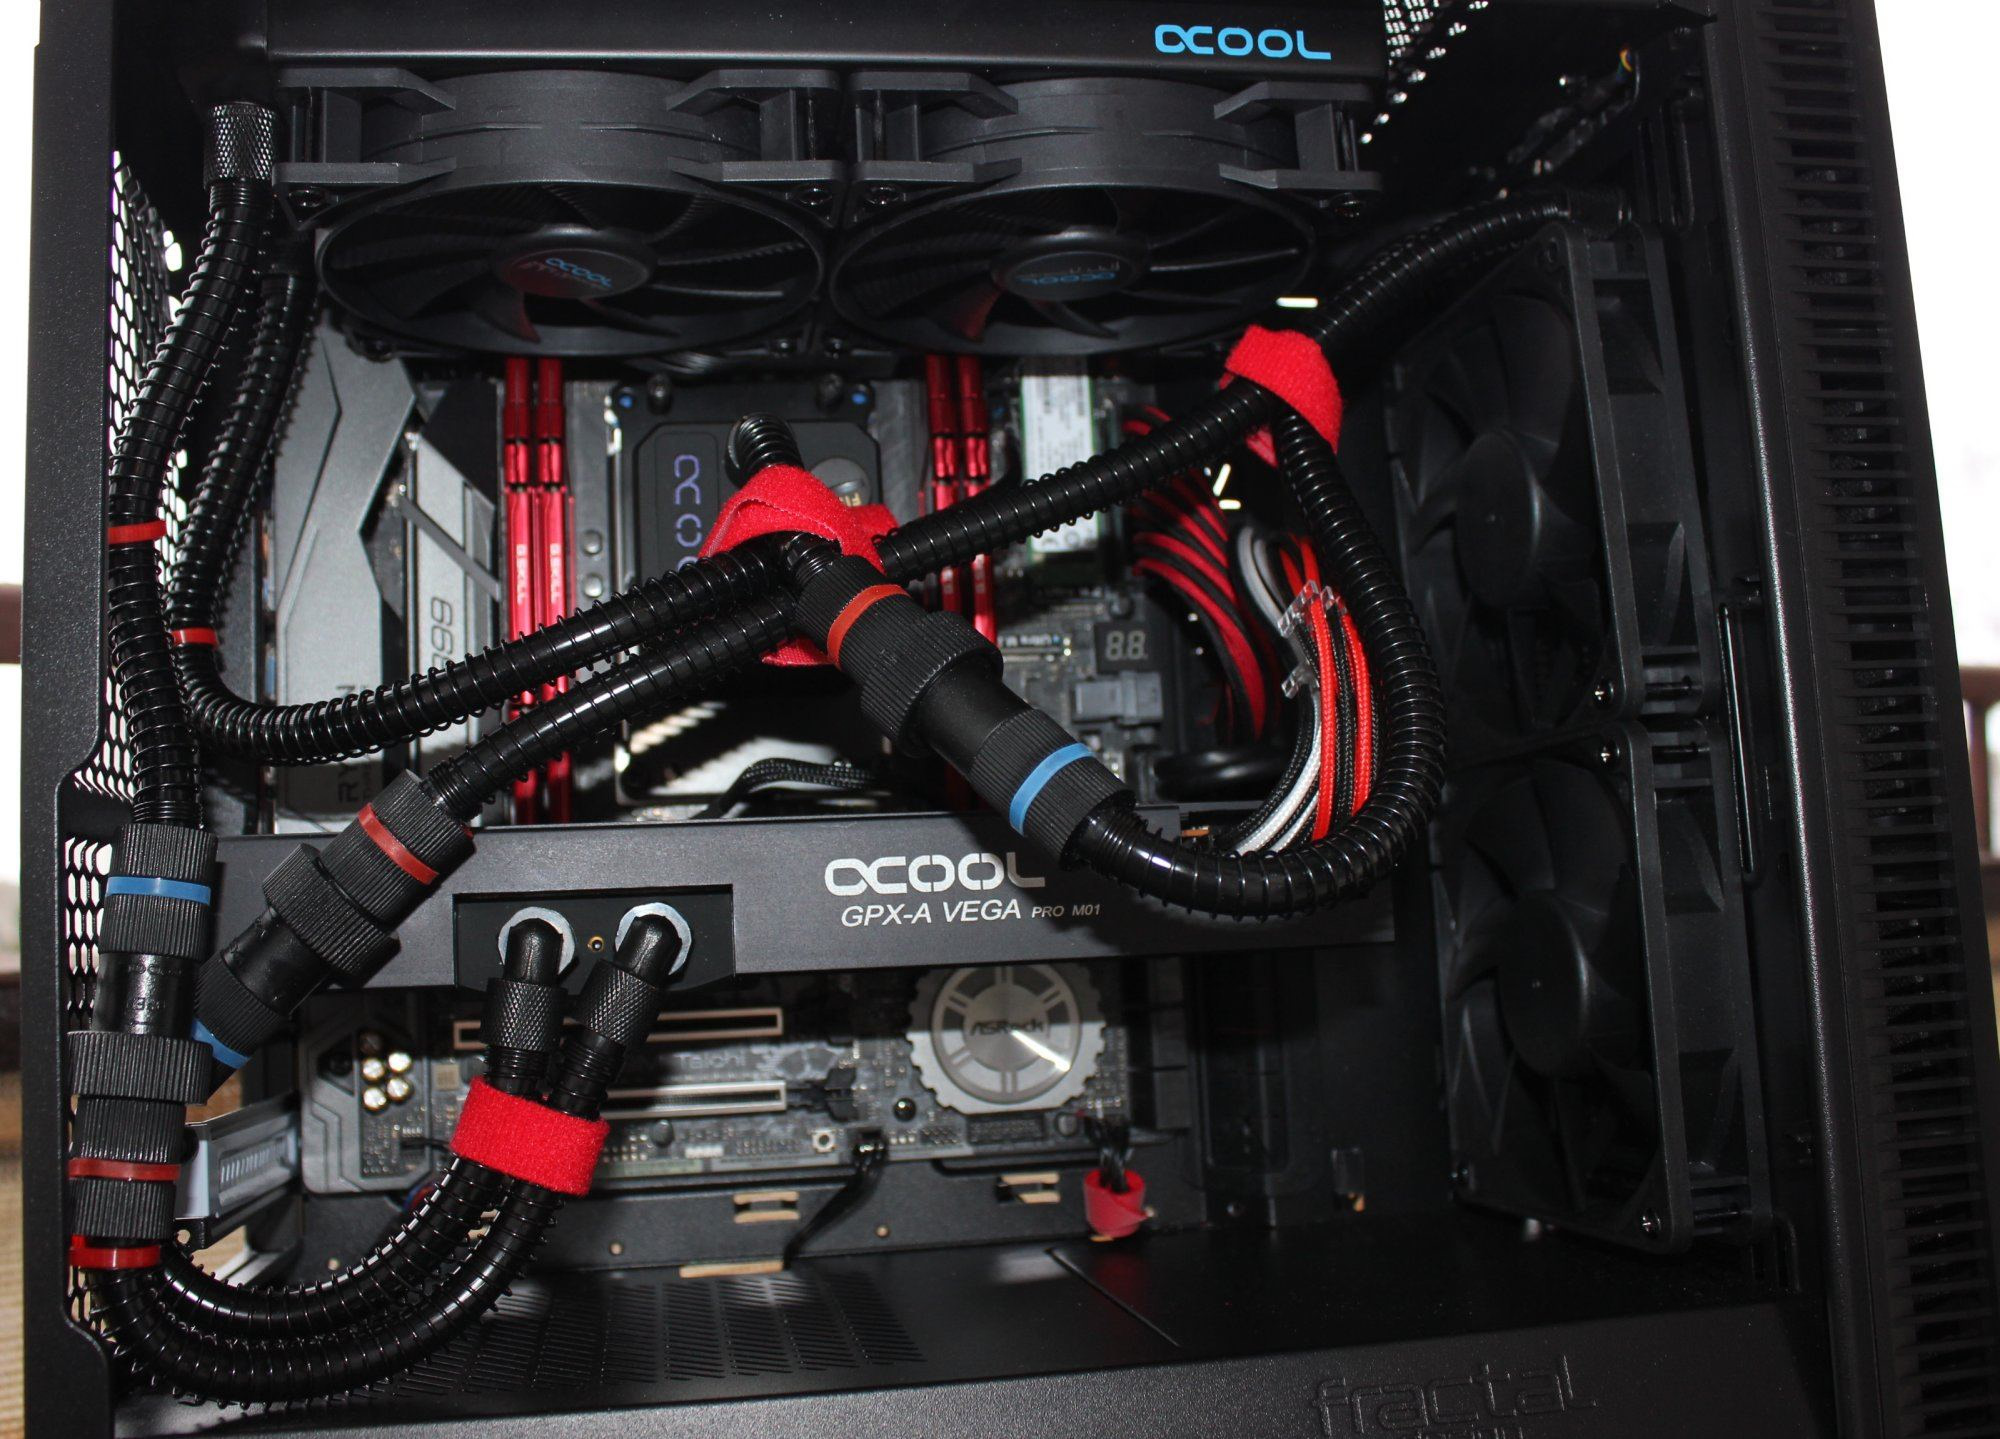
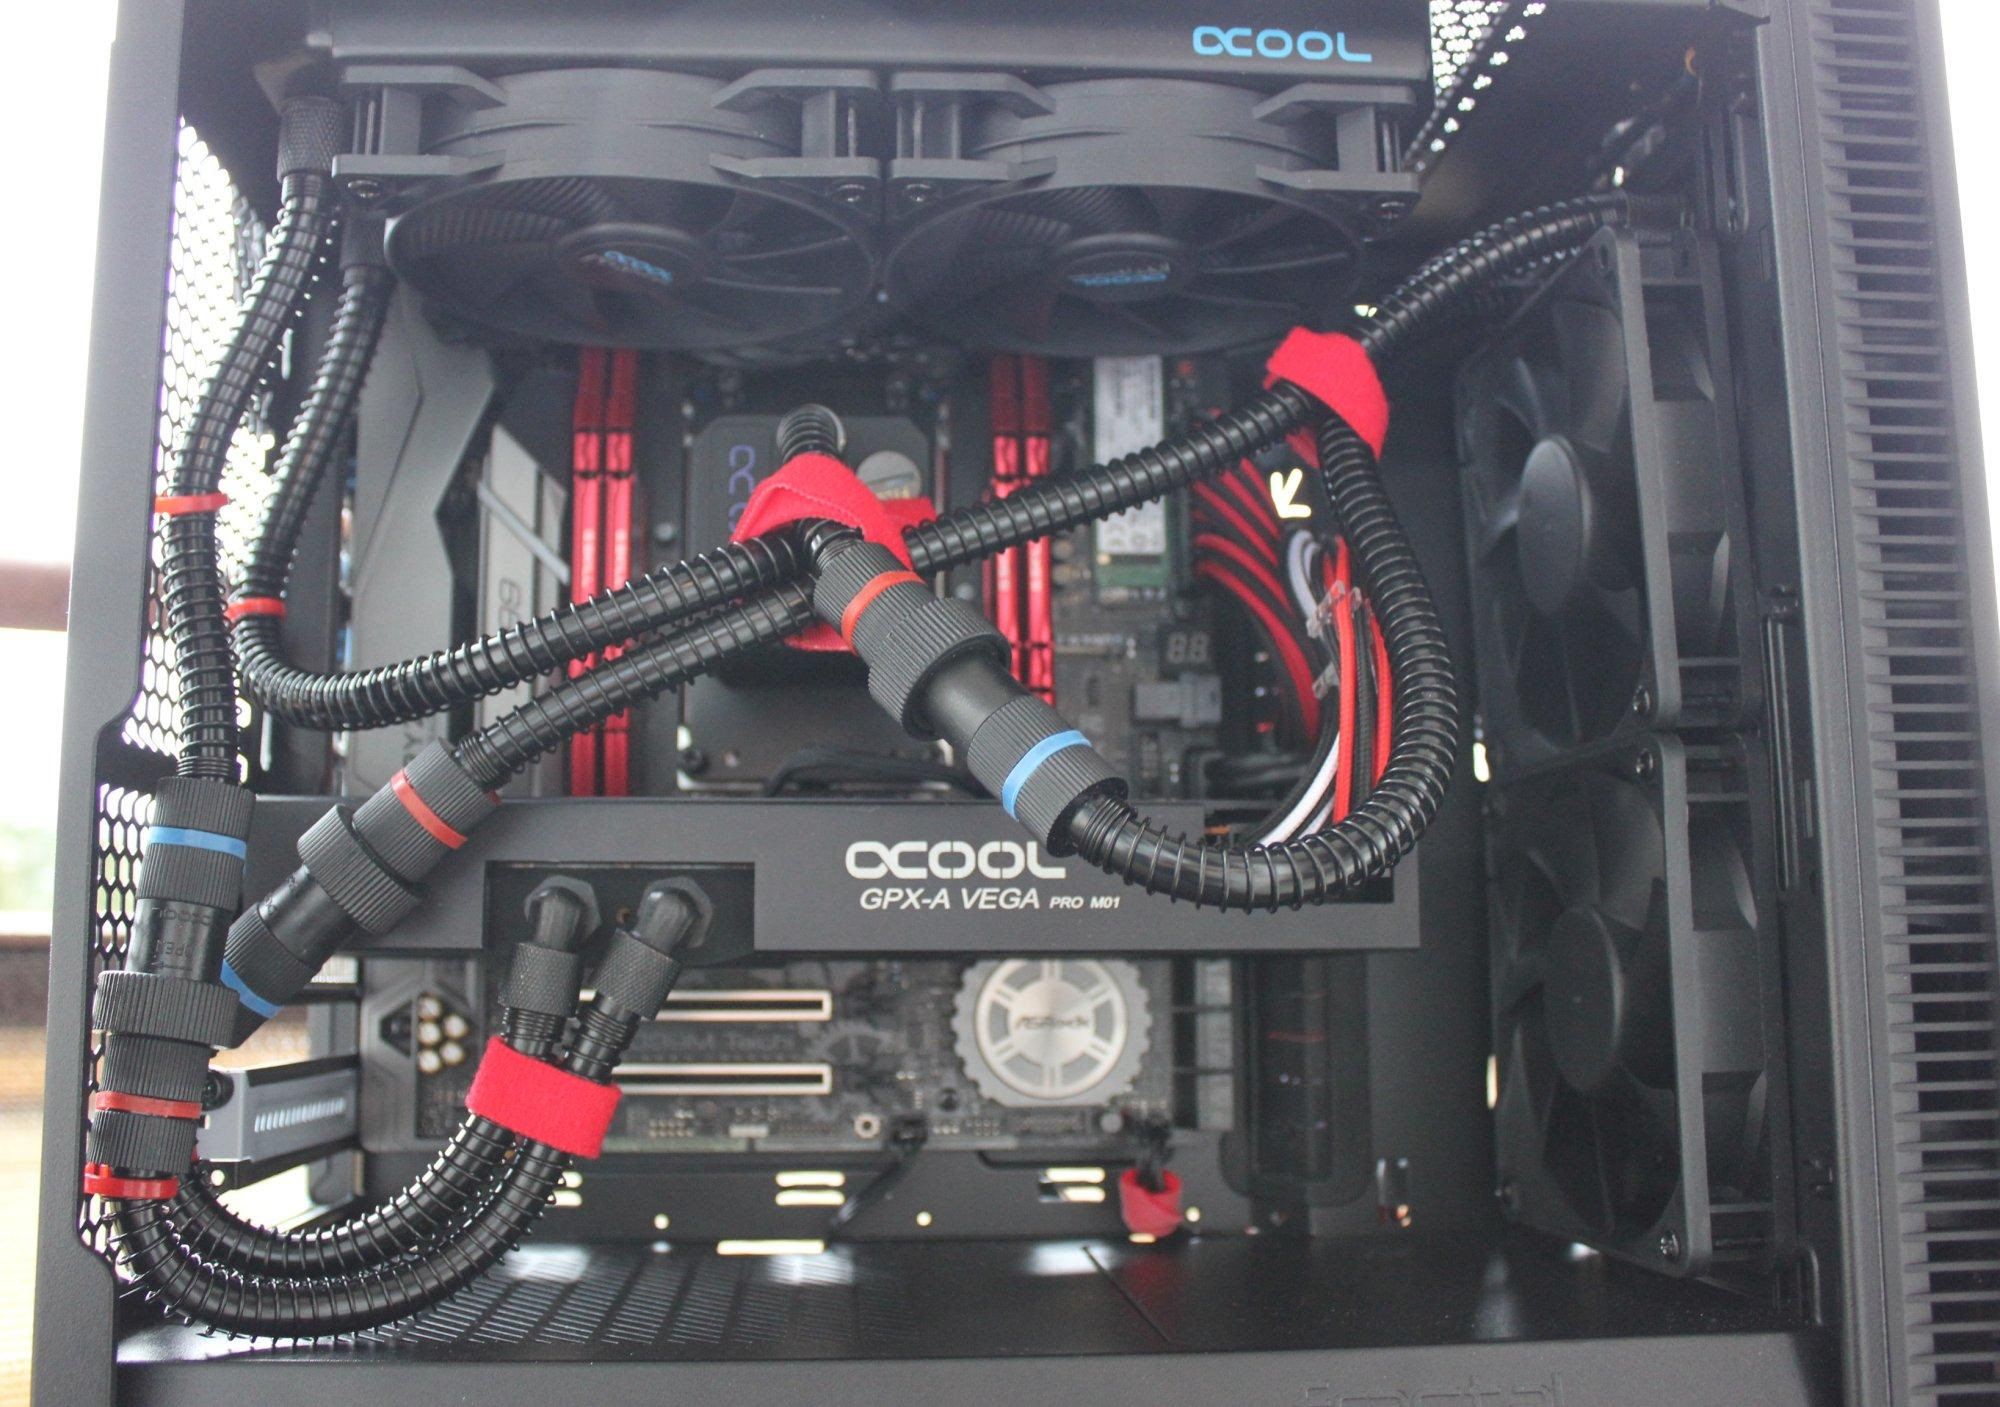
CPU water cooling - Alphacool Eisbaer 240
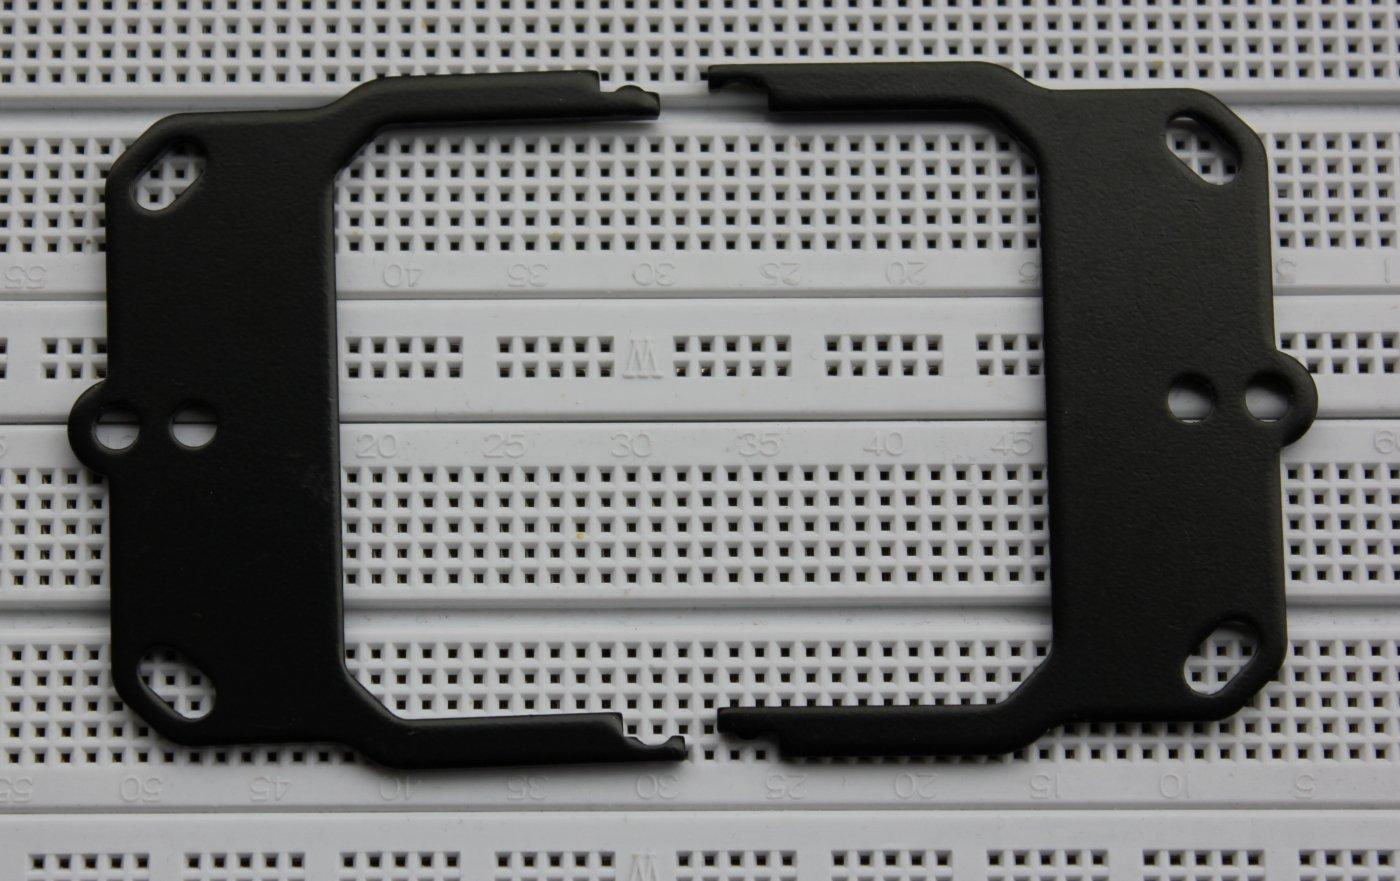
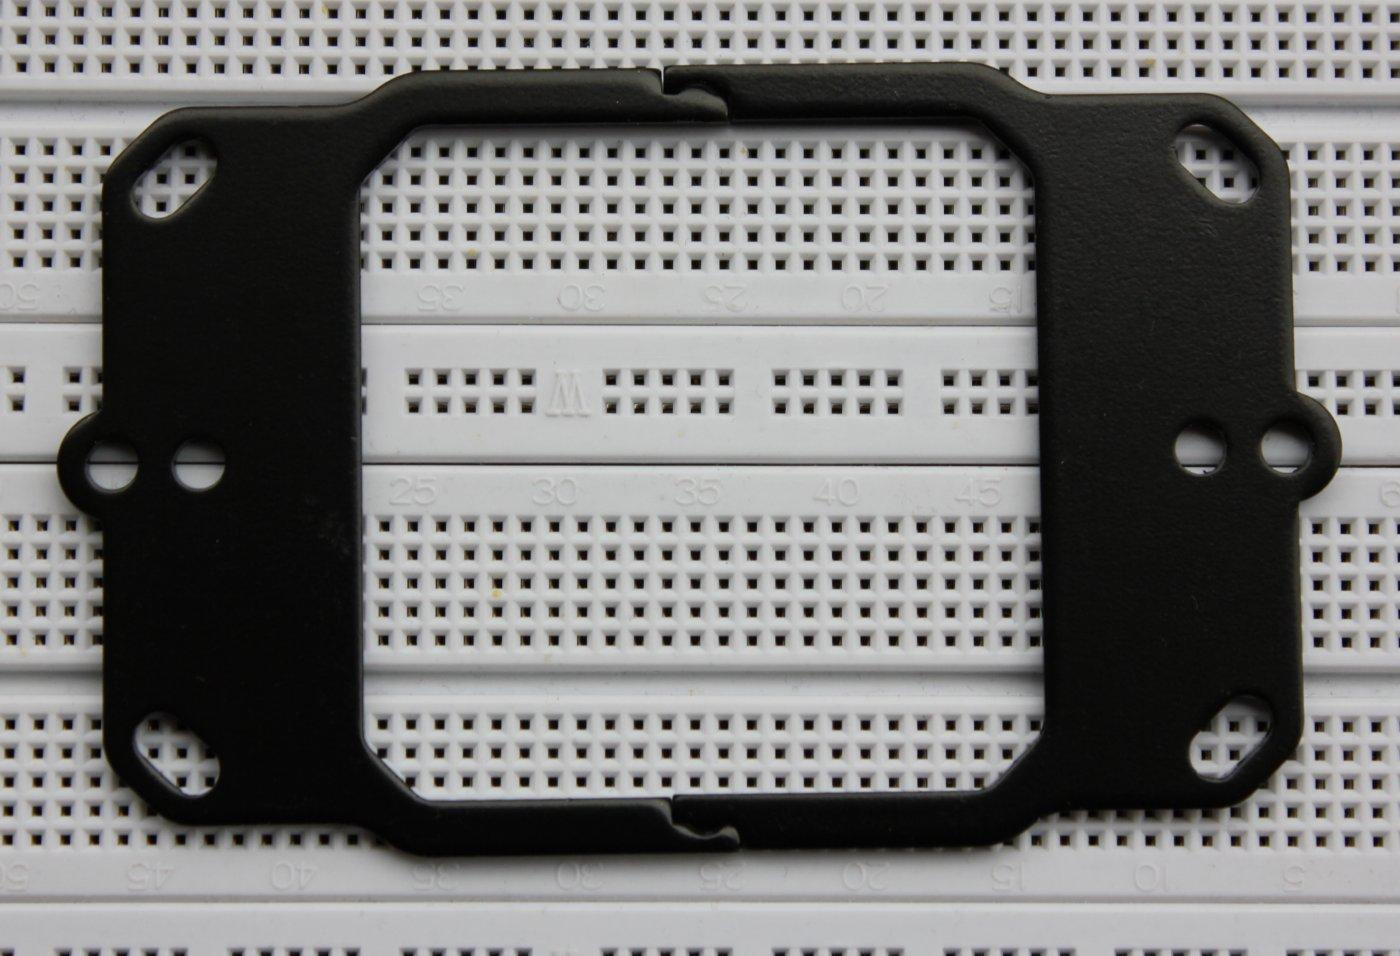
The Alphacool Eisbaer 240 CPU water cooling can be mounted relatively quickly when compared to the GPU counterpart. You get a filled and fully assembled AiO. You just have to pick the mounting bracket for your socket (TR4 adapter sold separately) which is a 2-part that goes into rails on the water block and have to snap together. In my case there was some problem with making them snap on so I tried Tony Stark solution on them - putting one in a freezer and second one on the heater for a moment. After that quick attempt, little bit of force and it clips nicely and is ready to use.
The tubes aren't very long and are quite stiff so you have to plan beforehand in which waterblock axis you will put the mounting bracket (it's a square and has rails on every side). You have to check your case for the optimal orientation.
Eisbaer 240 has a double
length radiator cooled with two 120 x 120 mm fans (4-pin PWM, 108 m3/h / 63,85 cfm, 1,66 mm H2O, 29 dB.
Advantages:
- Many sockets supported
- Doesn't have RAM clearance problem in a mATX Threadripper board
- Works as intended (at least for now)
- Can be combined with the GPU cooler for a one loop system
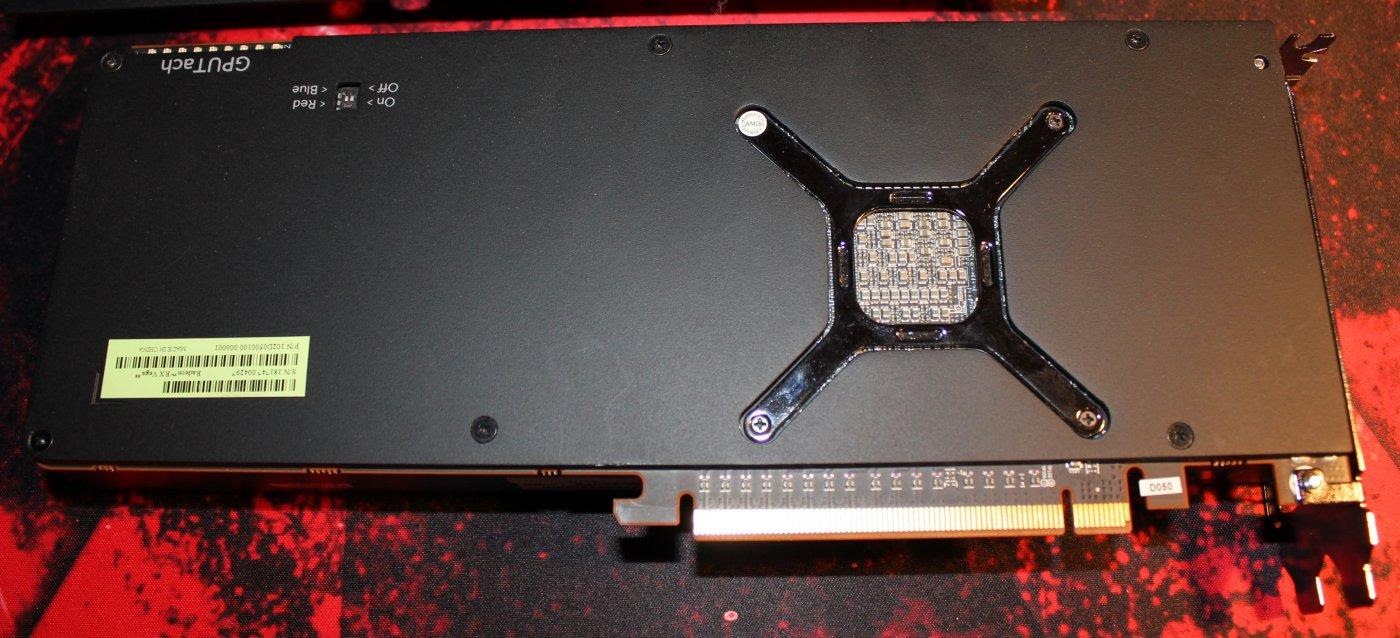
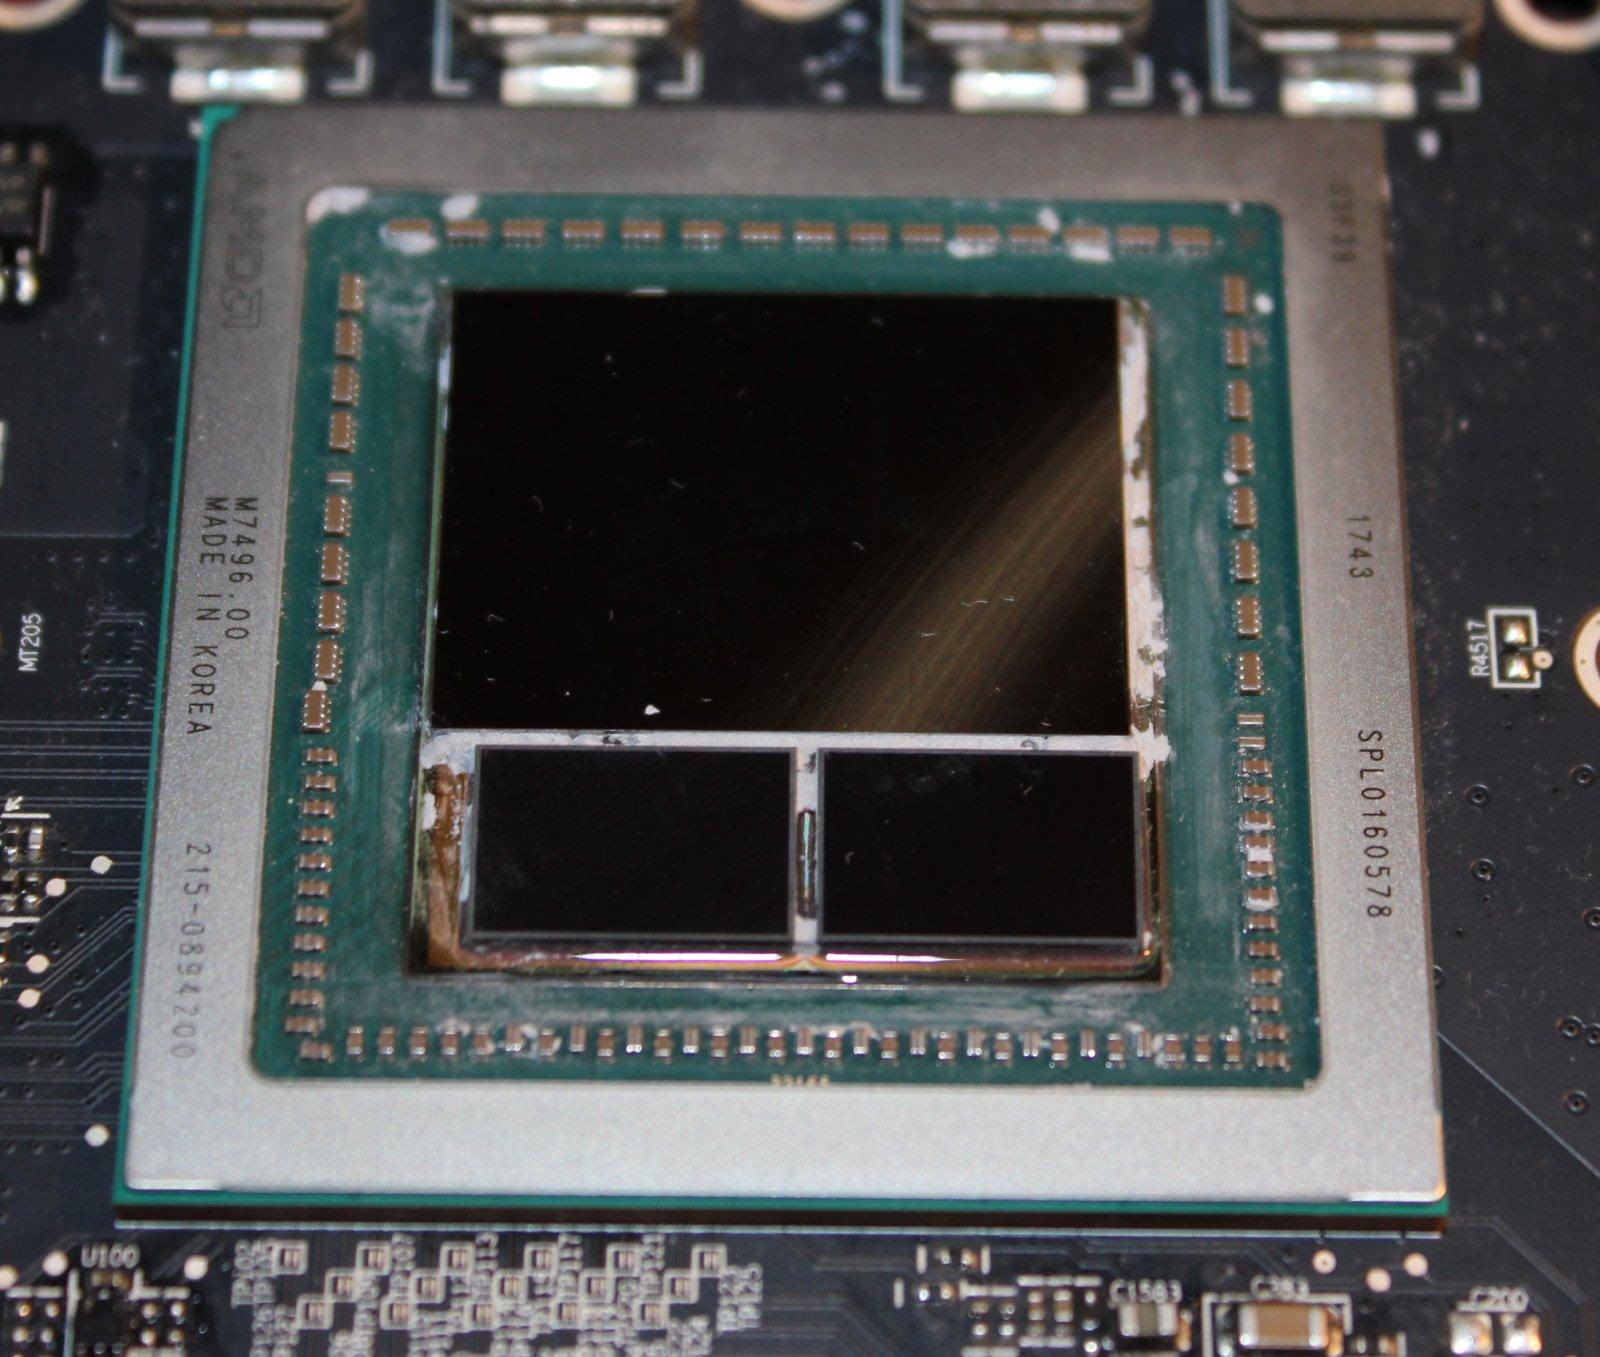
GPU water cooling - Alphacool Eiswolf 240 GPX Pro
This comes as a kit and you have to mod the card yourself - which is very likely to void any warranty so be warned. The water cooling part comes filled and assembled with both tubes having self-closing connectors - you can unscrew them, the coolant won't leak but few drops will. The tubes are longer than in the CPU kit.
Eiswolf 240 also uses double
length radiator and two 120 x 120 fans optimized for air pressure. Reference water cooled Vega uses single-length radiator and one 120 mm fan.
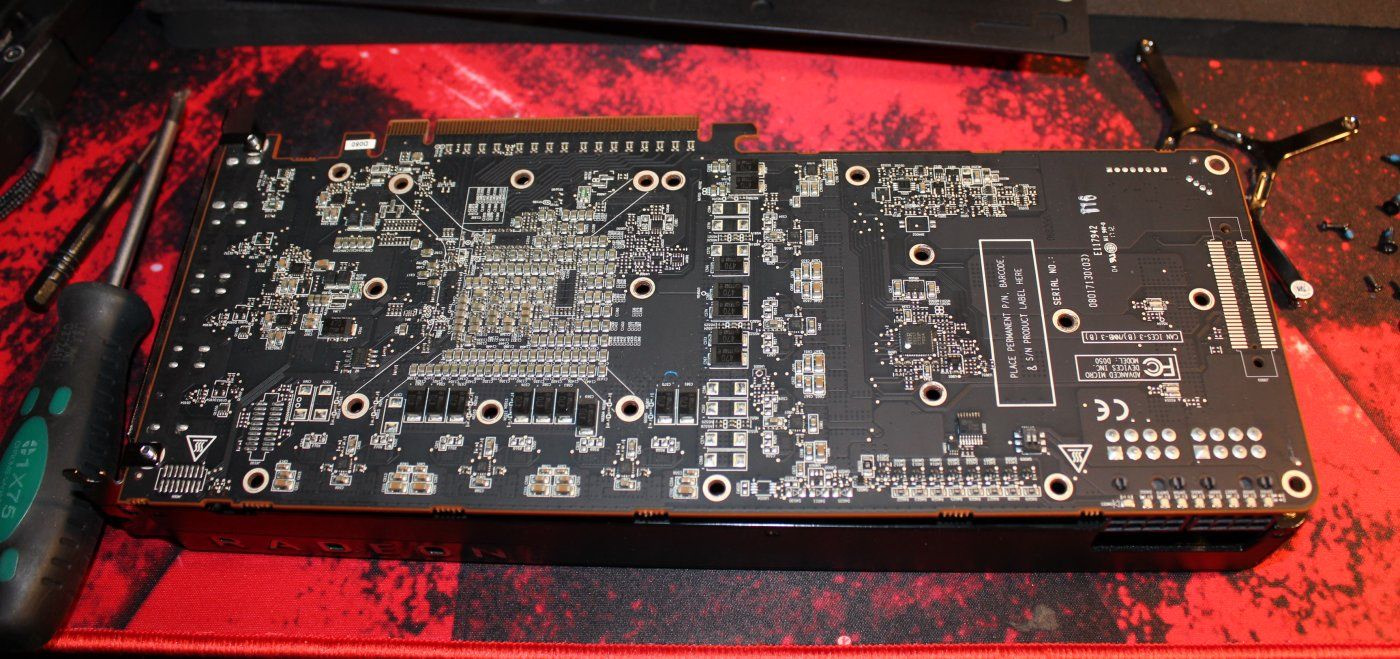
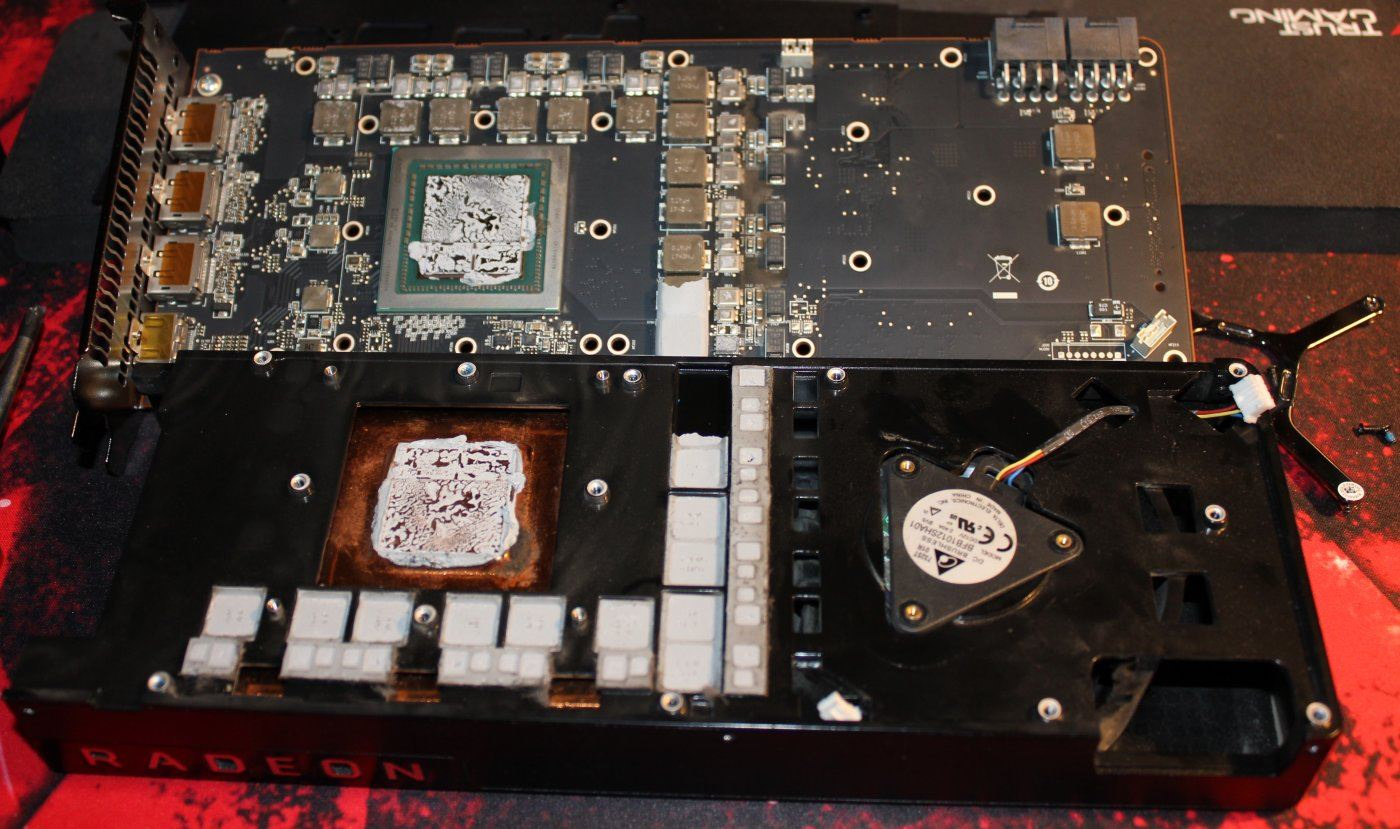
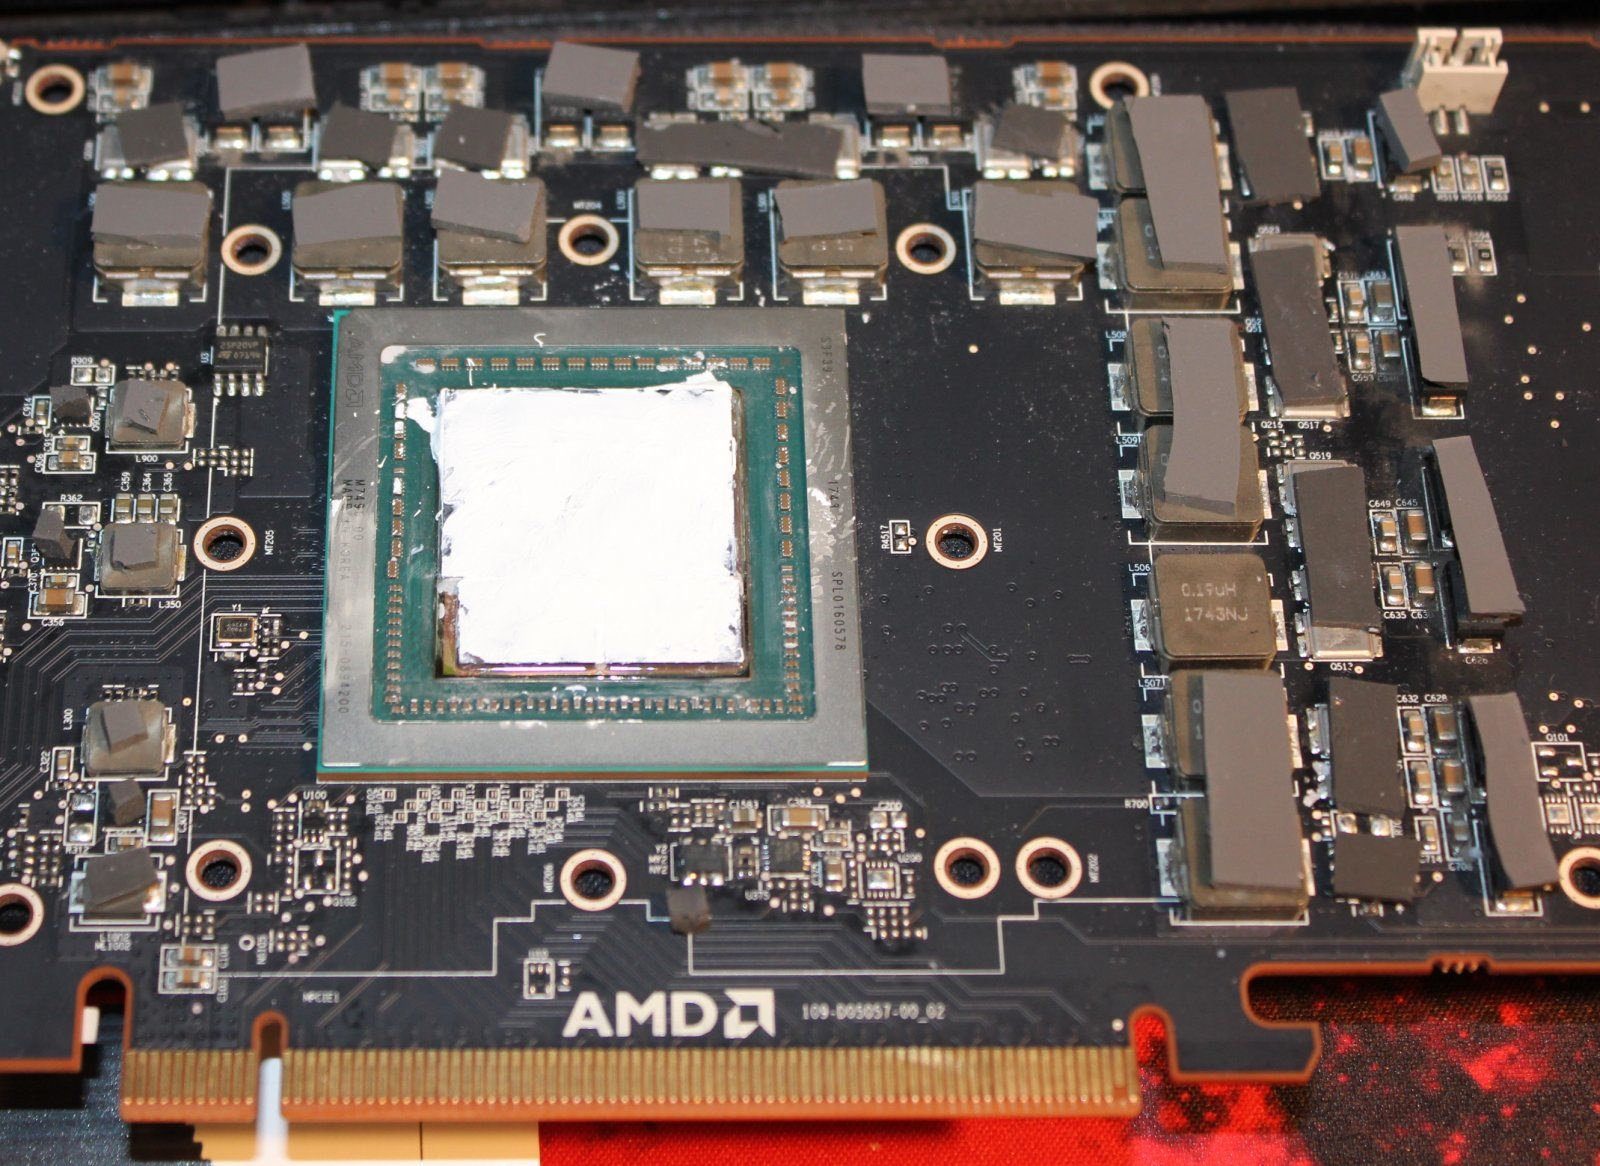
The second part of a Eiswolf kit is a set of thermal pads, a manual, a backplate and front plate for given model. You have to take apart your GPU - disassemble the cooling solution and get the PCB out. I modded a used card so potential losses are smaller. The manual uses pictures of your GPU model so it's relatively easy to mod it. You have to cut thermal pads for every highlighted element, put thermal paste on the die and HBM memory and then put the front panel on top of it. Then flip to the back side, put two screws, cut more thermal pads to size and the back plate can go in and screw everything together. It's also worth checking YouTube for a showcase mod.
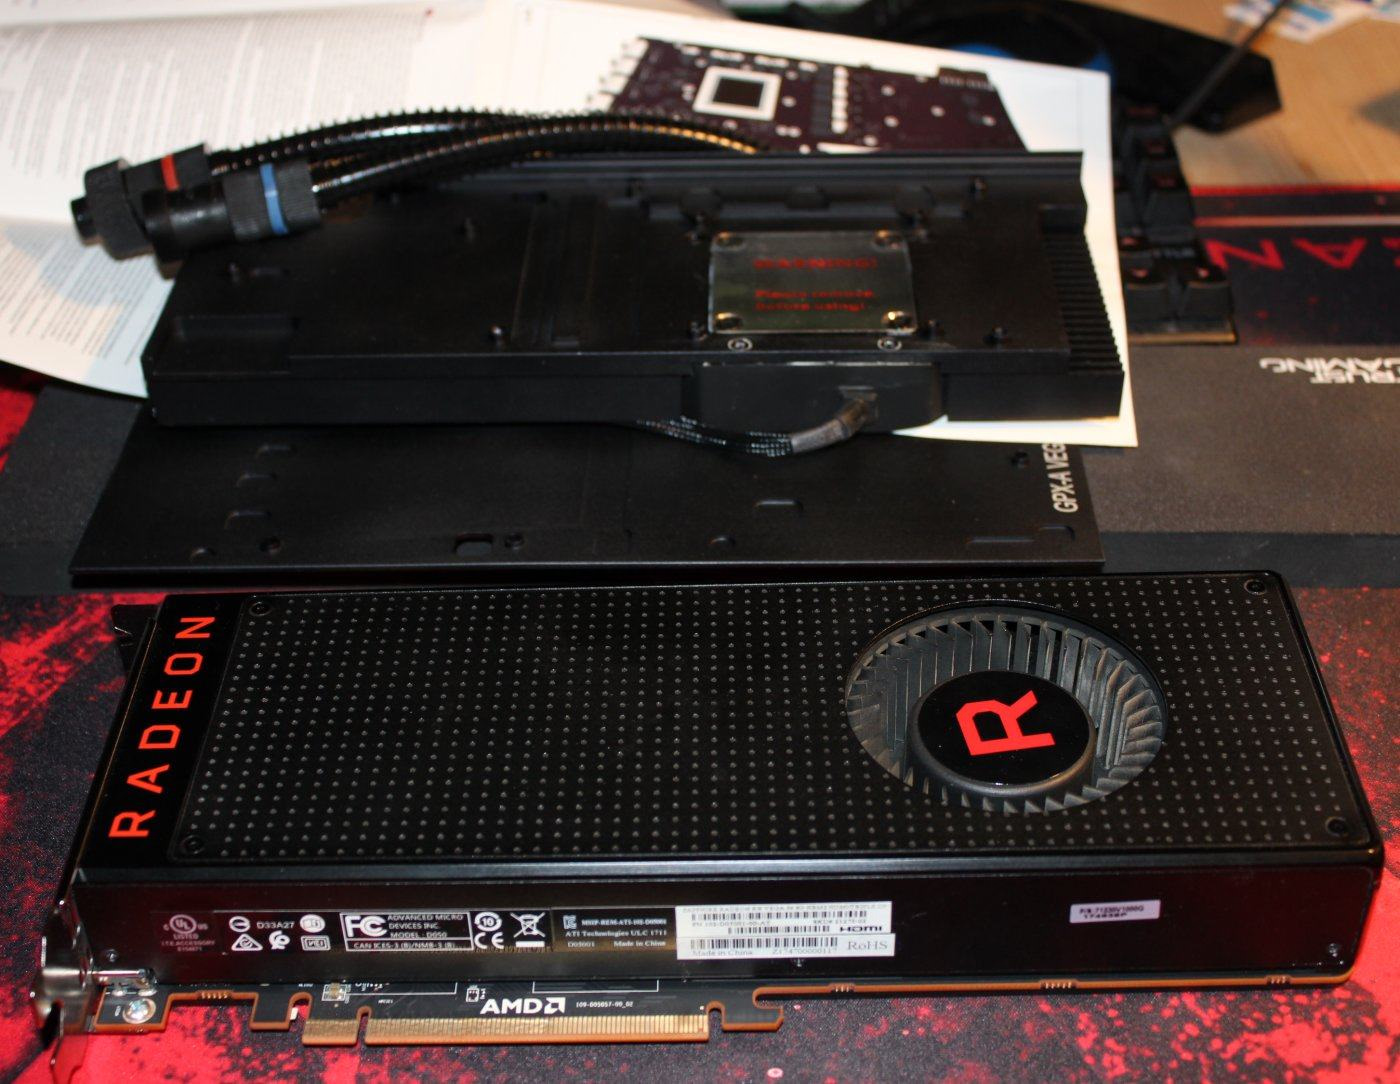
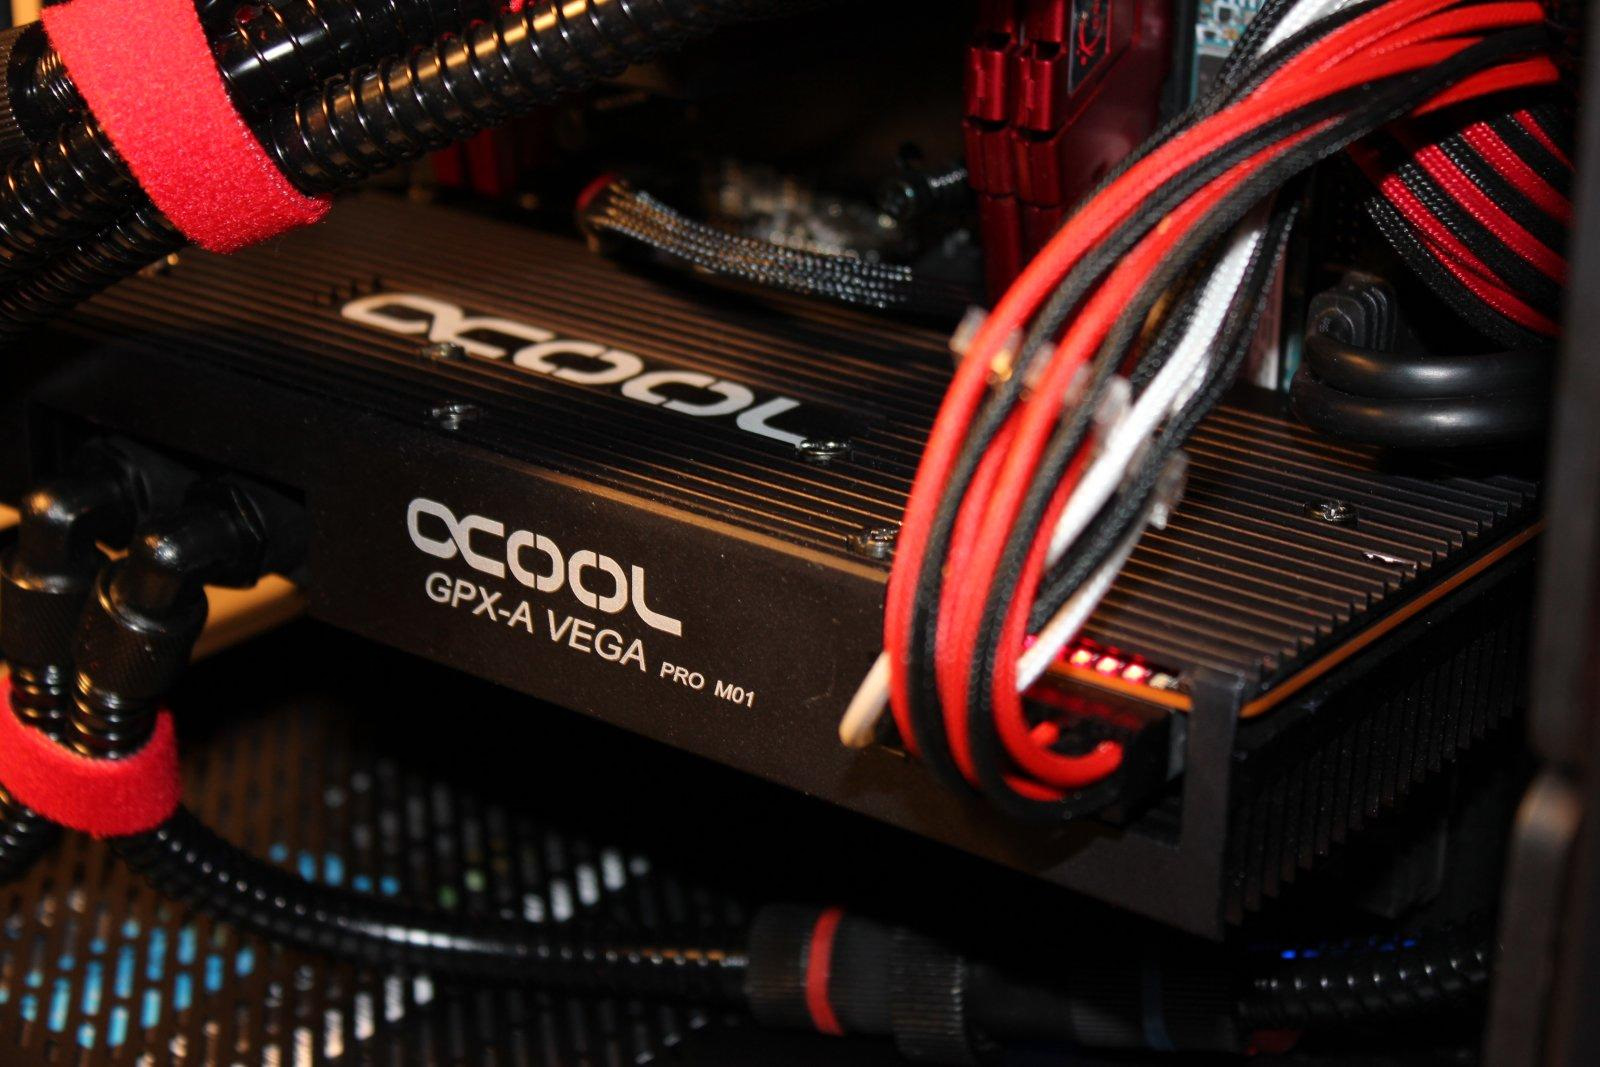
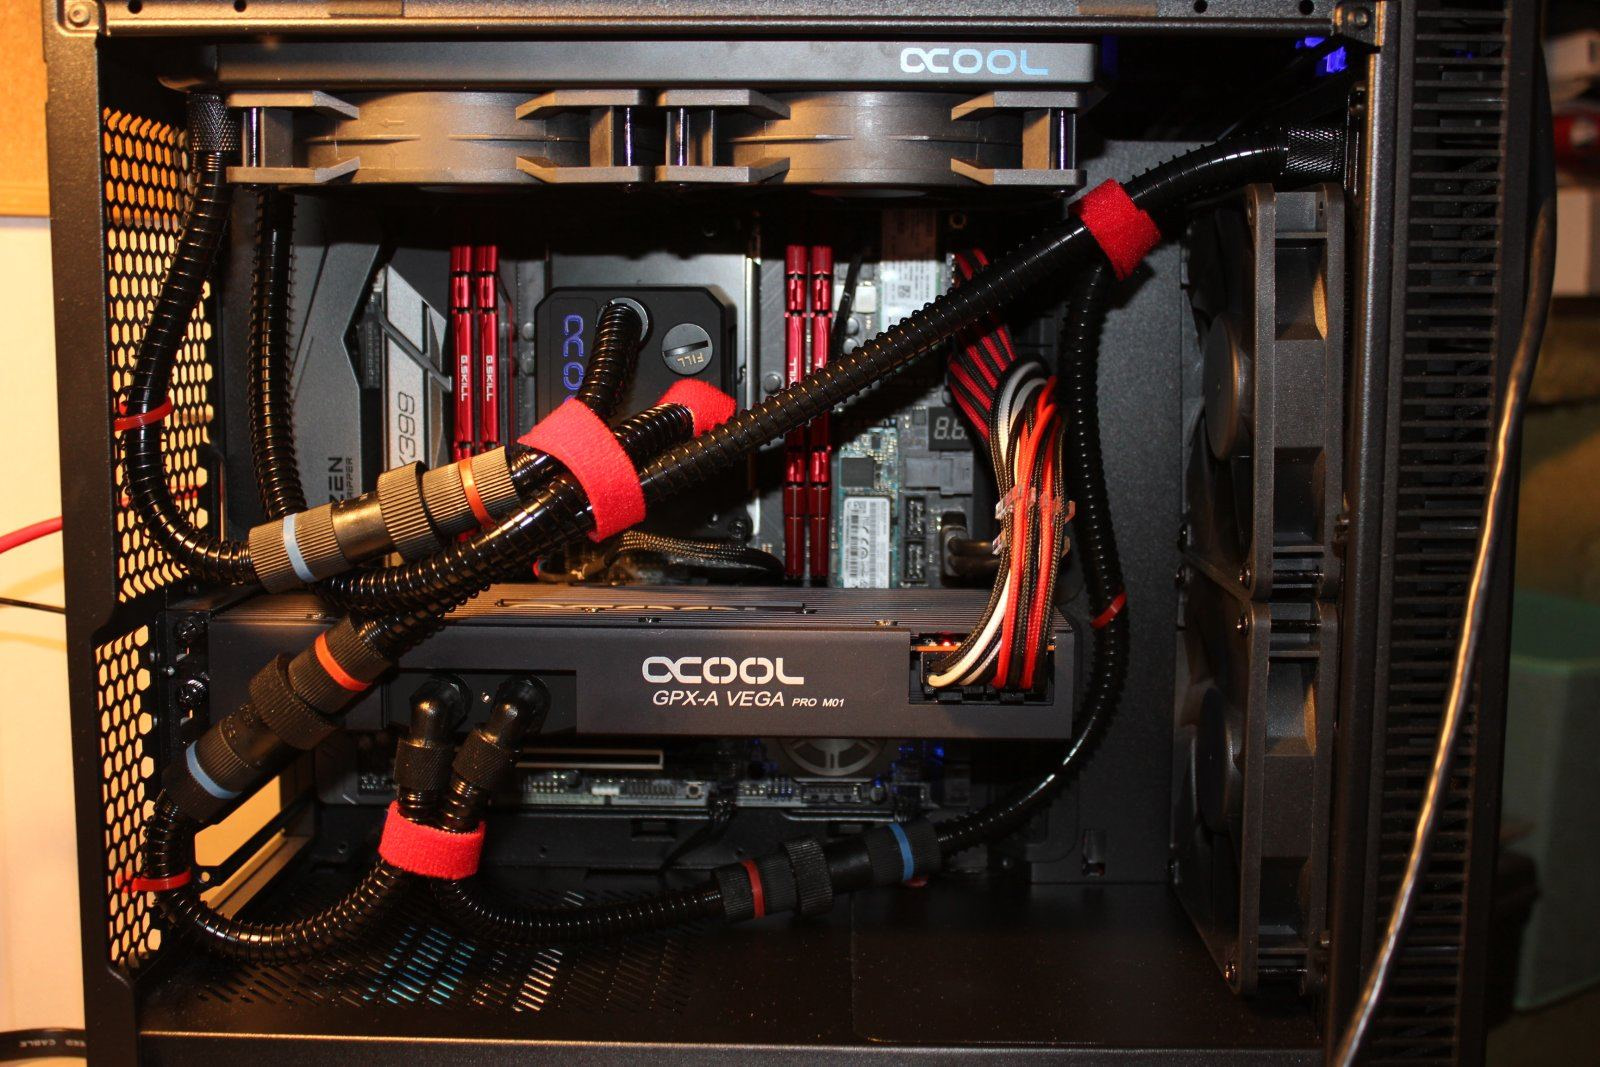
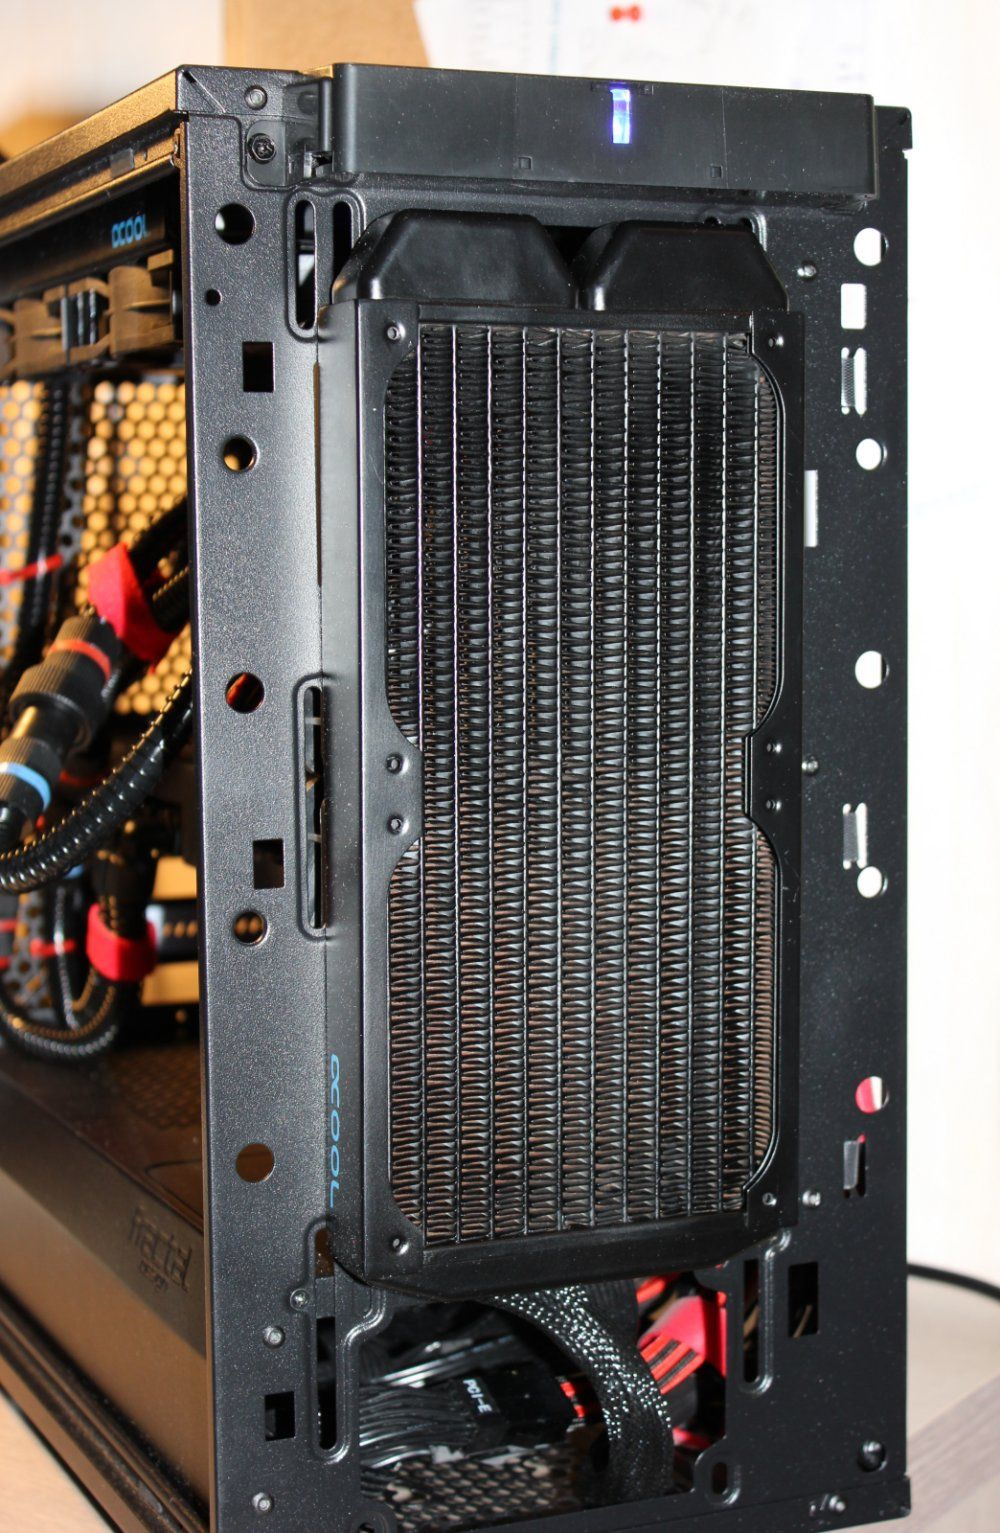
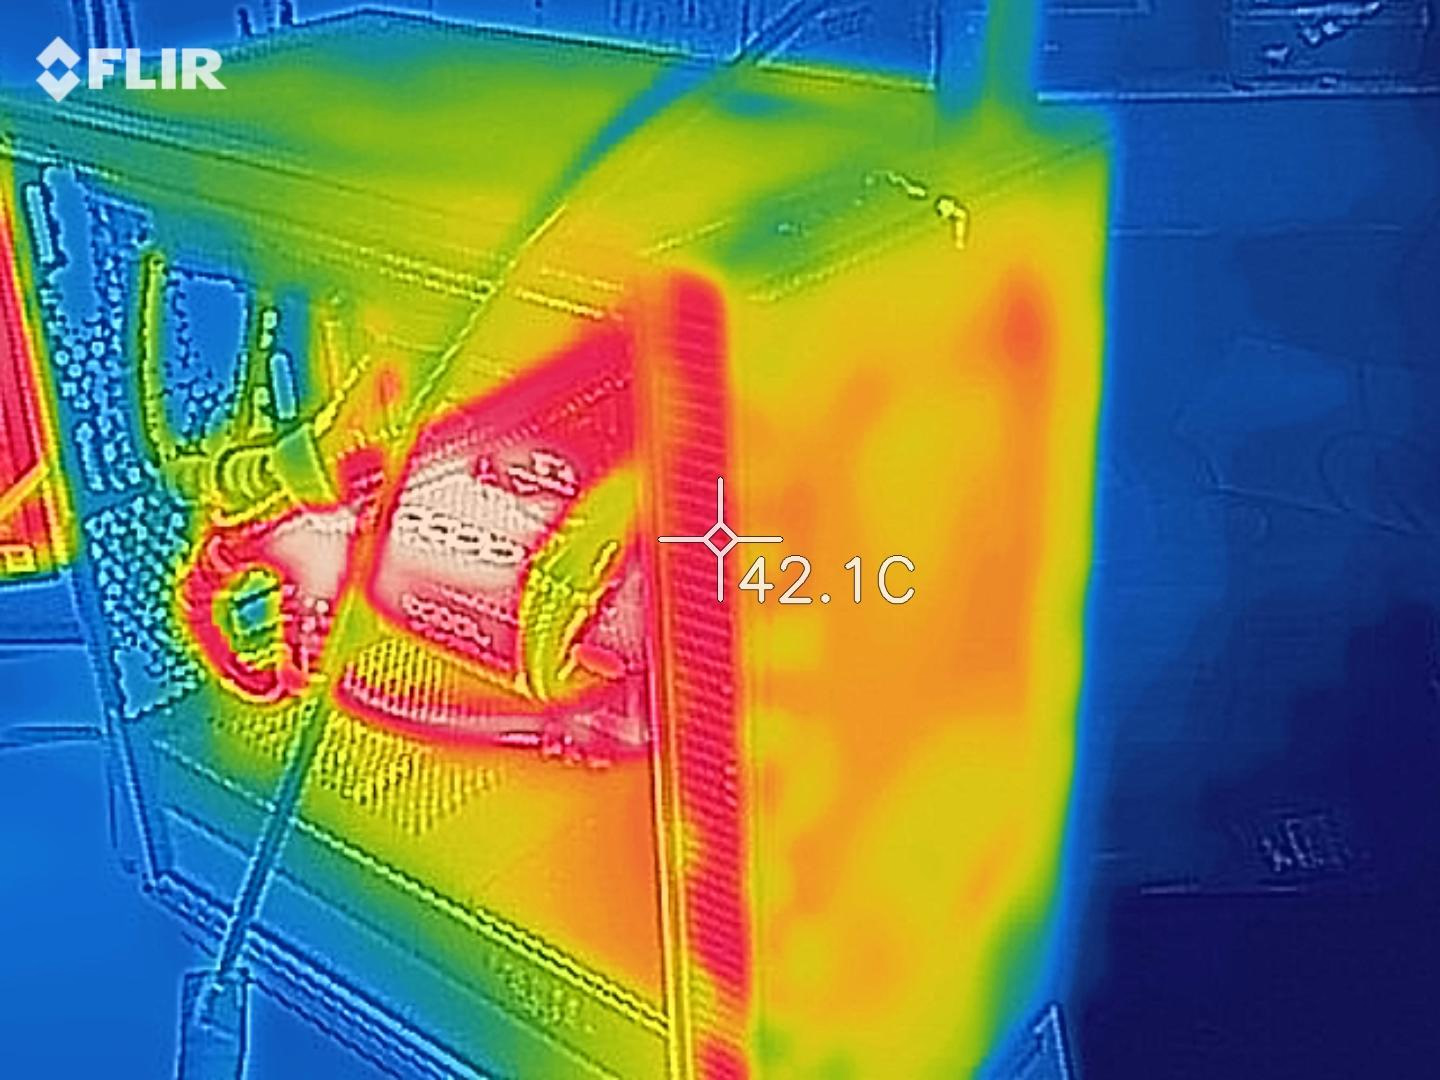
After modding the card I could start trying to plan the position of the radiator and the card. The tubes are quite long and stiff so they do impose some limitations on the routing. I wanted to put the radiator on top of the PC for best airflow and ejecting hot air outside of the case - Vega 64 will be the major heat source in this PC. The CPU cooler would usually be much cooler so it radiator could be mounted on the front panel with limited airflow and either push air in or out. However due to tube routing I had to switch positions of both of those radiators. The GPU radiator went on the front side of the front panel and the CPU radiator on top of the case... but still this system can be connected into a one loop AiO which does help spread the excess heat if present. Water from the GPU goes to radiator, to CPU, then to second radiator and then back to GPU.
The kit does work but I have some reservations. The included thermal paste was supposed to be spreaded on top of the chips but it was like to dry and was just graining
instead of staying on the surface as a layer. The manual doesn't show GPU PCIe bracket mounted to the PCB. That's bit odd as it's kind of risky to put a heavy water cooled GPU into a PCIe slot without any mechanical lock and support - especially when motherboard will be in a vertical orientation. In this case the PCIe bracket of the GPU can stay but you have unscrew one of it screws as it blocks the backplate.
Advantages:
- Relatively quiet and doesn't go very loud under load like normal cooling
- Manual for specific model (with very minor differences in some parts placement on the PCB)
- Can be combined with CPU cooling into a one loop configuration
Disadvantages, reservations:
- Codding different thermal pads with similar colors (yellow, light brown, and the manual doesn't have ideal color reproduction)
- You have to cut a lot of very small thermal pads
- Not so easy to apply thermal paste
Possible improvements:
- Letter/symbol coding of thermal pads (color blind mode too)
- Simplify procedure by cutting long strips of thermal pads (at the expense of using more of the material)
- More elastic tubes
- Better thermal paste
Cable management
The Chieftec PROTON BDF-1000C power supply is fully modular and has two 8-pin CPU connectors required by TR4 systems. The cables aren't particularly pretty or elastic so for routing I did use third-party extension cables. Define Mini C has a separate section for the power supply at the bottom and every cable can be routed from below the motherboard plane. I removed the drive cage to give more space for hiding excess of the now extended ATX cables. As the CPU radiator was next to the motherboard side where 4 and 8 pin connectors were - the elastic properties of those extensions were very handy.
Finished build
I was skeptical at first - is the extra effort, risk and money worth to use a custom water AiOs? Maybe I just should use Sapphire custom air cooled Vega, simple air cooling of the CPU and some standard case fans for a quick build? But in the end when everything is working I'm quite surprised how efficient and quiet the system is. I have it right next to me and not on the default spot and even so close the noise isn't a problem. It's likely louder at idle as the fans always spin but at load there is no loud ramp present. One question still stands though – how long the coolant will stay clear?
Water cooling fan noise
I said the noise is low but at first the GPU cooler fans were quite loud and I went into the UEFI settings to check which fan curves control them. When I set the curve to quiet
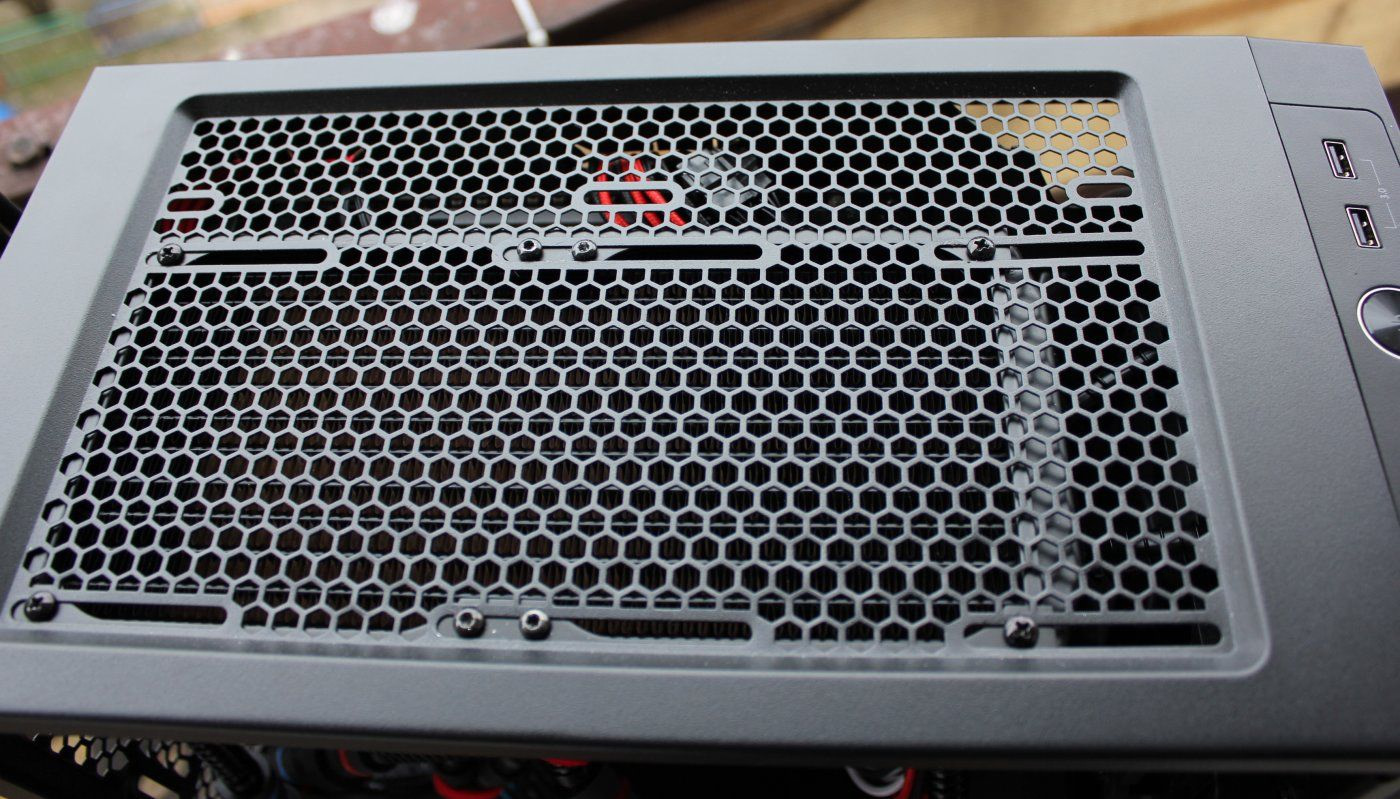
the noise went dramatically down. The CPU fans were quite stable on noise even if more aggressive curve was picked. The extra noise of the GPU radiator fans can likely be attributed to air resistance. The air has to go through a radiator and then do a tight 90 degree turn into the vents of the front panel. There is no mesh on the front panel, just side ventilation holes.
Both cooling systems push air outside of the case and there is no inlet fan present. Likely I could add a reversed fan on the back of the case if needed (likely outside of it as tubes are packed tight in that area).
Benchmarks
I did some benchmarks on air cooled system on the open test bench and then a bigger run on the final build PC. On Linux (latest Xubuntu) I used Phoronix benchmark tool and on Windows popular synthetic benchmarking apps and few of my favorite games recorded with AMD ReLive and monitored with Afterburner.
Test bench air cooled results
- UserBenchmark: Game 110%, Desk 123%, Work 131%
- 3DMark Time Spy: 7 394
- Cinebench R15 OpenGL: 88,17 fps
- Cinebench R15 CPU: 2397 cb
- Superposition 1080p Medium: 13 267
- Superposition 1080p High: 10 033
- Superposition 1080p Extreme: 4407
- Superposition 4K Optimized: 5846
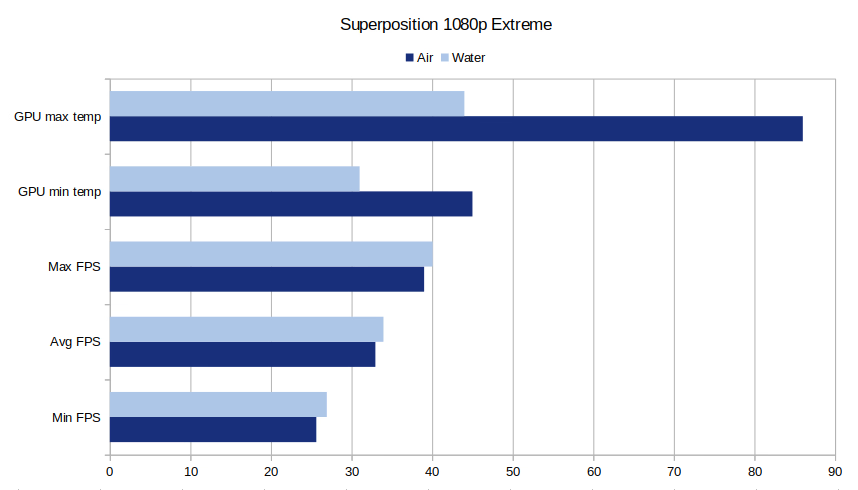
Water cooled final PC benchmarks
- 3DMark Time Spy: 7 693
- 3DMark Night Raid: 40 994
- 3DMark Full API Overhead 1.5: DX12 draw calls per second 25 133 926
- 3DMark Full Time Spy: 7 685
- 3DMark Full PcMark 10: 5 916
- 3DMark Full Time Spy Extreme: 3 654
- 3DMark Full Firestrike Ultra: 5 444
- 3DMark Full Night Raid: 40 165
- UserBenchmark: Game 111%, Desk 113%, Work 127%
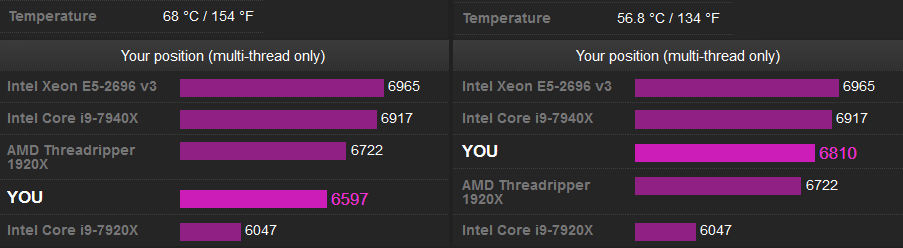
- CPU-Z: ST 454, MT 6810
- Geekbench CPU: ST 4574, MT 32916
- Geekbench Compute: OpenCL 213 233
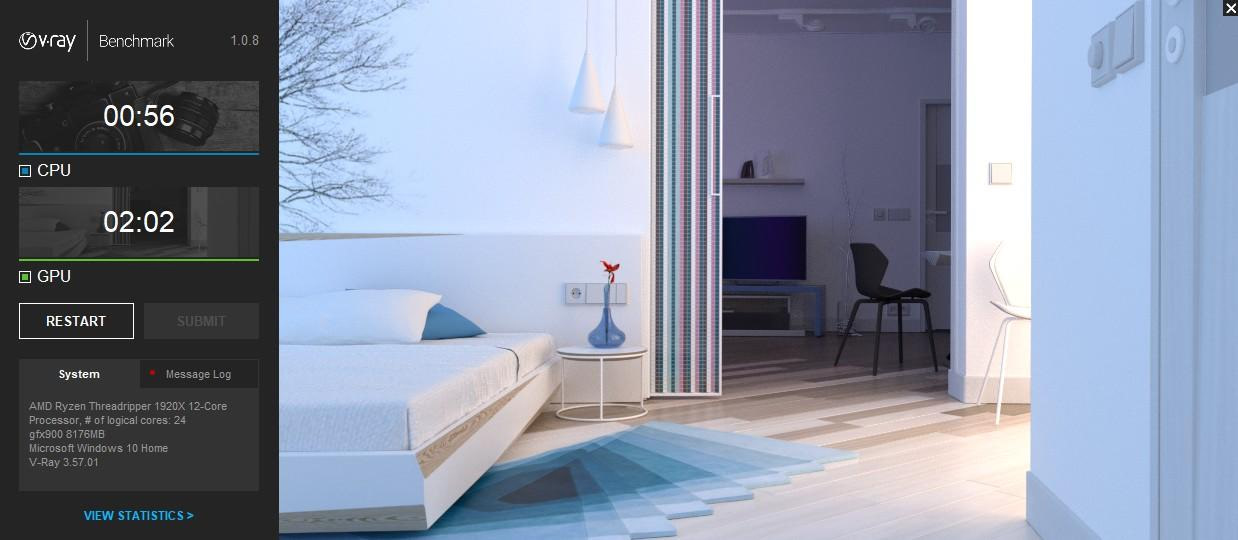
- V-Ray CPU Time: 00:56.542
- V-Ray GPU Time: 02:02.816
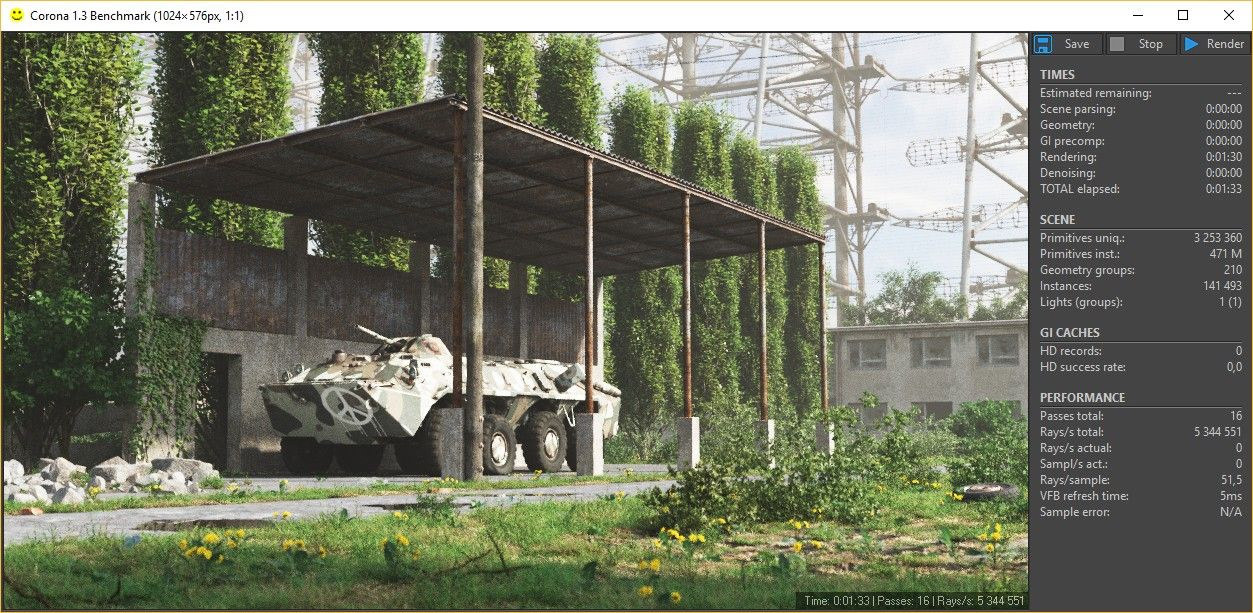
- Corona 1.3: Render Time: 0:01:30, Rays/sec: 5 344 550
- Superposition 1080p High: 10 265
- Superposition 1080p Extreme: 4540
- Superposition 4K Optimized: 5949
- Cinebench R15 OpenGL: 100,20 fps
- Cinebench R15 CPU: 2438 cb
- Asus RealBench 2.56 System Score: 175 489
Water cooling does improves some scores a bit. This could be attributed to better GPU temperatures as some benchmarks did report lower max temperatures on water cooling. I do plan to undervolt Vega and overclock the HBM which should improve them even more.
Also those benchmarks were separated in time so Windows or drivers update may have affected this as well.
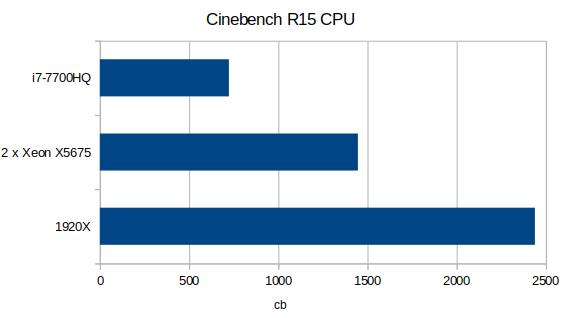
Xeon X5675 was launched in 2011, made on a 32nm node, has 6 cores, 12 threads, clocks up to 3,46GHz and now is worth very little on ebay. Two Xeons give 12 cores and 24 threads just like 1920X. Each of the Xeons had 12 GB of DDR3 RAM in NUMA mode. This system reached only 60% of Threadripper score. Quad core i7-7700HQ in a laptop was released in 2017 and made on the 14 nm node. Clocks up to 3,8 GHz but the score is far behind.
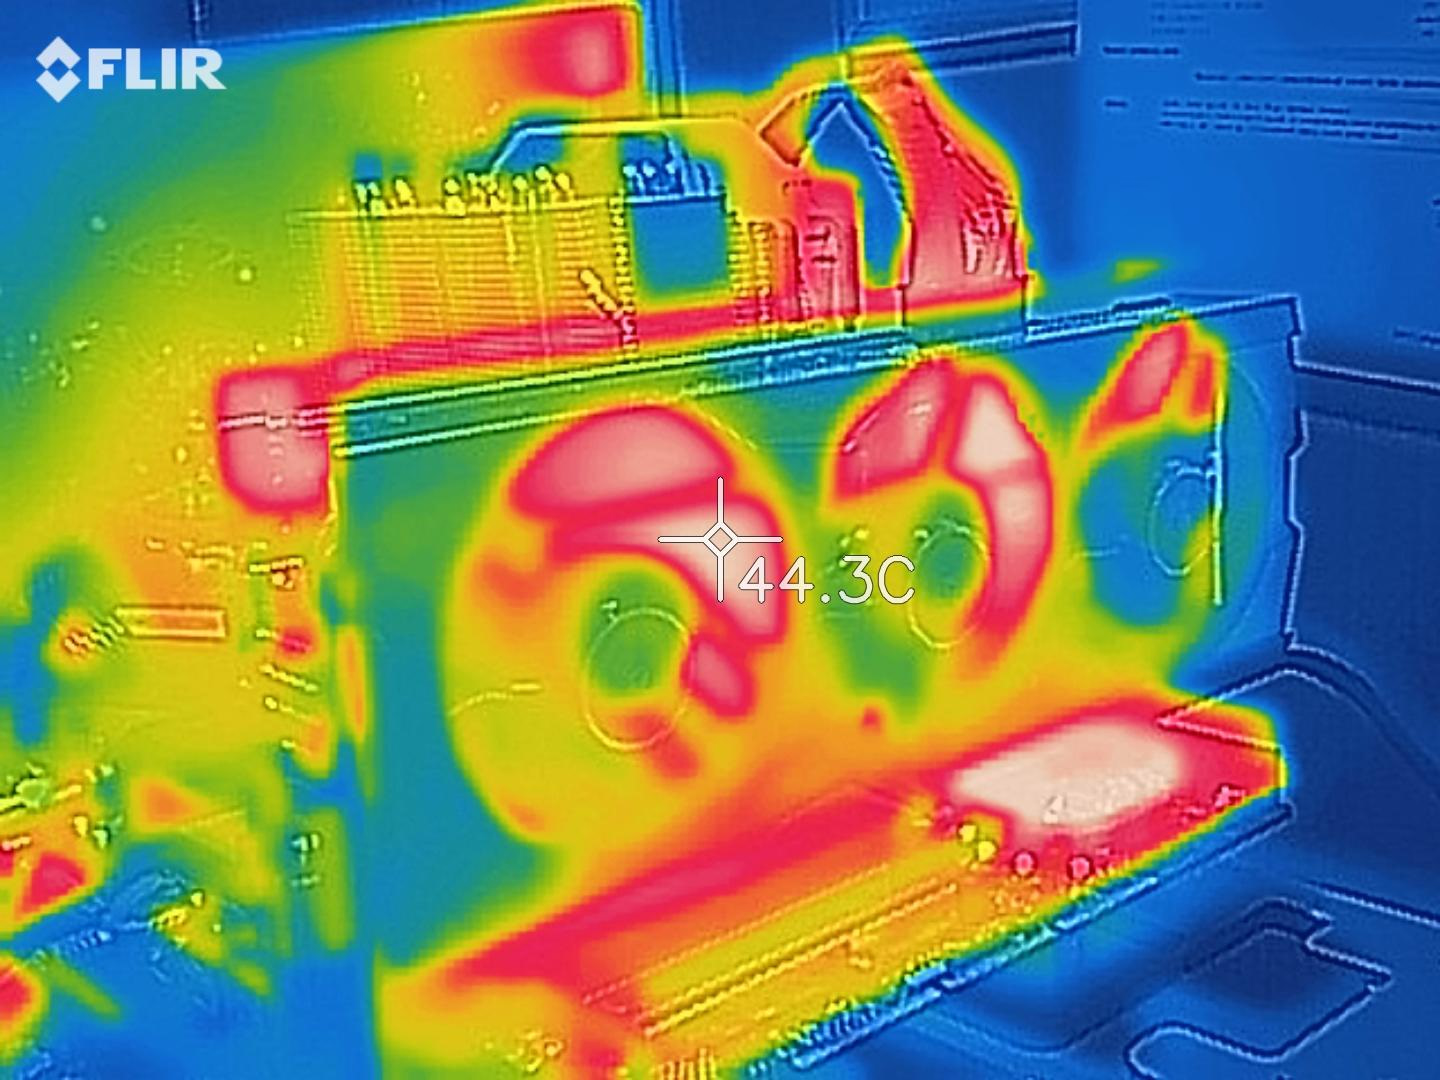
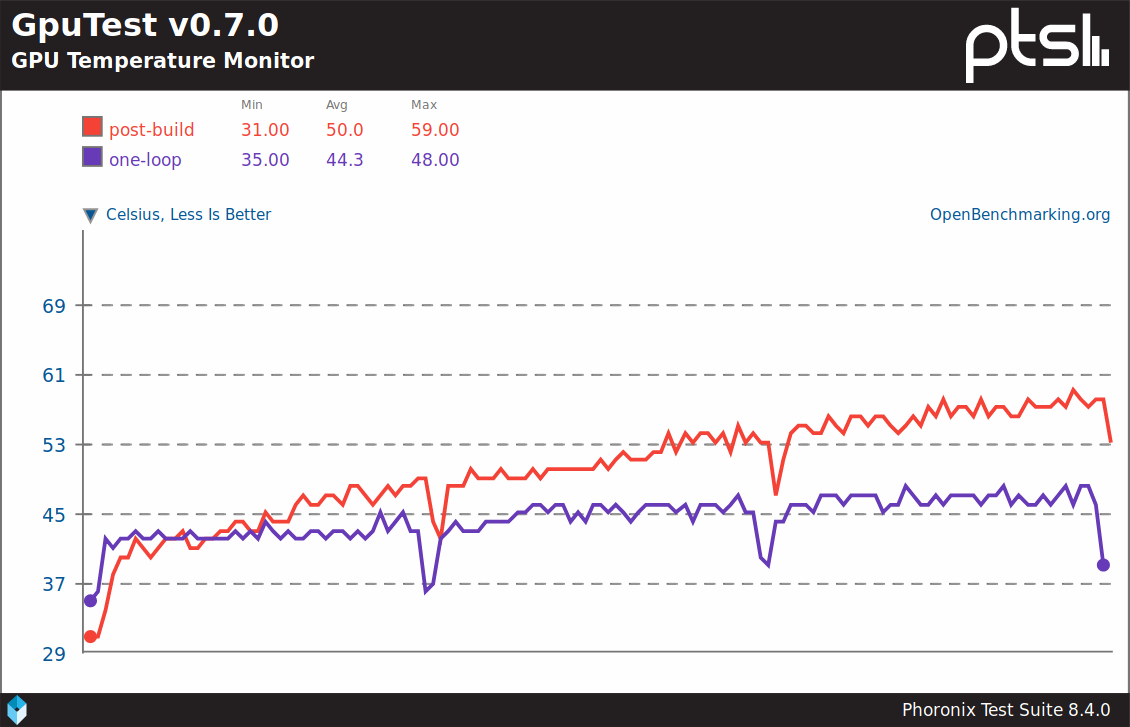
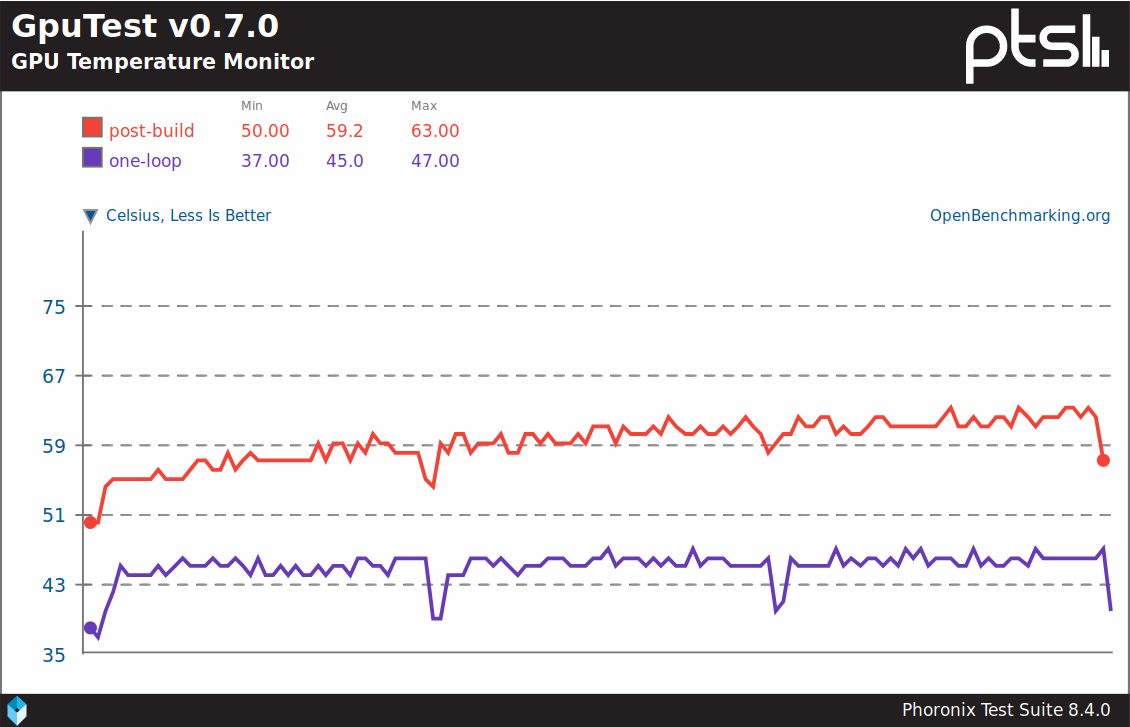
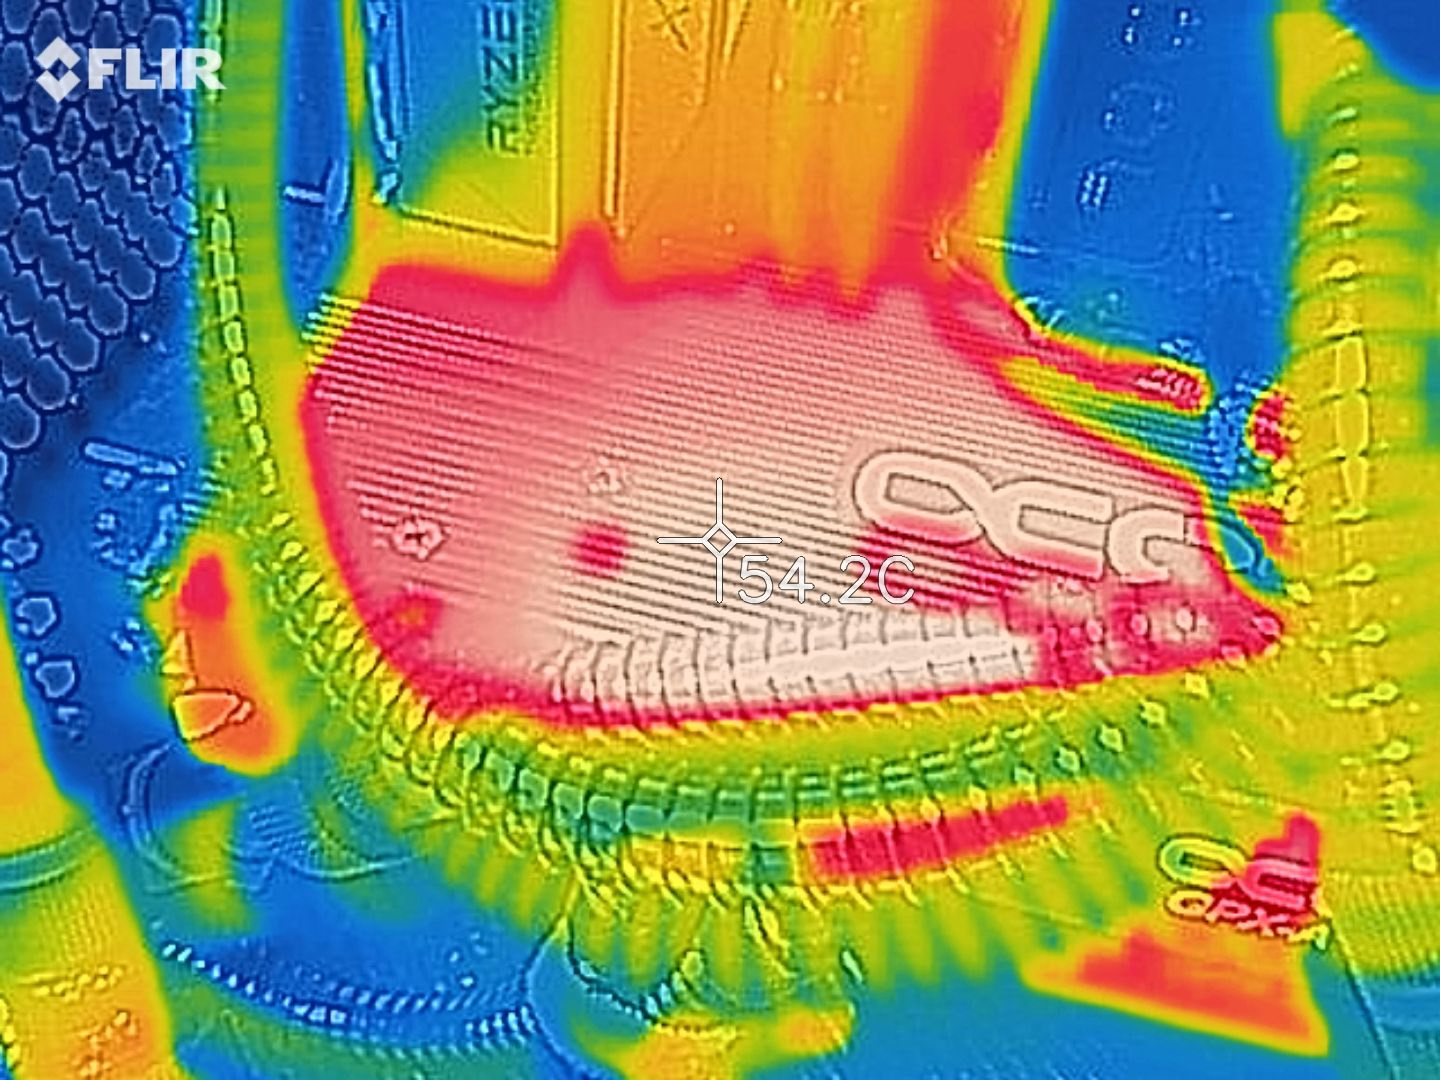
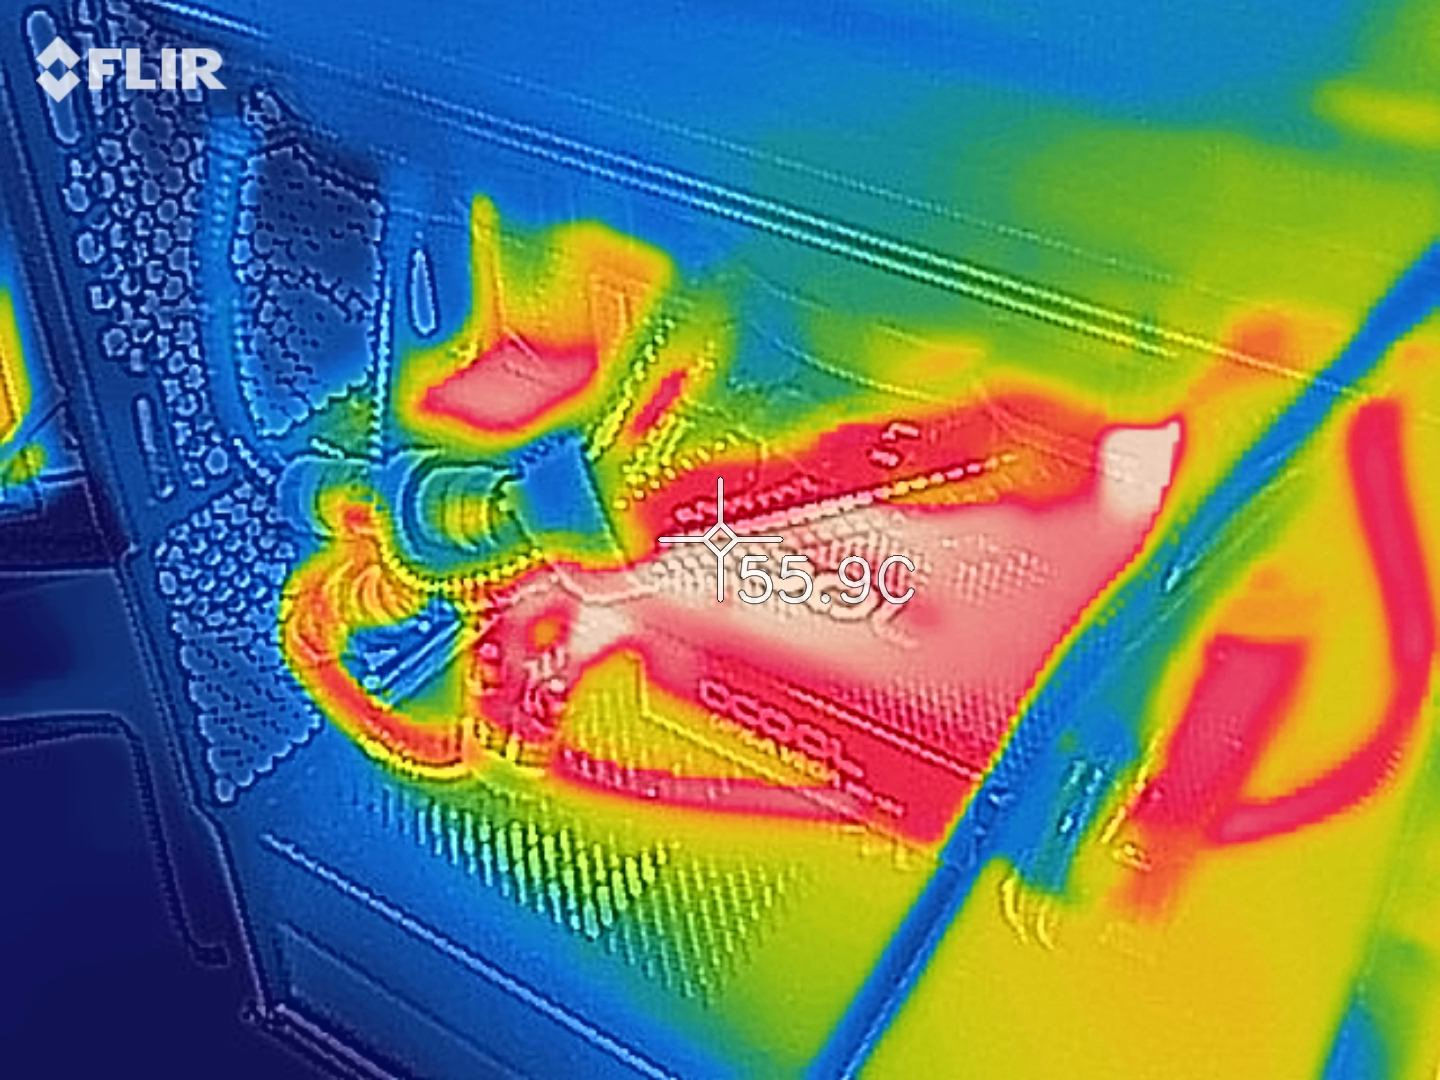
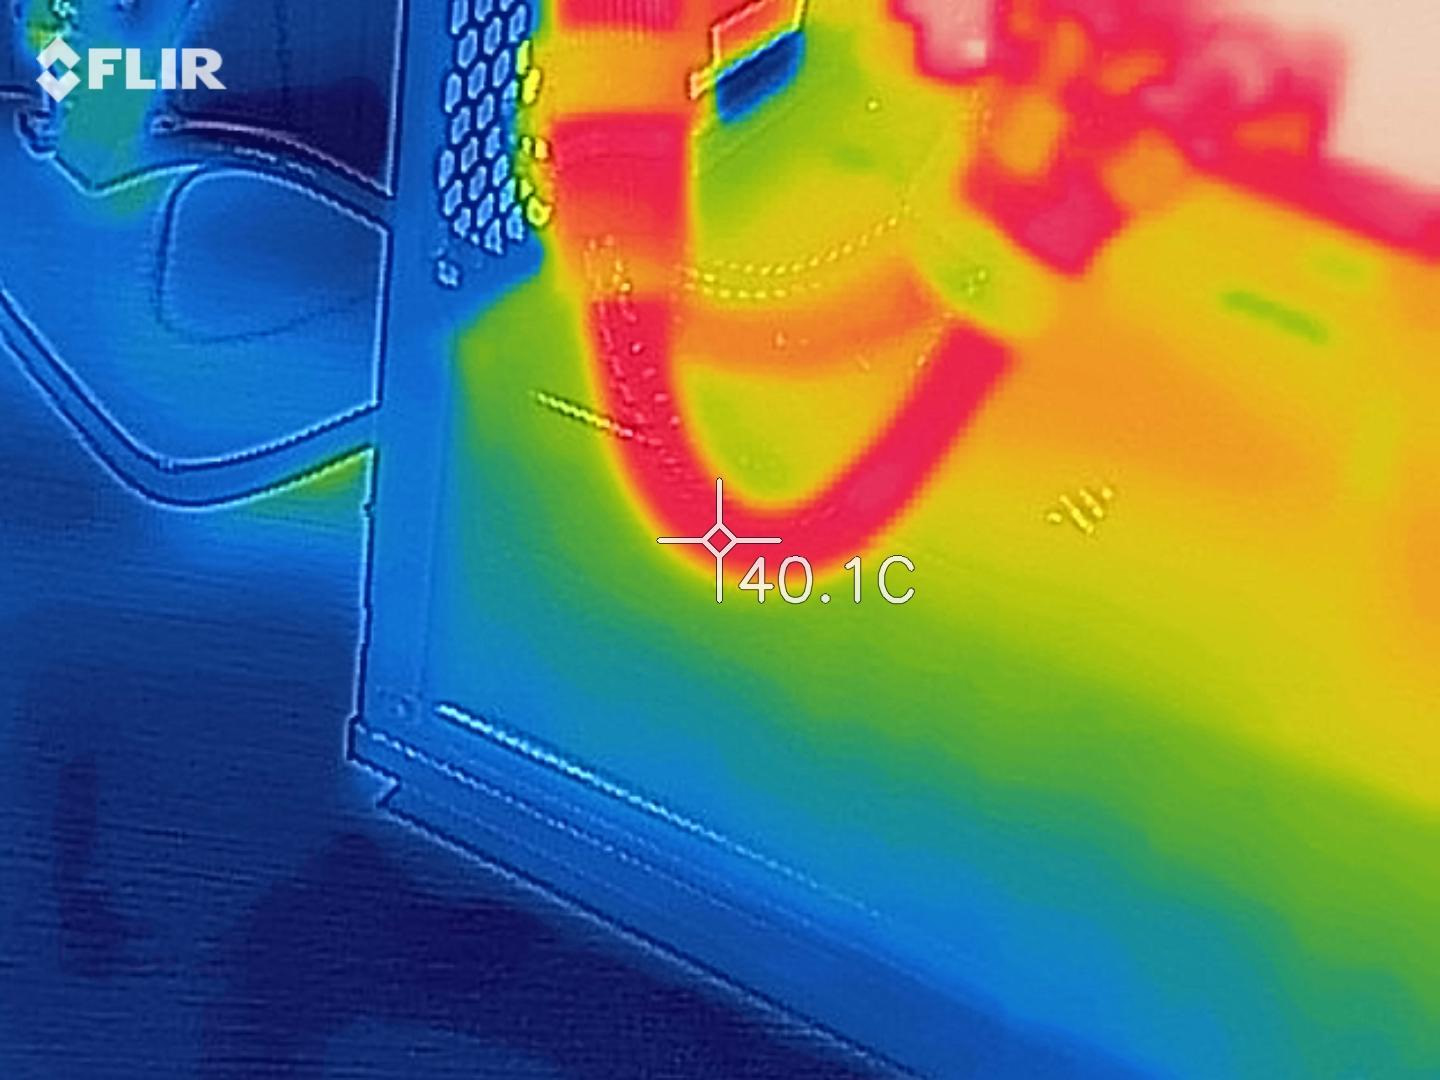
CPU and GPU temperatures for separate and one loop configurations
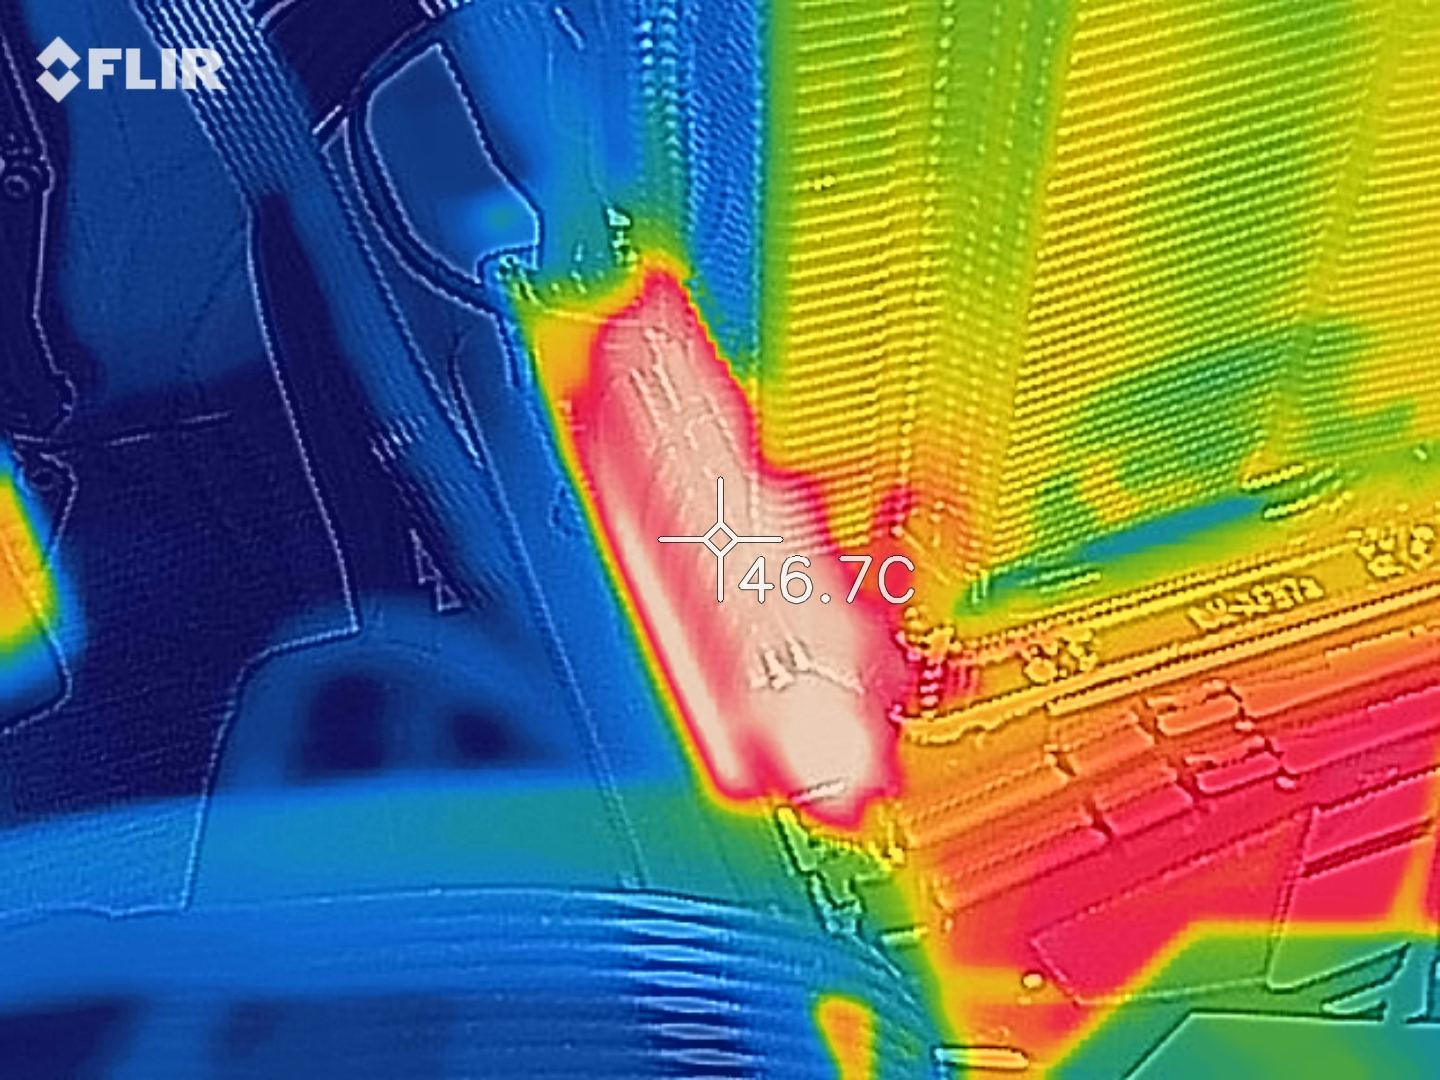
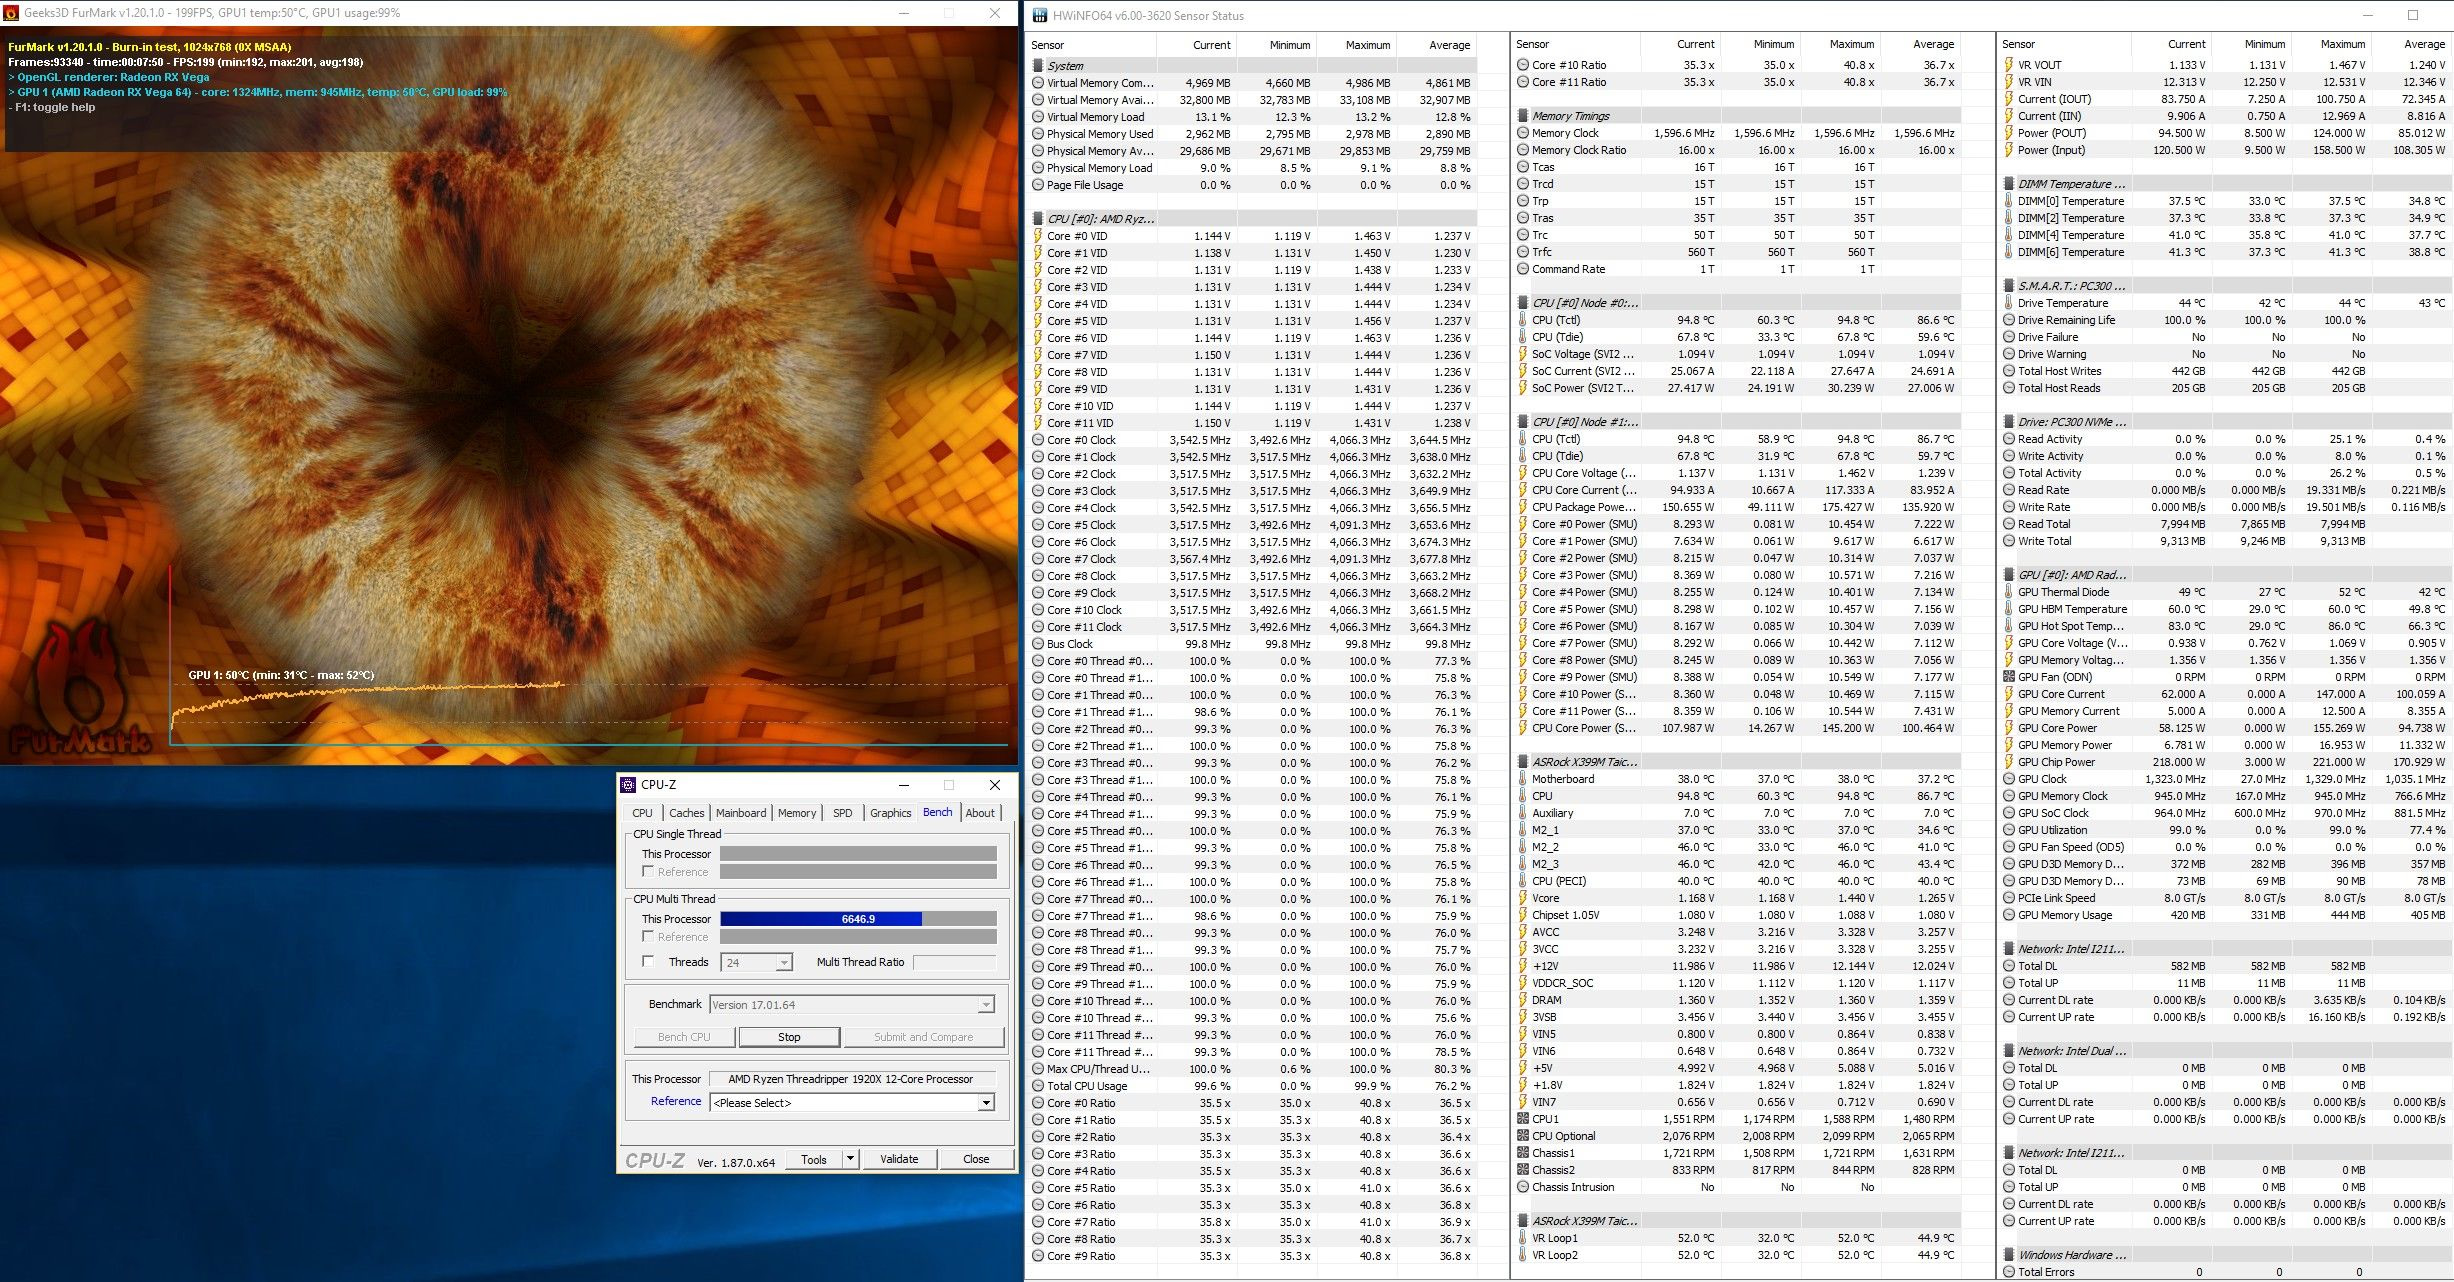
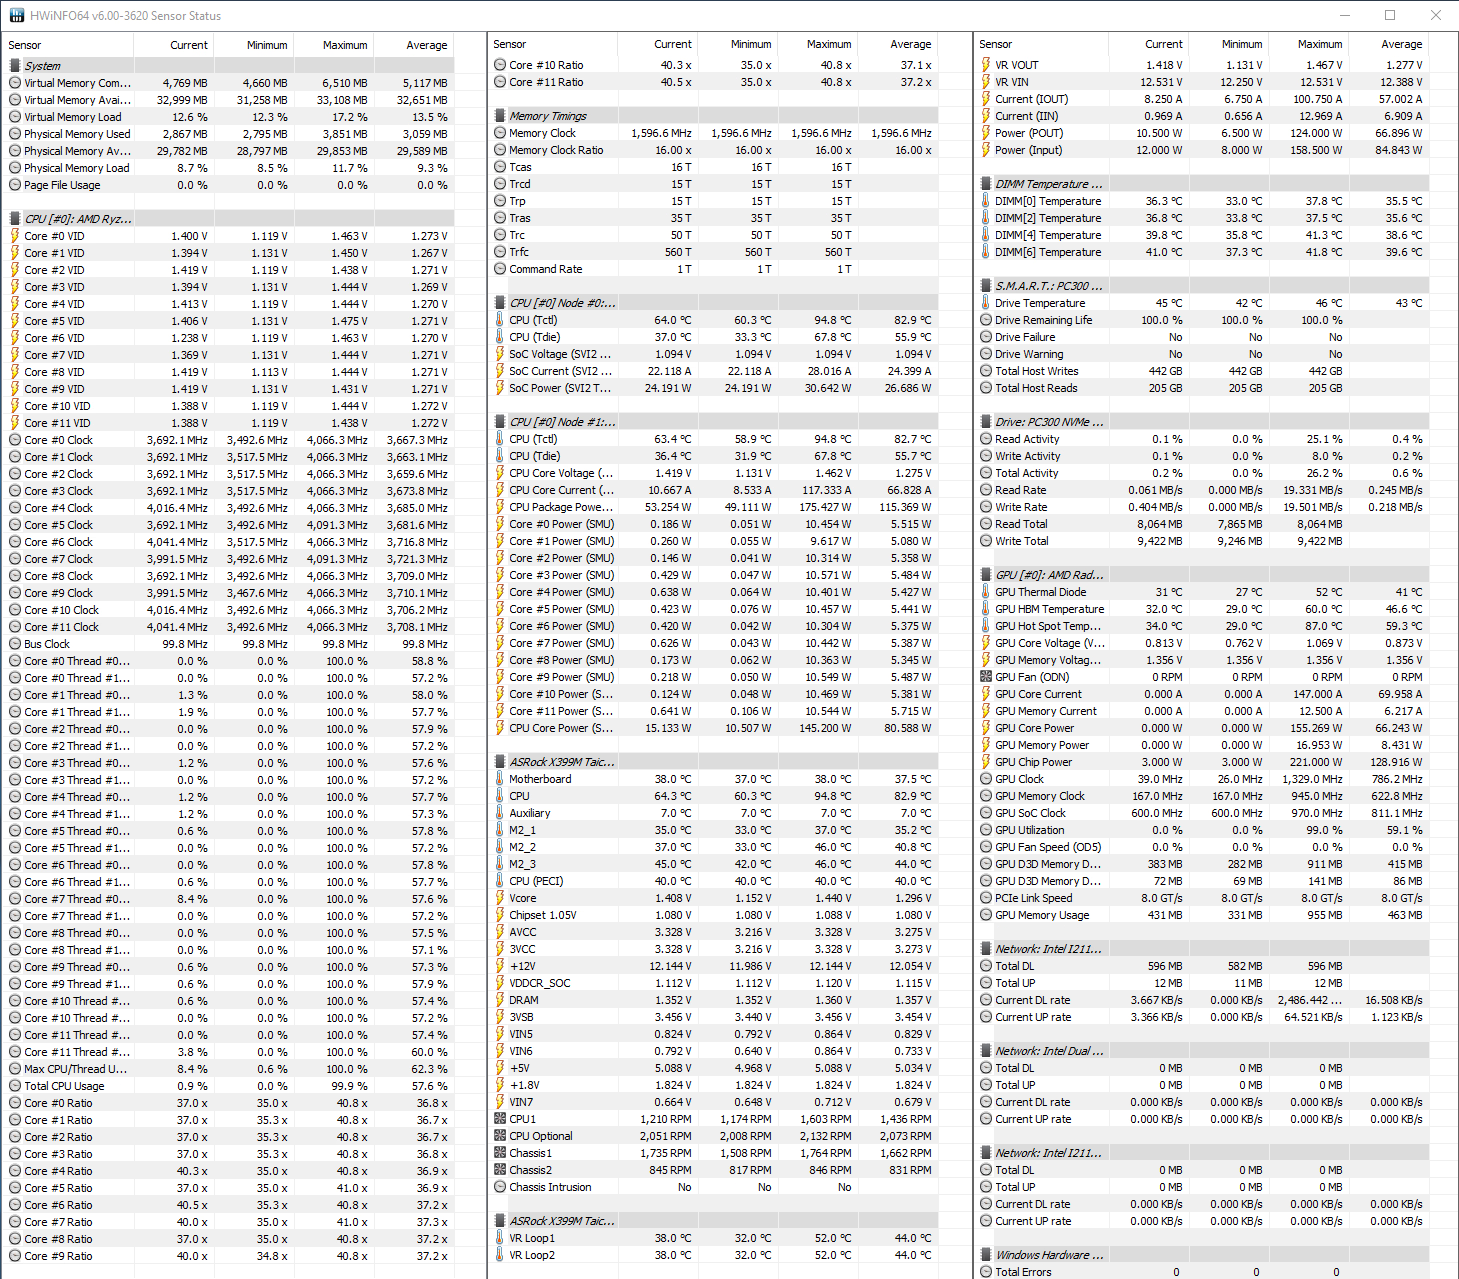
I used Phoronix benchmarks under Linux to log temperatures during benchmark runs - Kernel compilation (multi-core CPU load) and then Furmark and Pixmark Piano GPU short stress test runs. The question is which AiO configuration is better and how excess heat from GPU affects the CPU in one loop configuration.
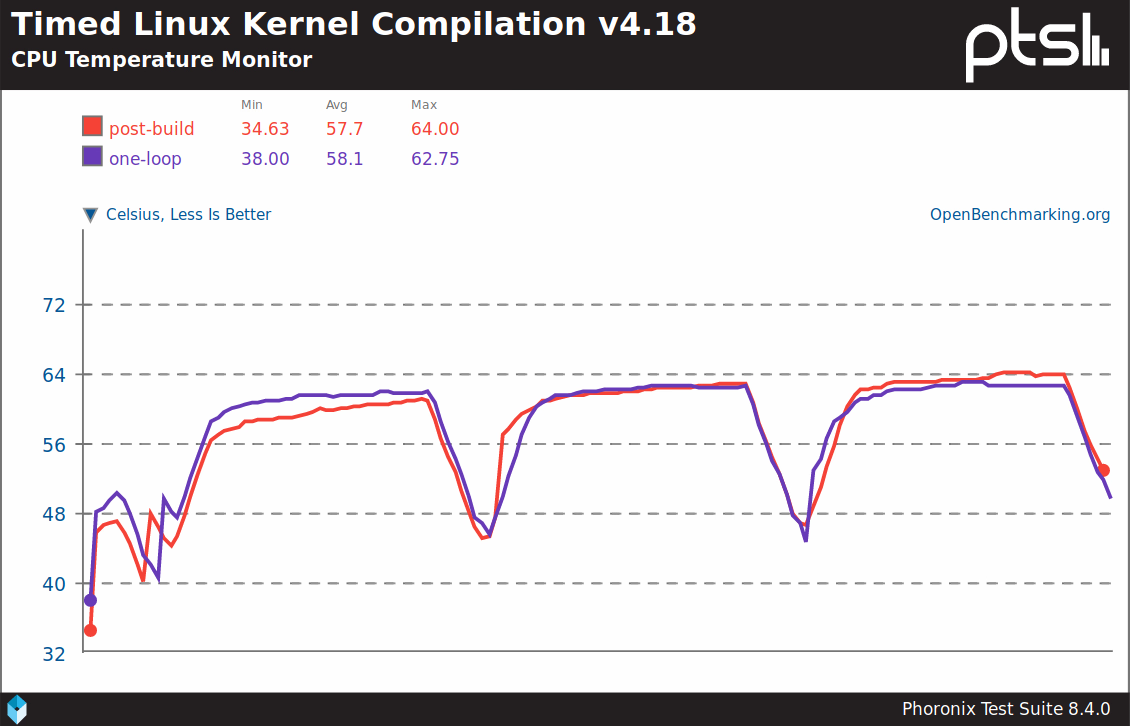
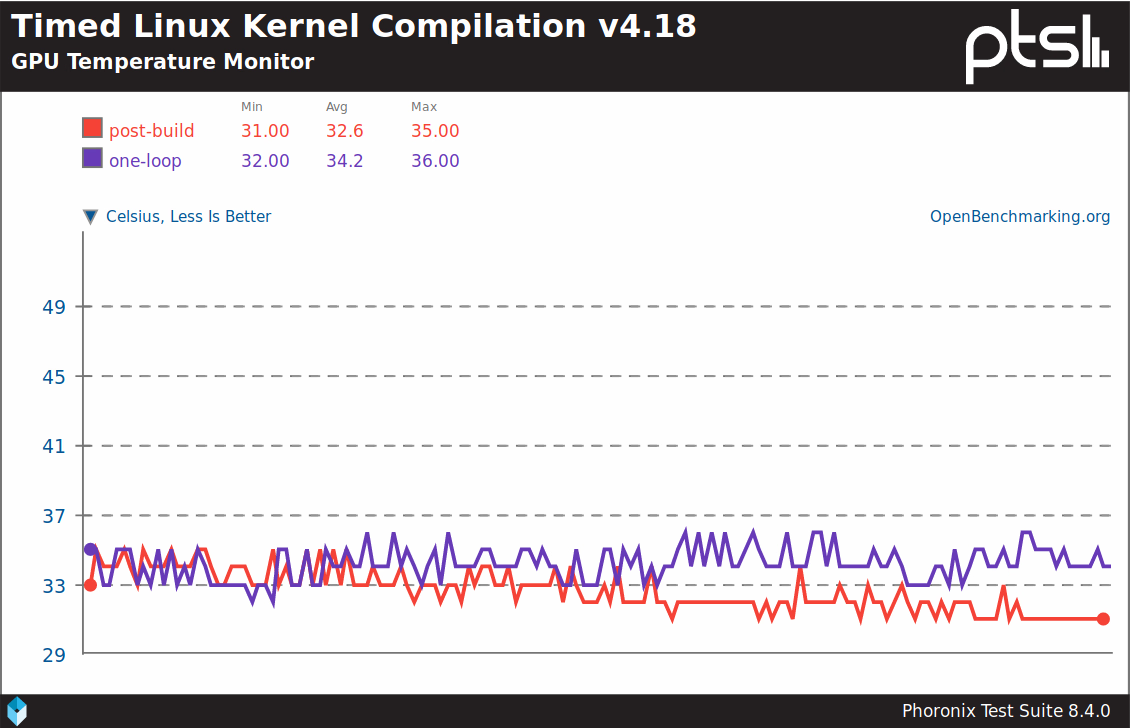

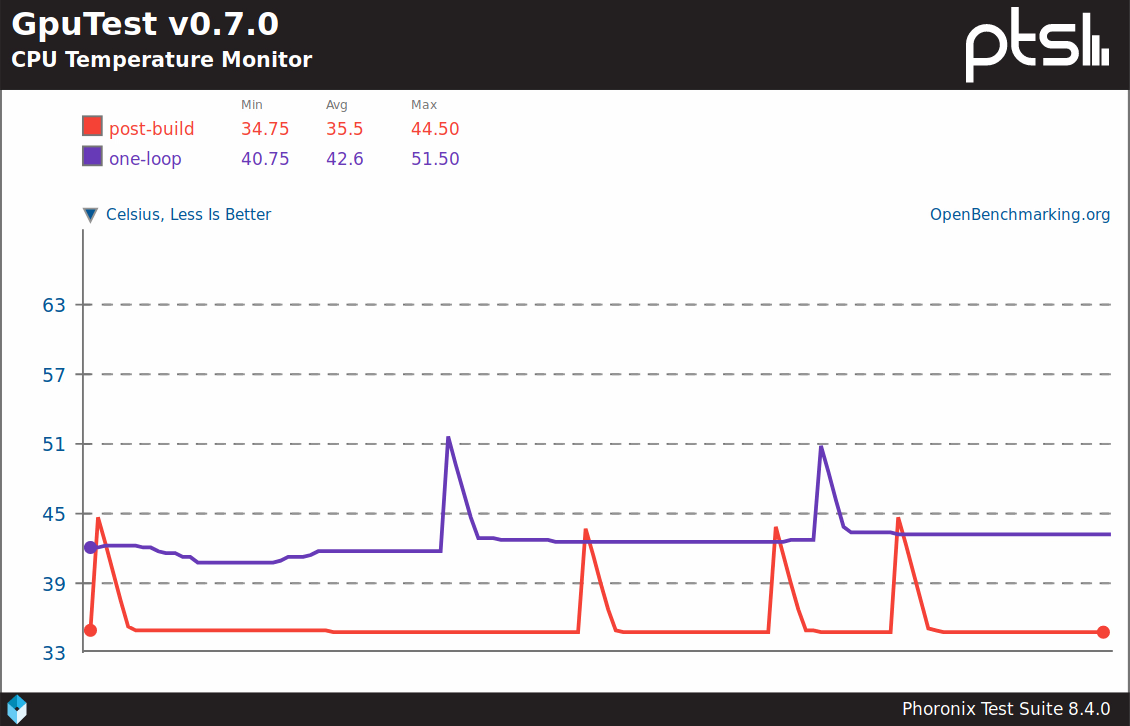
The CPU alters it clocks depending on the temperature and if there is a need for extra processing power. CPU benchmarks may be then heavily reliant on CPU temperature. I did a CPU-Z benchmark just after a full system stress test and after few minutes when it cooled down. Got two quite spread out scores out of it:
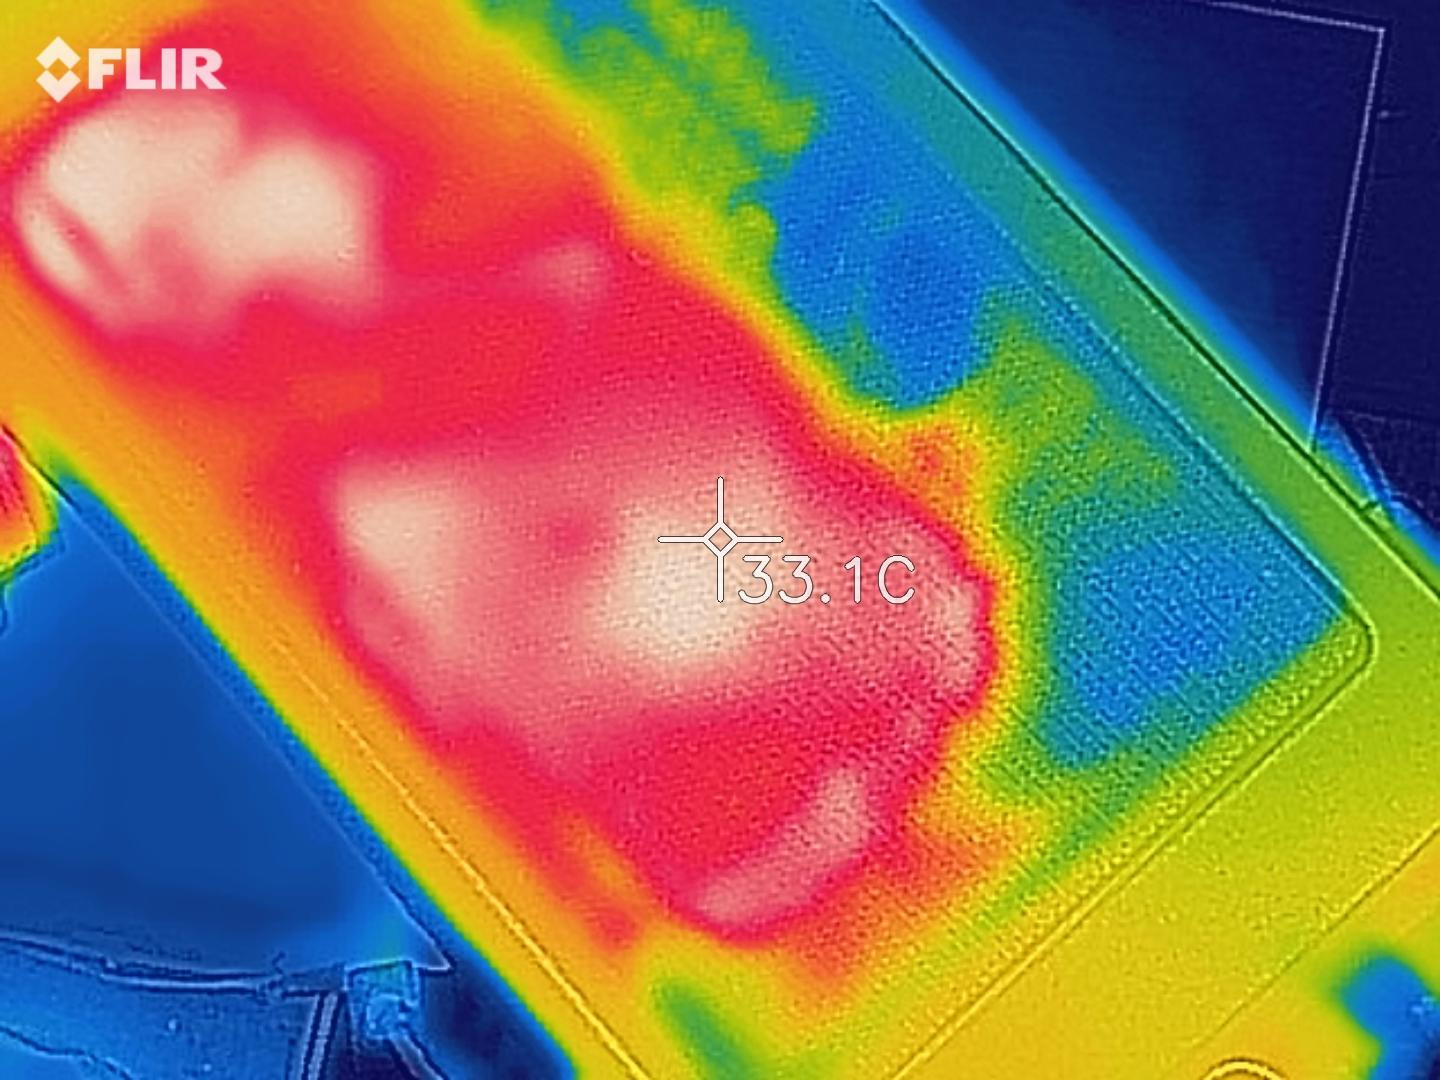
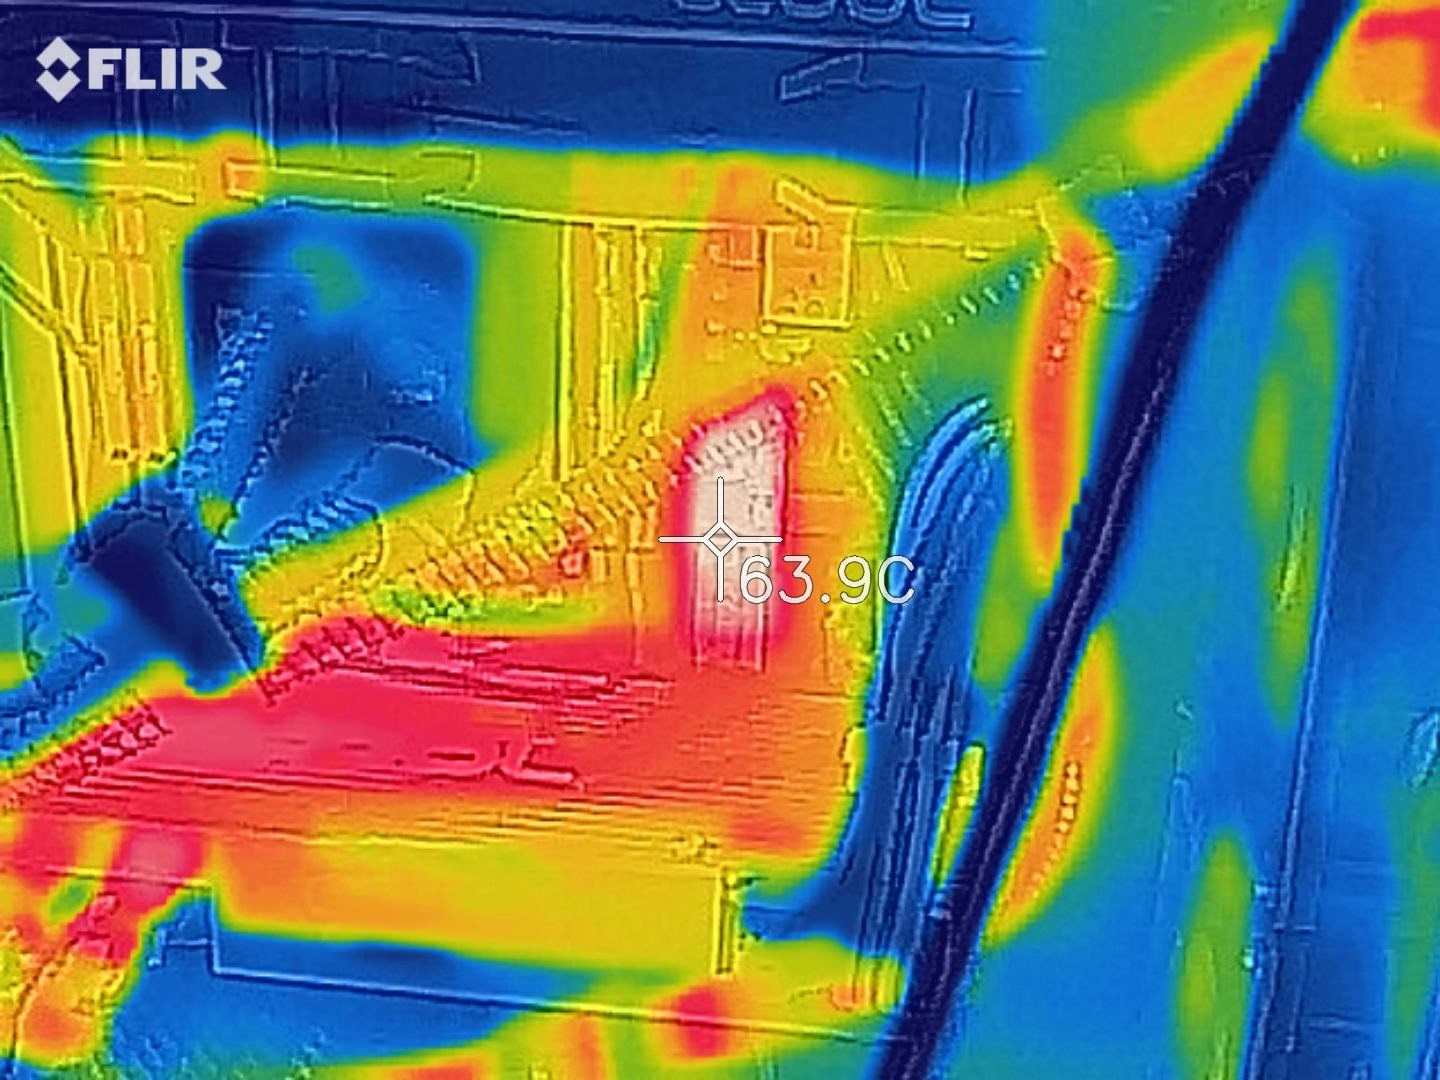
I used Furmark and CPU-Z stress tests to put high load on GPU and CPU at the same time. This can be used to check system stability and cooling system performance. HWinfo shows that under such load the CPU clocks were slightly lower than default 3700 MHz but still the system did manage it... although it was on high performance limit. The Vega 64 in-die Hot Spot
reached 80C (with around 105C limit?)
Such stress test is usually far away from real life workloads or game loads so handling it means it will handle all of those tasks. If for some reason it would work under such high load then for max clocks some more aggressive fan curves would likely be needed. In even more extreme builds you can use an external radiator for this AiO - Eiswand 360.

AMD software
Aside of the usual GPU drivers and Adrenaline software AMD has some additional apps you may find useful on their platform.
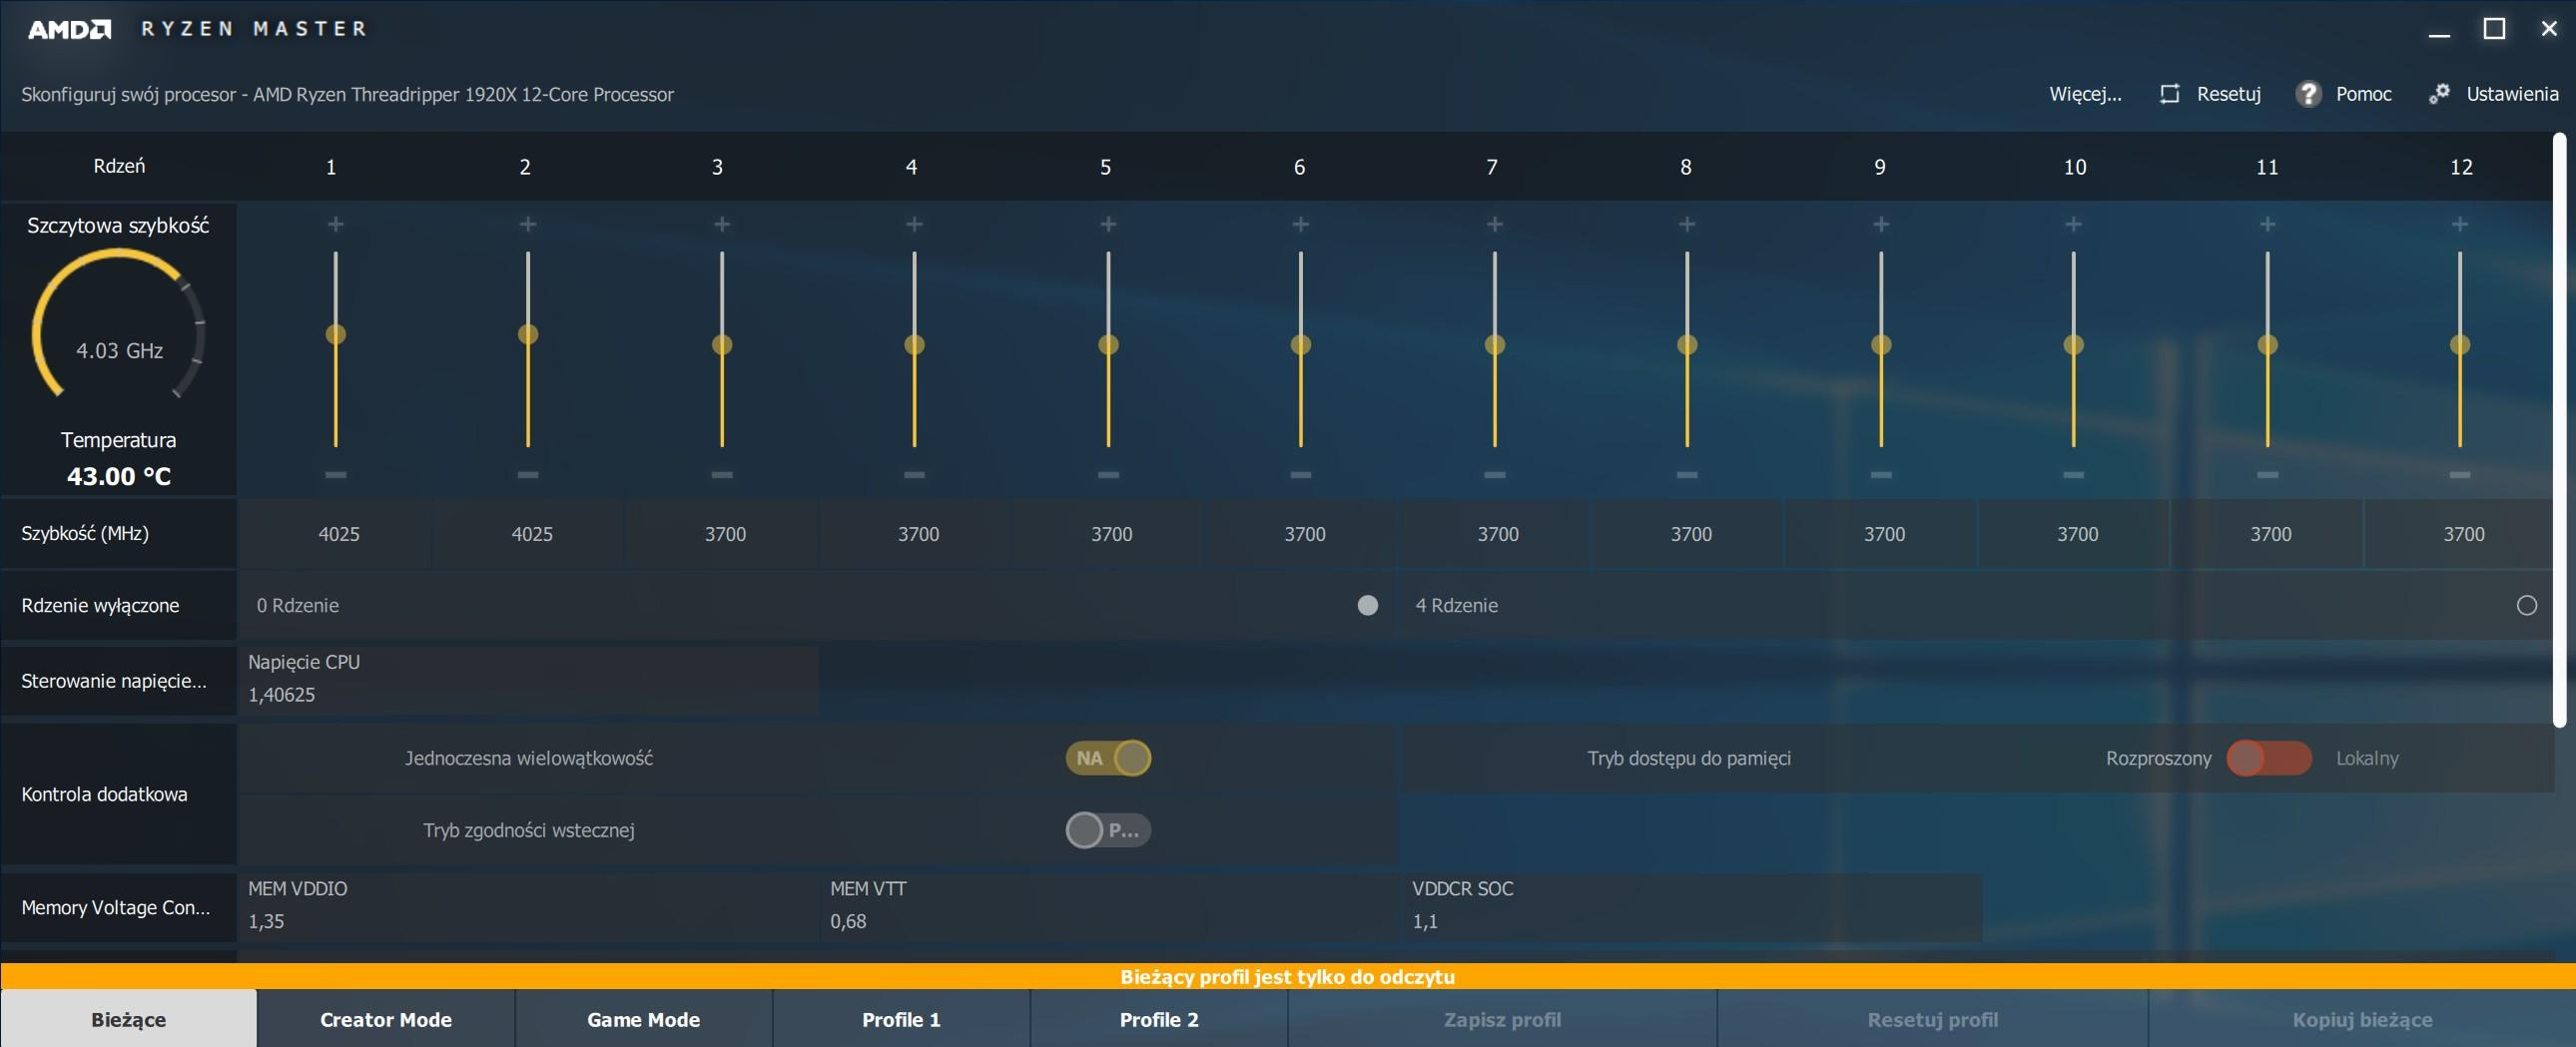
Ryzenmaster is an application that can configure your AMD CPU, mostly Threadrippers, especially second generation with four chiplets active - where cores on the extra two enabled chiplets do not have direct memory access and have to use Infinity Fabric which is less effective and may cause some apps to perform poorly or not work correctly. Ryzenmaster can set the memory mode to NUMA (each chiplet uses memory channels connected to it) or UMA (standard for consumer PCs, each core/chiplet has equal access to unified memory layer) and disable cores on some chiplets to handle those misbehaving apps. There is also performance case which may depend on memory latency which depends on that memory mode. Also some games may not work properly if the system has so many cores - so there is Gaming / Legacy mode that disables cores on all chiplets except one. you will find detailed informations on anandtech.
AMD μProf is another interesting application. It's meant for mostly software developers as it can allow profiling code or applications for power, thermal and general performance, debug bottlenecks and alike. Just an honorable mention.
ToDo
- Undervolt Vega and overclock the HBM
- Check ASRock monitoring features, play with fan curves
- Migrate Linux system fully (and maybe pick a rolling release distro instead of Xubuntu, or maybe that Zen-optimized build of Mandriva?)
Comment article